Ollama GUI tutorial: How to set up and use Ollama with Open WebUI
By default, Ollama runs large language models (LLMs) through a command-line interface (CLI). However, you can pair Ollama with Open WebUI – a graphical user interface (GUI) tool – to interact with these models in a visual environment.
This setup reduces complex, error-prone command-line inputs, making it ideal for non-technical users and teams who need a collaborative, visual way to work with LLMs and deploy AI applications.
In this article, you’ll learn how to set up Ollama and Open WebUI the easiest way – by using a preconfigured virtual private server (VPS) template. We’ll also walk you through Open WebUI’s dashboard, show you how to customize model outputs, and explore collaboration features.
Setting up Ollama with Open WebUI
The easiest way by far to use Ollama with Open WebUI is by choosing a Hostinger LLM hosting plan. This way all necessary components – Docker, Ollama, Open WebUI, and the Llama 3.1 model – are preconfigured.
Based on Ollama’s system requirements, we recommend the KVM 4 plan, which provides four vCPU cores, 16 GB of RAM, and 200 GB of NVMe storage for RM42.99/month. These resources will ensure your projects run smoothly.
After purchasing the plan, you can access the Open WebUI dashboard by entering your VPS IP address followed by :8080 in your browser. For example:
http://22.222.222.84:8080
However, if you’ve switched your operating system since the initial setup or use a regular Hostinger VPS plan, you can still install Ollama as a template by following these steps:
- Log in to hPanel and navigate to VPS → Manage.

- From the VPS dashboard’s left sidebar, go to OS & Panel → Operating System.
- In the Change OS section, select Application → Ubuntu 24.04 with Ollama.
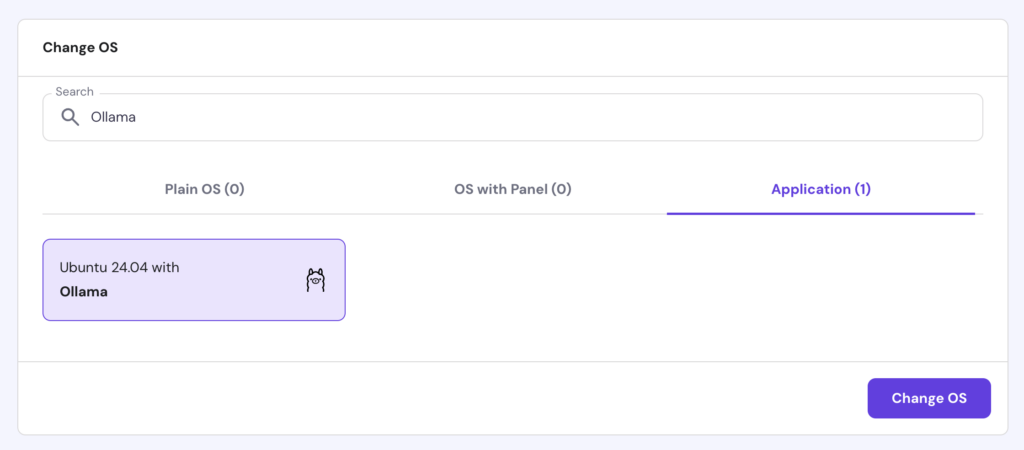
- Hit Change OS to begin the installation.
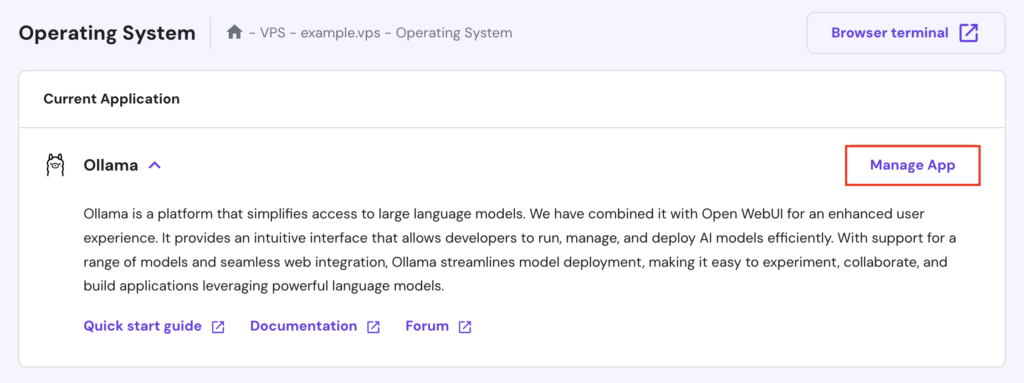
Wait around 10 minutes for the installation process to complete. Once done, scroll up and click Manage App to access Open WebUI.
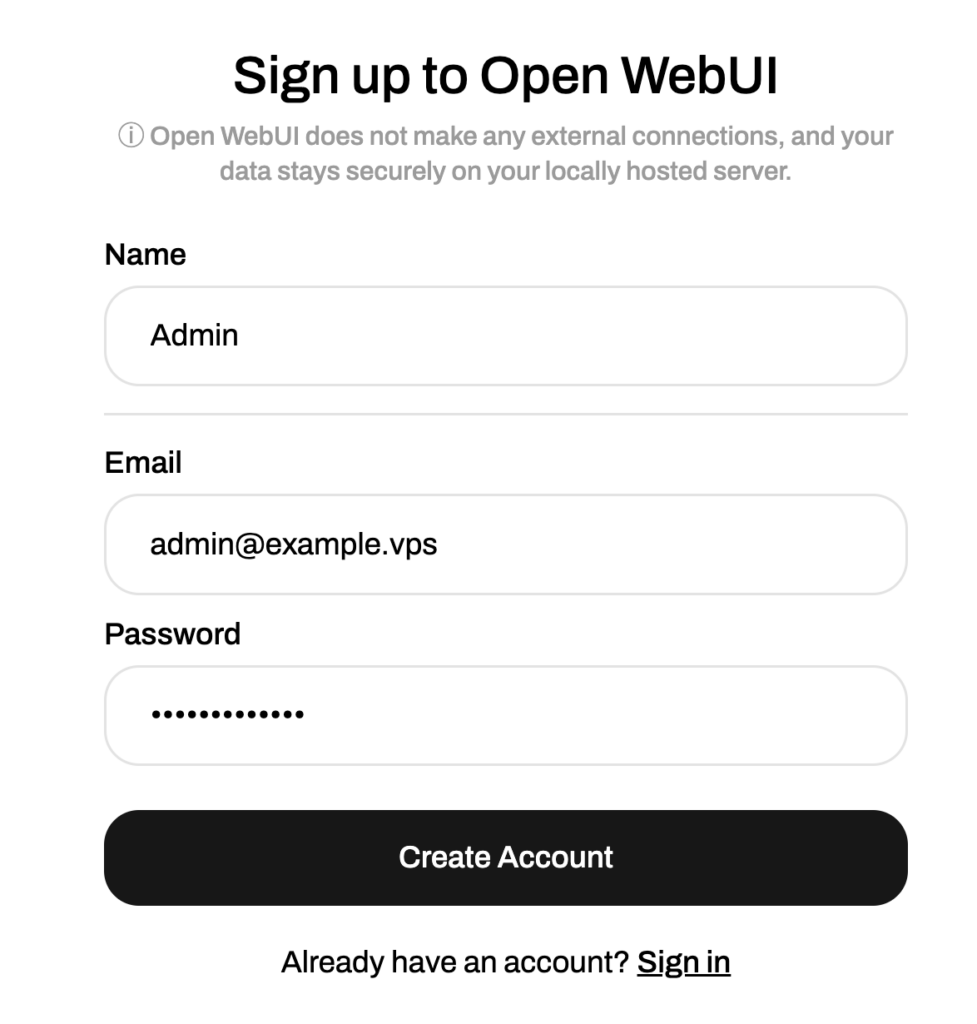
On your first visit, you’ll be prompted to create an Open WebUI account. Follow the on-screen instructions and store your credentials for future access.

Using Ollama with Open WebUI
This section will help you familiarize yourself with Open WebUI’s features, from navigating the dashboard to working with multimodal models.
Navigating the dashboard
The Open WebUI dashboard offers an intuitive, beginner-friendly layout. If you’re familiar with ChatGPT, adapting to Open WebUI will be even easier, as they share a similar interface.
The dashboard is divided into two main sections:
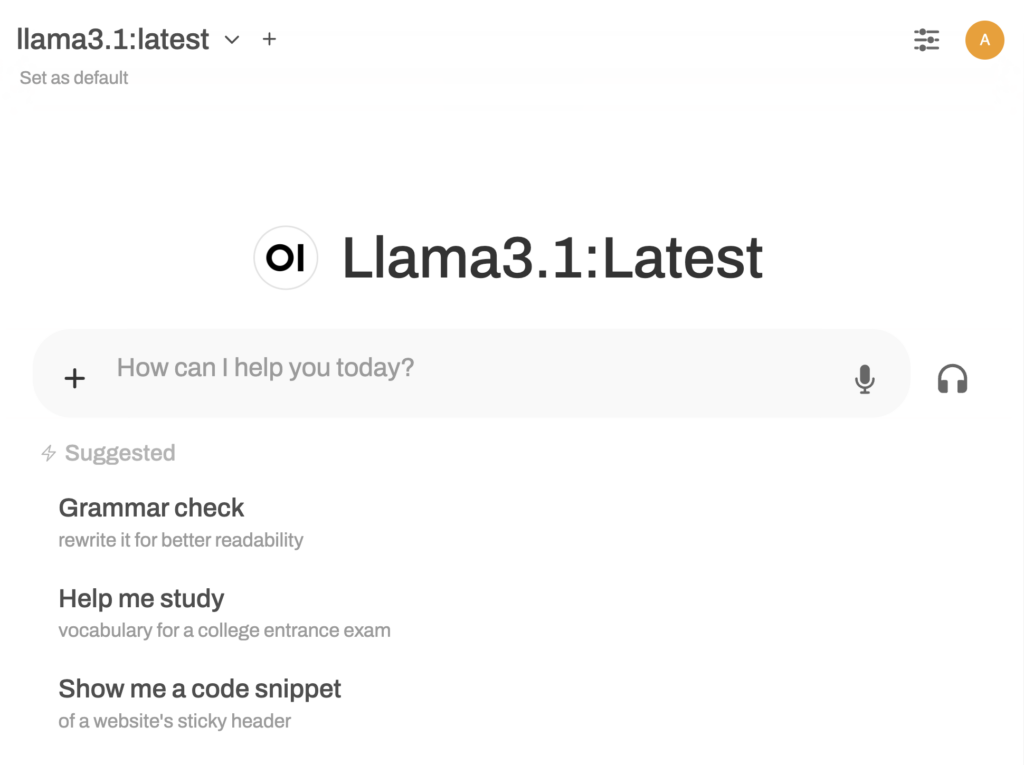
- Data pane. This is the main chat interface where you can interact with the model by typing prompts, uploading files, or using voice commands. In the upper-left corner, you can select models or download additional ones from the Ollama library. Meanwhile, go to the upper-right corner to adjust model behavior, access settings, or open the admin panel.
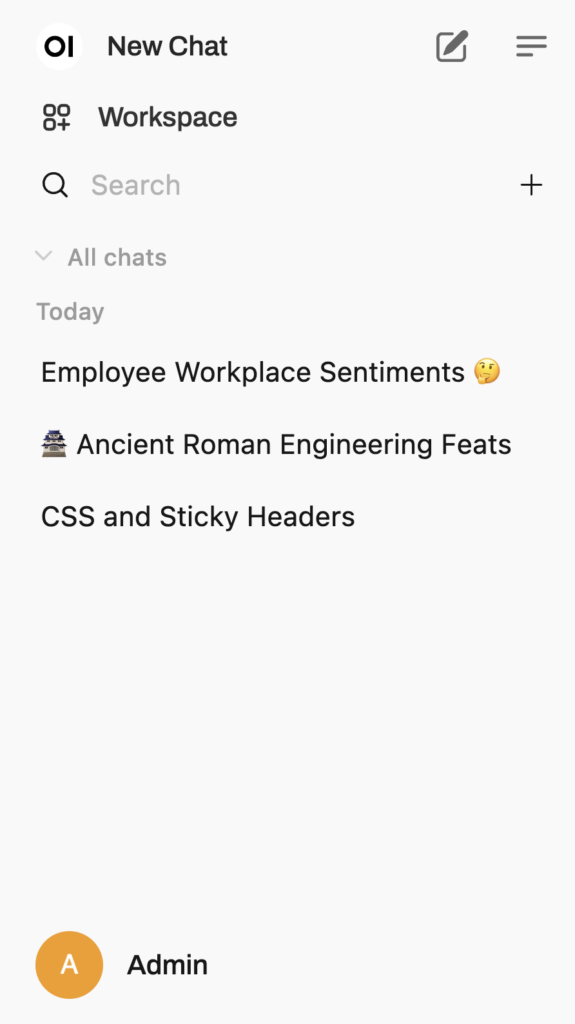
- Left sidebar. The sidebar lets you start new threads or continue previous interactions. Here, you can pin, archive, share, or delete conversations. It also includes a workspace admin section, where you can create custom Ollama models and train them with specific knowledge, prompts, and functions.
Selecting and running a model
Since you’ve installed Ollama and Open WebUI using the Hostinger template, the Llama 3.1 model is ready to use. However, you can download other language models via the model selection panel in your data pane’s upper-left corner.
Here, add a model by typing its name in the search bar and hit Pull [model] from Ollama.com. If you’re unsure which model to use, visit Ollama’s model library for detailed descriptions and recommended use cases.
![The Pull [model] from Ollama.com option in Open WebUI's model selection panel](/tutorials/wp-content/uploads/sites/2/2024/11/open-webui-model-selection-panel-pull-mistral-from-ollama-com-highlighted-1024x462.png)
Some popular options include Mistral, known for its efficiency and performance in translation and text summarization, and Code Llama, favored for its strength in code generation and programming-related tasks.
Once downloaded, start a new conversation by clicking New Chat. Choose the model and type your prompt, then the model will generate a response. Like ChatGPT, you can copy the output, give feedback, or regenerate responses if they don’t meet your expectations.
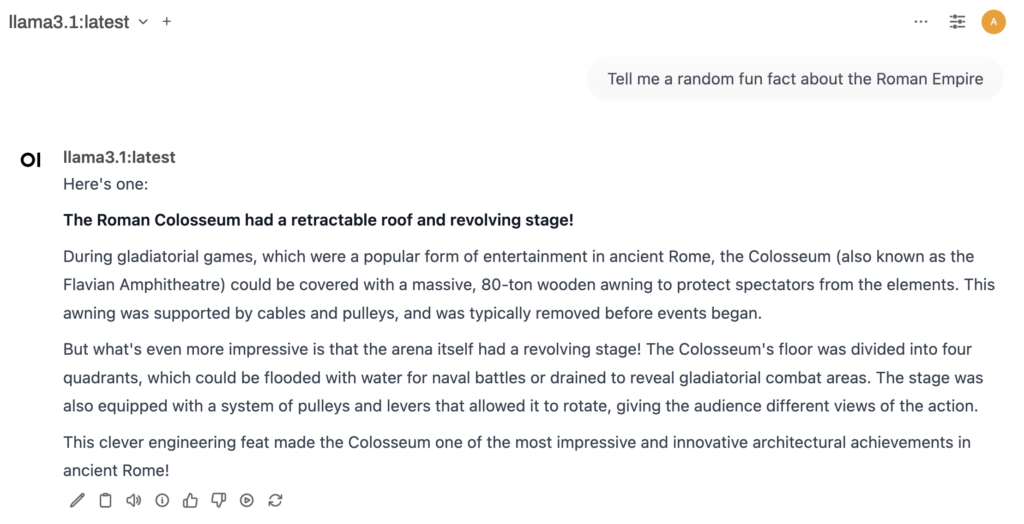
Unlike using Ollama via the command-line interface (CLI), combining this LLM tool with Open WebUI lets you switch models mid-conversation to explore different outputs within the same chat. For example, you can start with Llama for a general discussion and then switch to Vicuna for a more specialized answer on the same topic.
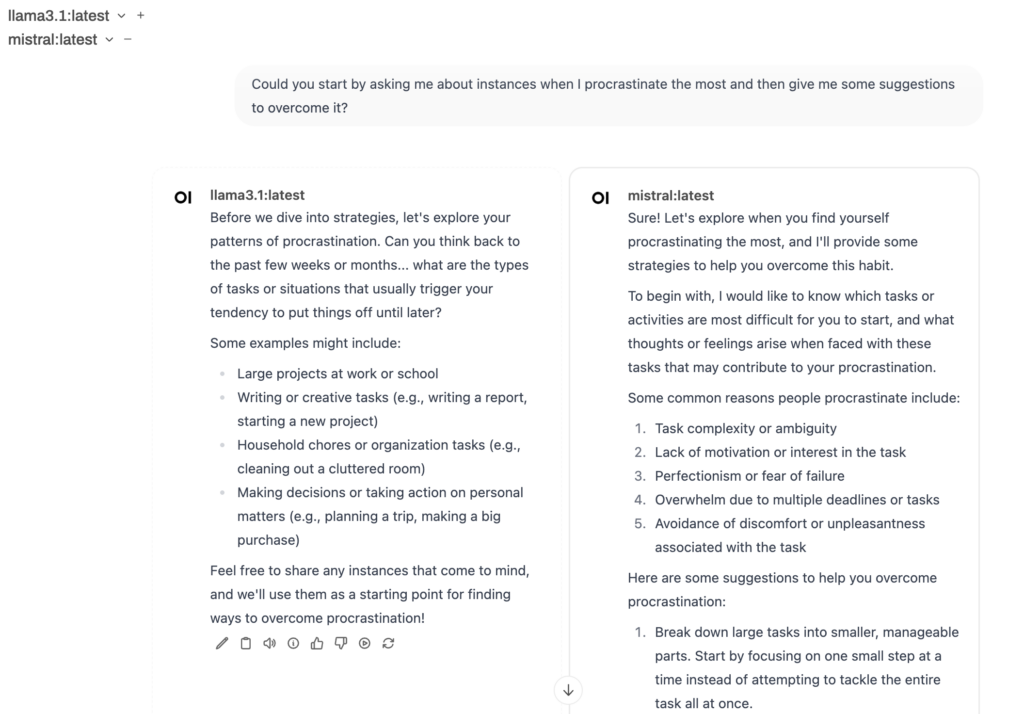
Another unique feature is the ability to load multiple models simultaneously, which is ideal for comparing responses. Select your initial model, then click the + button next to it to choose additional models. After entering your prompt, each model will generate its output side by side.
Suggested reading
Learn how to write better prompts with our AI prompt engineering techniques guide.
Customizing model outputs
Adjusting model responses lets you fine-tune how the model interprets prompts, optimizing it for specific tasks, tones, or performance needs. Hit the Chat Control button to access parameters that adjust response behavior, style, and efficiency, including:
- Stream Chat Response. Enables real-time response streaming, where the model displays text as it generates rather than waiting for the entire output.
- Seed. Ensures consistent results by generating the same response each time for identical prompts, useful for testing and comparing setups.
- Stop Sequence. Sets specific words or phrases that end the response at a natural point, like the end of a sentence or section.
- Temperature. Controls response creativity. Lower values make responses more focused and predictable, while higher values increase creativity and variability.
- Mirostat. Balances response flow, helping the model remain coherent during longer outputs, especially for detailed prompts.
- Frequency Penalty. Reduces word repetition, encouraging more varied word choice.
- Context Length. Sets the amount of information the model remembers within each response for smoother conversation flow.
- Max Tokens (num_predict). Limits the response length, useful for keeping answers concise.
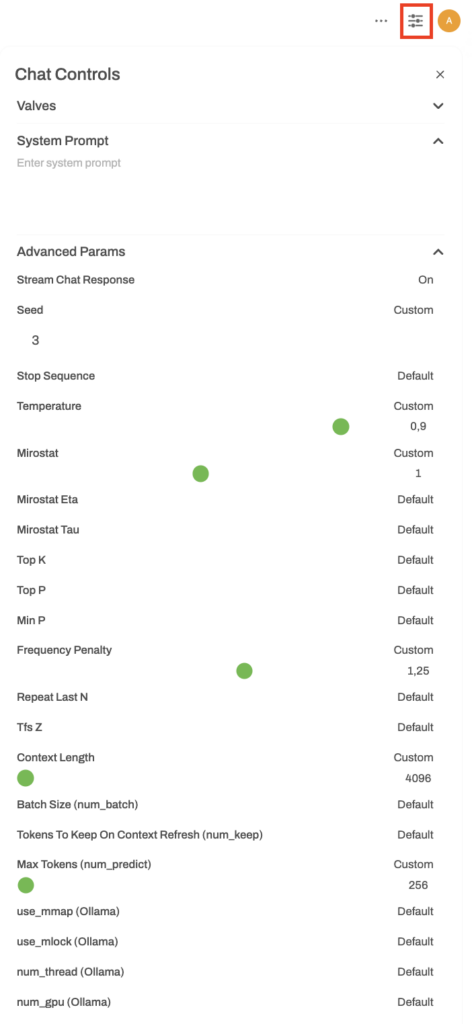
In the same menu, you can also customize Valves, which includes custom tools and functions, and System Prompt, which defines the model’s tone and behavior. We’ll explain these further in the collaboration features section.
Additionally, the Playground mode, accessible from the top-right corner, lets you experiment with different settings and prompt types. In the Chat tab, you can test conversational setups:
- System Instructions. Define the model’s role or set specific instructions for its behavior.
- User Message. Enter questions or commands directly for the model.
For example, setting system instructions to “You’re a financial advisor” and typing a question in the user field will prompt the model to respond from that perspective.
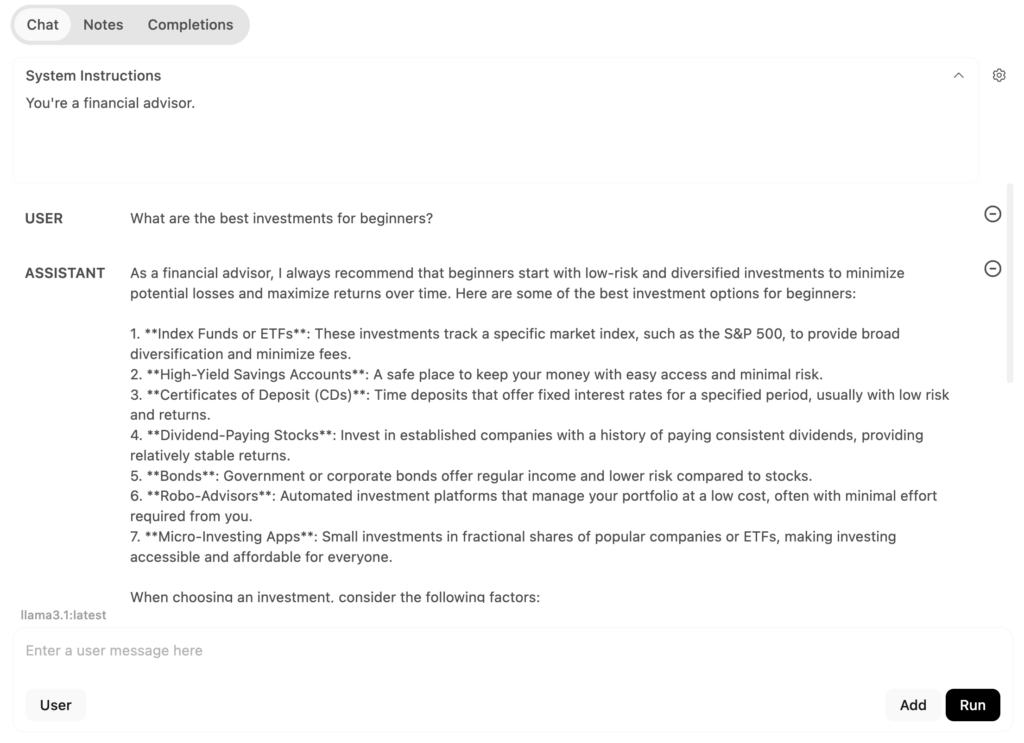
Meanwhile, the Completion tab prompts the model to generate responses by continuing from your input. For instance, if you type “Machine learning is…,” the model will complete the statement, explaining machine learning.
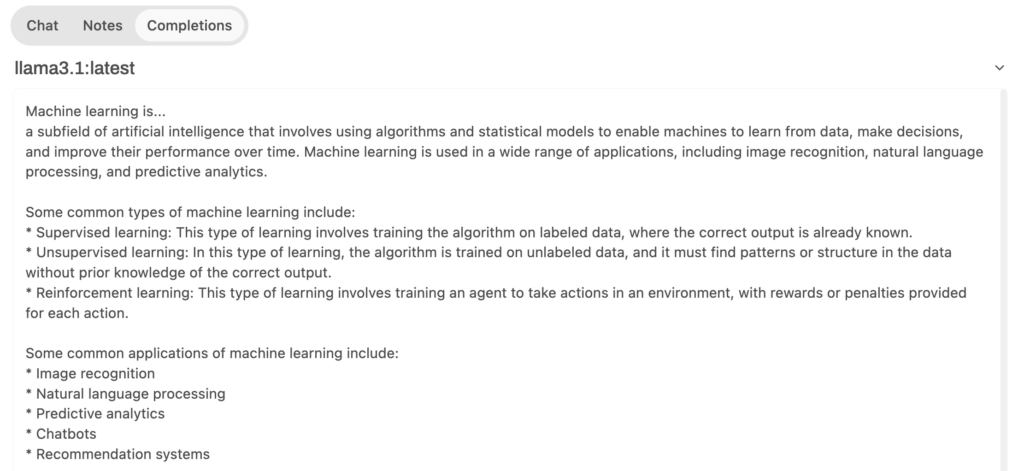
Accessing documents and web pages
Ollama and Open WebUI support retrieval-augmented generation (RAG), a feature that improves AI model responses by gathering real-time information from external sources like documents or web pages.
By doing so, the model can access up-to-date, context-specific information for more accurate responses.
Open WebUI lets you upload documents in DOC, PDF, TXT, and RTF formats. Click the + button in the prompt field and select Upload Files. Choose the document you want to upload, then type an instruction for the model, such as:
“Please summarize the content of the attached file in 50 words.”

If you want the model to browse the web, you can connect Open WebUI to SearchApi, an application programming interface (API) that retrieves information based on search results. Follow these steps to set it up:
- Go to the official SearchAPI site and sign up for a new account.
- In the dashboard, copy your API key.
- Return to Open WebUI, then go to your profile → Admin Panel.
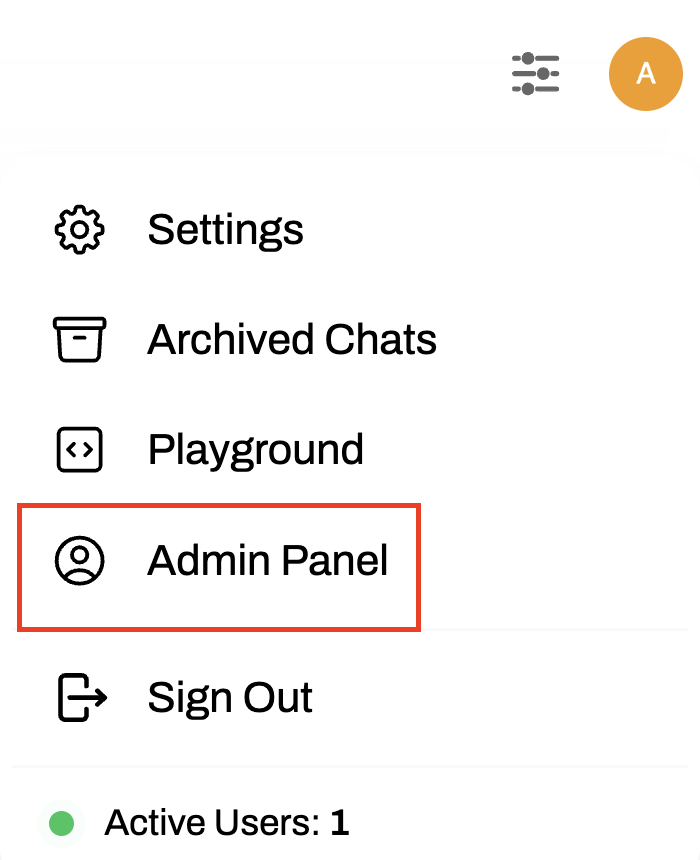
- Navigate to Settings → Web Search.
- Toggle Enable Web Search to activate the feature.
- In Web Search Engine, select searchapi from the drop-down list.
- Paste the API key you copied earlier.
- Enter your preferred search engine, such as google, bing, or baidu. If left blank, SearchApi defaults to google.
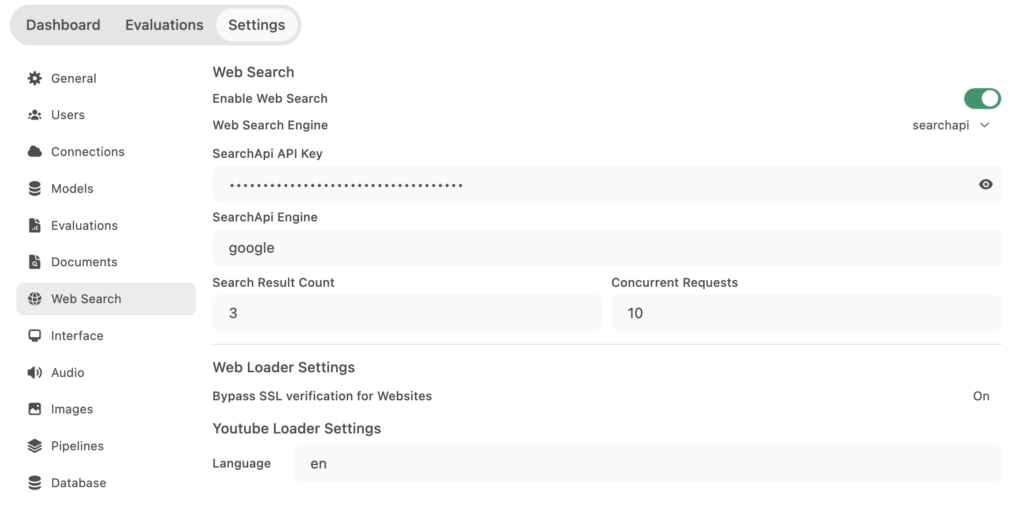
- Click Save.
Once the setup process is complete, return to the chat interface, click the + button in the message field, and enable Web Search. You can now ask the model to access information directly from the web. For example:
“Find the latest news on renewable energy and summarize the top points.”
Using collaboration features
For teams looking to collaborate, Open WebUI lets you manage multiple users. To add a new user:
- Go to Admin Panel → Dashboard → Add User.
- Enter the new user’s role – either user or admin – along with their name, email address, and password.
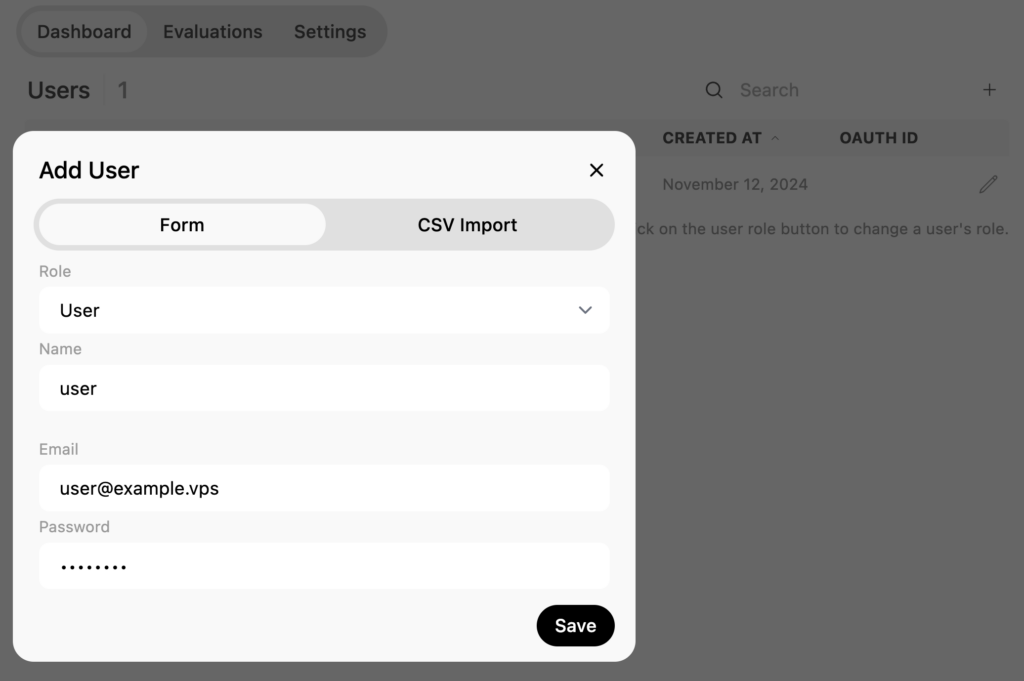
Once complete, share the credentials with the user so they can log in. Please note that non-admin users can’t access the workspace area and admin panel.
Next, explore the workspace area via the left sidebar. In the Models tab, you can create new models based on existing ones, import custom models from the Open WebUI community, and delete downloaded models.
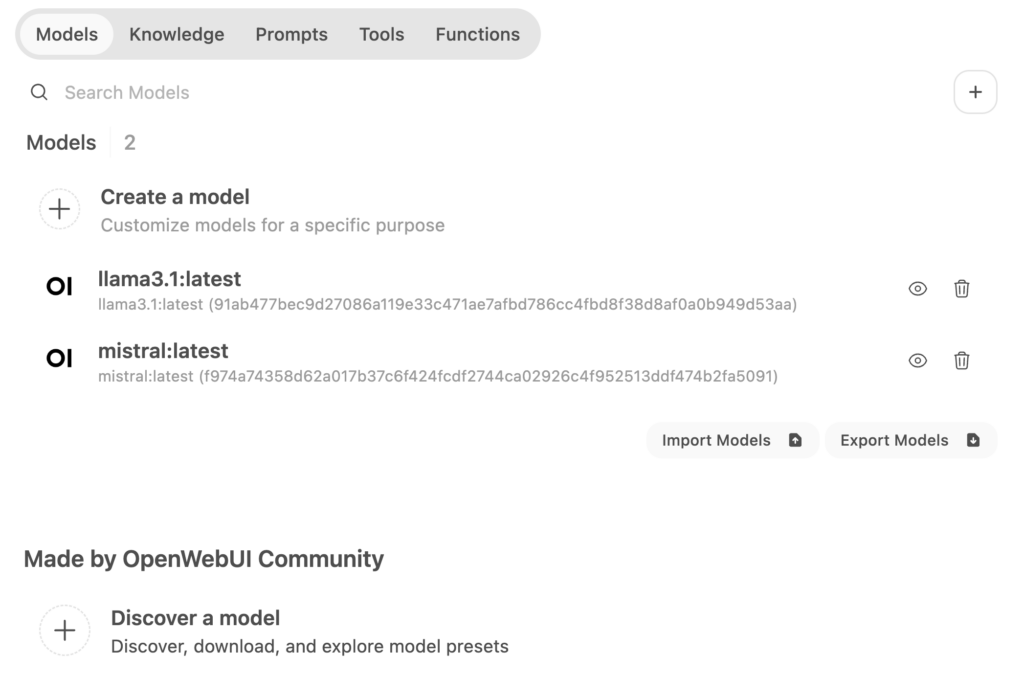
To create a custom model, click Create a Model and fill in details like the name, ID, and base model. You can also add a custom system prompt to guide the model’s behavior, such as instructing it to act like a financial advisor and avoid unrelated questions.
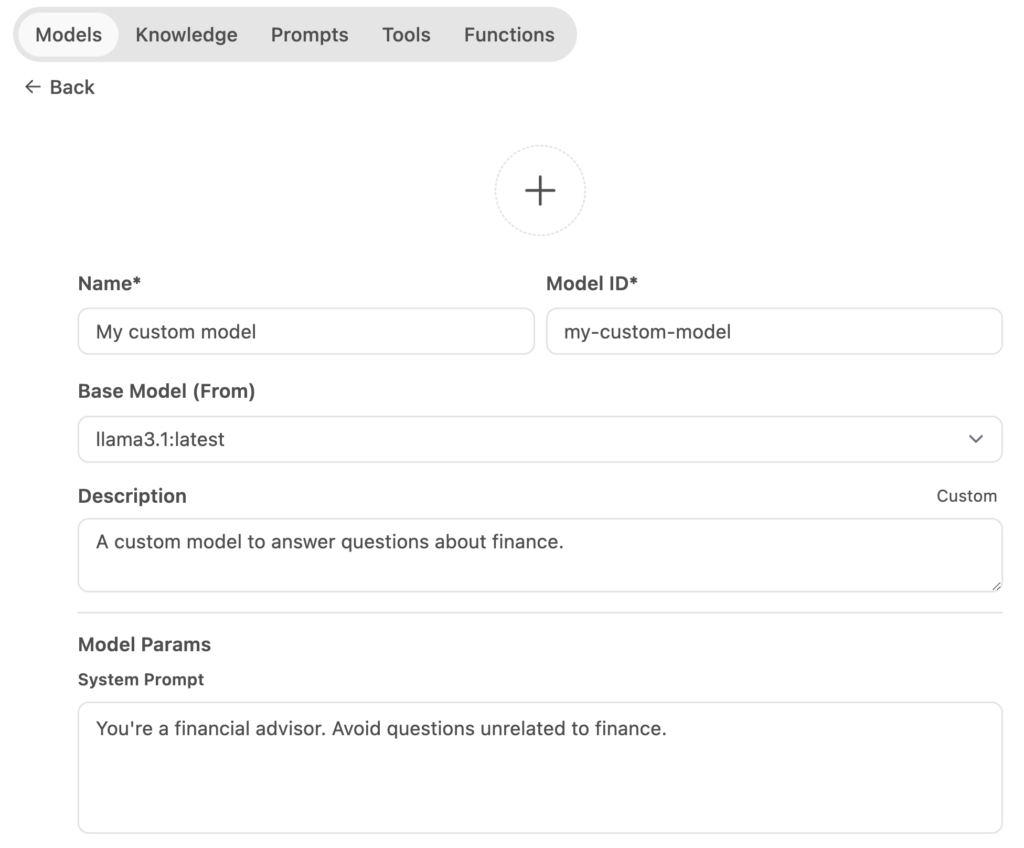
Advanced options are also available to set parameters, add prompt suggestions, and import knowledge resources. After completing the setup, click Save & Create.
If you haven’t yet created knowledge resources and want to train your new model, go to the Knowledge tab. Click the + button and follow the instructions to import your dataset. Once uploaded, return to your new model and import the knowledge you’ve just added.

You can add similar customizations in the Prompts, Tools, and Functions tabs. If you’re unsure how to get started, import community-made presets instead.
Working with multimodal models
Last but not least, we’ll demonstrate how to work with multimodal models, which can generate responses based on text and images. Ollama supports several multimodal models, including LlaVa, BakLLaVA, and MiniCPM-V.
In this example, we’ll use LlaVa. After downloading it from the model selection panel, you can use it for various tasks. For instance, you can upload an image and ask the model questions about it, such as, “What is in this image?”
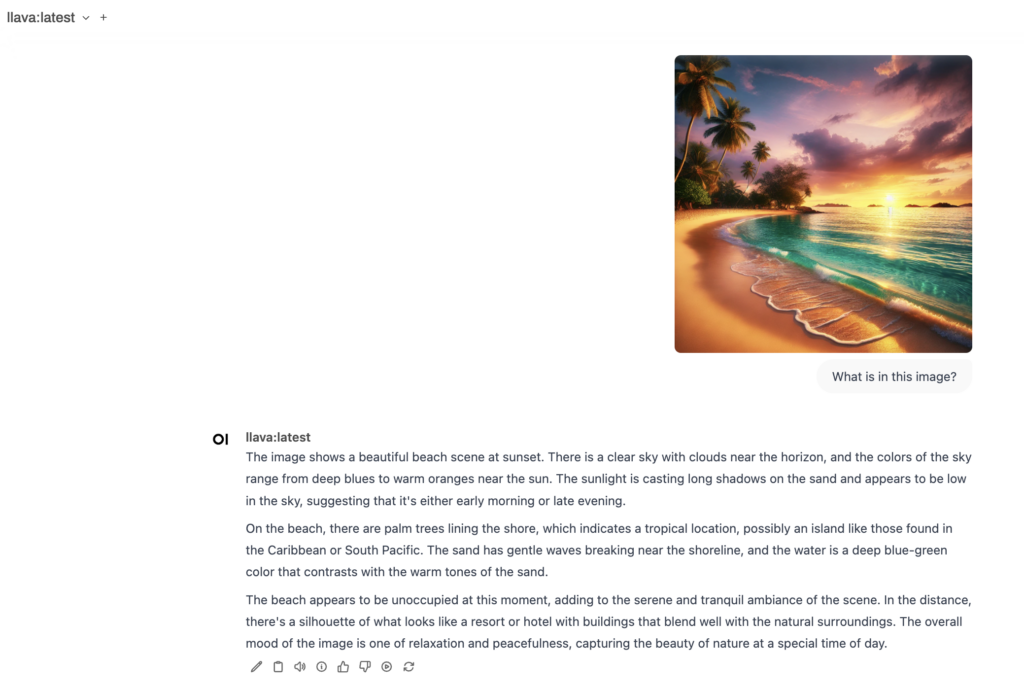
You can also use it to create descriptive captions for your images. Additionally, the model can identify objects within an image. For example, if you upload a picture of cats, you might ask the model, “How many cats are in this image?
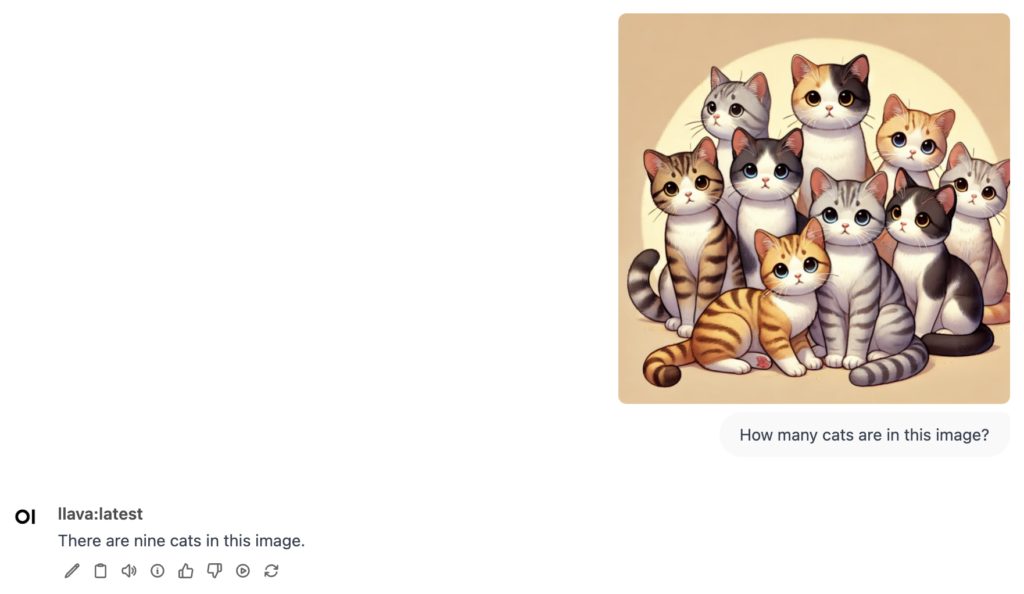
However, please note that LLaVA currently can’t generate images. Its primary purpose is to analyze and respond to questions about existing images.
Conclusion
Using Ollama with Open WebUI lets you run models through a visual, beginner-friendly interface. Hostinger’s Ollama VPS template makes installing these tools easy, even for non-technical users.
Once installed, you can navigate the dashboard, select and run models, and explore collaboration features to boost productivity. Open WebUI’s advanced tools – like web search and model parameter customization – make it ideal for users looking to tailor model interactions.
For those interested in deploying their own models, you can import your knowledge sets, experiment with different instructions, and combine them with custom prompt templates and functions made by the community.
If you have any questions, feel free to ask in the comments below!
Using Ollama with GUI FAQ
Why use Ollama with GUI?
Using Ollama with a GUI tool like Open WebUI simplifies model interactions through a visual interface, making it beginner-friendly and ideal for collaborative, team-based workflows without requiring command-line expertise.
What models can I use in the GUI version?
You can use all Ollama models in both the CLI and GUI versions. However, the GUI environment makes it more convenient to run multimodal models for tasks like analyzing and generating images.
Do I need Docker to run the GUI version of Ollama?
Yes, you must install Docker before setting up Ollama with Open WebUI. If you use Hostinger’s Ollama template, all necessary components, including Docker, are pre-installed.

