How to fix the WordPress Failed to Write File to Disk error in 3 ways

Getting the Upload: Failed to Write File to Disk error on your WordPress site when trying to upload a photo for a post can be frustrating. Fortunately, debugging this WordPress error is quite easy.
In this tutorial, we will discuss various possible causes of the error and show you how to fix it with easy-to-follow steps.
Download all in one WordPress cheat sheet
Why you get the Upload: Failed to Write File to Disk error
The Upload: Failed to Write File to Disk WordPress error can happen due to a number of reasons. The most common cause of the error is incorrect folder permissions. This error can also occur due to your website exceeding the hosting service’s quota limit. In rare cases, you might be experiencing this error due to the file capacity of the WordPress temporary folder.
All three cases of the error are fixable, and we will show you the solutions to every one of them in the following steps.
Method 1 – Checking uploads folder permissions
Whenever you try to upload files to a folder on your website, the web server checks whether the folders are allowed to write those files. If the folder does not have the appropriate permissions, the web server is unable to write files to that folder. The same goes for making changes to particular files, as they also have permissions that determine their interactibility.
There are three methods of modifying folder permissions on your web server:
Method 1.1 – Changing permissions with Hostinger File Manager
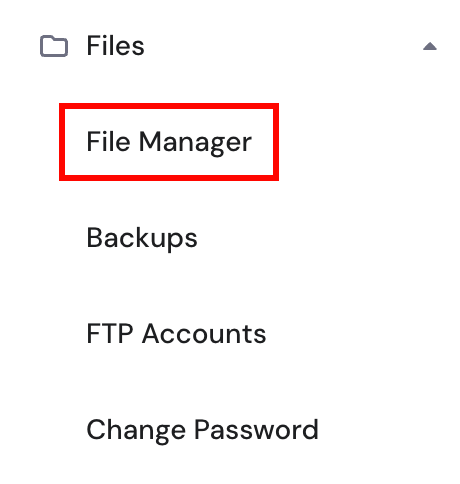
If you’re using Hostinger’s WordPress hosting, you can easily change folder permissions through our control panel, hPanel. To do this, log in to your web hosting account and go to Files → File Manager.

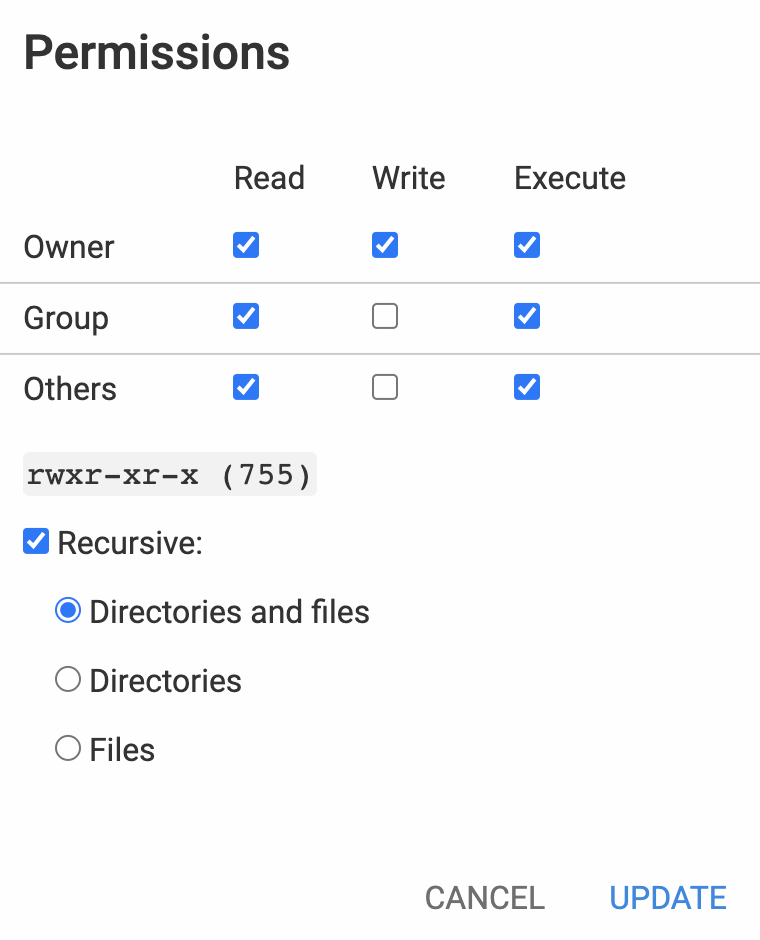
Then, navigate to the public_html → wp-content folder. Once inside, you should be able to see the Uploads folder. Right-click on this folder, and then hit on the Permissions button. Set the permission to 755 (read and write).
Try uploading the image again and see if the error still appears. If so, proceed to change the permissions on individual files inside the Uploads folder as well.


Method 1.2 – Changing permissions with FTP Client
You can also change the permissions of files/folders using an FTP client like FileZilla. First, connect to your hosting using FileZilla. Then, hover over to WordPress installation folder (usually it’s public_html) and to wp-content folder.
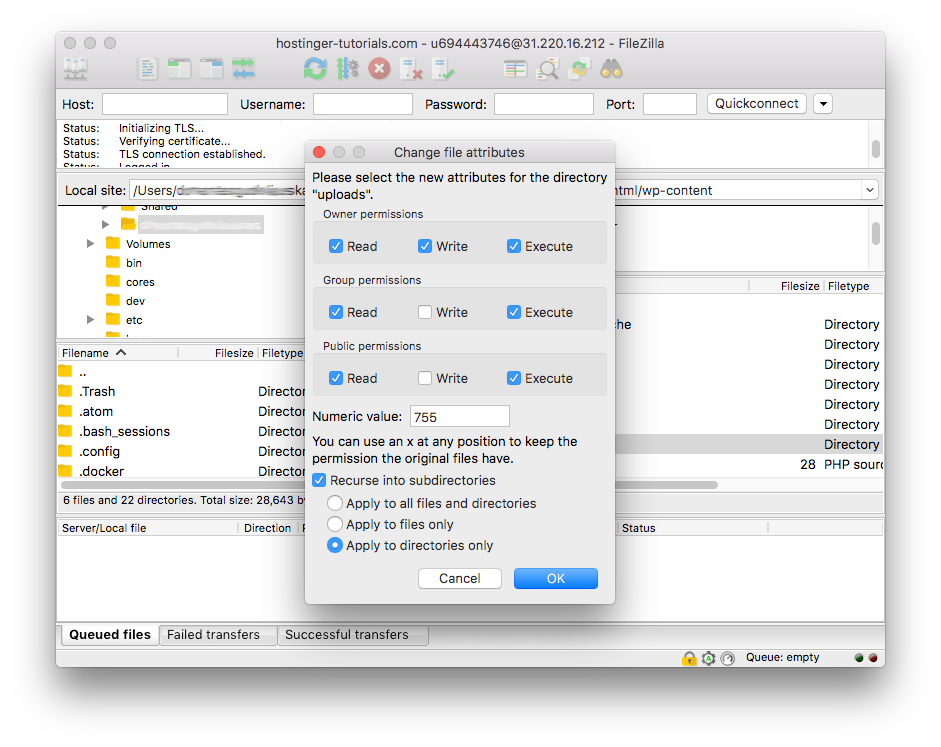
Right-click on the folder Uploads and select File Permissions. You will now see a new dialog box open up. In the Numeric value section, enter 755. Next, check the Recurse into subdirectories option, which will apply the same permission to all folders inside Uploads. Finally, choose Apply to directories only in the sub-menu. Finish by clicking OK.

Sometimes, you have to change permissions for files inside the folder as well. To do this in FileZilla, right-click on the wp-content folder and choose the File Permissions option. Next, enter 644 in the Numeric value field. Finally, check Recurse into subdirectories, and this time, select Apply to files only. Click OK to save your settings.
Method 1.3 – Changing permissions via SSH
Important! We recommend checking our tutorial on how to manage permissions and owners via command line before proceeding with this method.
On Hostinger VPS hosting, you can change file/folder permissions via SSH (see our tutorial on how to connect to your account or VPS with SSH).
To change permissions using SSH, you only need to use the chmod command:
- Access the WordPress installation folder. If your WordPress installation is inside the public_html folder, execute:
cd public_html
- Change the permissions to 755:
chmod 755 wp-content
By running the above command, the wp-content folder’s permission will be set to 755. If you want to give the same permission to all files and folders inside this directory, simply add the -R flag before 755 in the command.
Method 2 – Checking the quota limit
Another cause for the Upload: Failed to Write File to Disk WordPress error is when your website has exceeded the hosting’s storage space limit.
If you have a lot of content on your website, this is likely to be the case. To resolve this, delete unused files on your server or upgrade your plan for more storage space.
Method 3 – Checking the temporary folder
If the error still persists, it’s possible that the temporary folder of your WordPress site is filled to its maximum capacity.
WordPress works by uploading your content to a temporary location on the server, and then proceeds to save this content in the Uploads folder. If the temporary folder is full, there is no way for that content to reach the Uploads folder, causing the Upload: Failed to Write File to Disk error.
If this is the case, you will need to contact your hosting provider. If you are on VPS, here are instructions how to clean up disk space on VPS.
Conclusion
In this tutorial, we’ve explained how to fix the Upload: Failed to Write File to Disk WordPress error. The error can be caused by:
- Incorrect file/folder permissions
- Exceeding the storage limit of the web hosting plan
- A full temporary folder
We hope this guide has helped you solve this error and allow you to upload more content on your WordPress website.
Learn how to solve other WordPress errors
How to fix Briefly Unavailable for Scheduled Maintenance error
How to fix Missed Schedule Error in WordPress
How to fix mixed content on WordPress
How to fix broken links on WordPress
How to solve 404 WordPress error
How to fix the white screen of death on WordPress
How to solve WordPress not sending emails
How to fix the Installation Failed: Destination Folder Already Exists error


Comments
December 05 2017
How to check the Space usage in my hosting, I am using Free Hosting Now.
December 14 2017
Hostinger does not provide free hosting. If you are using 000webhost, please ask in 000webhost forum.