How to install Bolt.new on a VPS via Git
Bolt.new is an AI agent that helps you develop a full-stack application, from generating the code to deploying it to the production environment. This tool is self-hosted, meaning you can install it on your remote server and access it anytime from your web browser.
In this tutorial, we will explain how to install Bolt.new on a Linux virtual private server (VPS). We will cover the steps from preparing the hosting environment to testing the AI agent’s functionality.
Prerequisites
Before getting into the installation process, make sure you have a Linux VPS ready. Also, since Bolt.new is resource-demanding, the host system must at least meet the following minimum hardware requirements:
- 100 GB of storage
- 16 GB of RAM
- 4 CPU cores
If you don’t have a Linux VPS, we recommend purchasing one from Hostinger. Costing RM44.99/month, our KVM 4 offers a 4-core CPU, 16 GB of RAM, and 200 GB of NVMe storage, which is ideal for Bolt.new.
Should your project become more complex and resource-intensive, you can upgrade to KVM 8 easily. This higher-tier plan has 8 vCPU cores, 32 GB of RAM, and 400 GB NVMe disk space.
As for operating system requirements, Bolt.new works with popular Linux distributions like Ubuntu and CentOS. To avoid security and compatibility issues, use a newer version of your chosen OS, like Ubuntu 24.04 or CentOS 9.
Hostinger users can install these operating systems with one click using the VPS template. They can also use the Kodee AI assistant to troubleshoot issues during the setup.

Installing bolt.new on a VPS
After making sure your server meets the requirements, follow these steps to set up Bolt.new.
Important There are two versions of Bolt – Bolt.new and Bolt.diy. Bolt.diy supports more AI models, while Bolt.new only uses Claude. Apart from that, they function similarly.
In this tutorial, we wil explain the steps to configure Bolt.diy. However, the general procedure should be the same for Bolt.new.
1. Prepare your server
Start by connecting to your server as root via SSH using PuTTY or Terminal. If you use Terminal, execute the following command with 185.185.185.185 being your IP address:
ssh root@185.185.185.185
Alternatively, Hostinger users can access their VPS command line via a web browser using the Browser terminal. To do so, simply open hPanel, hit Manage on your VPS, and click Browser terminal in the top right.
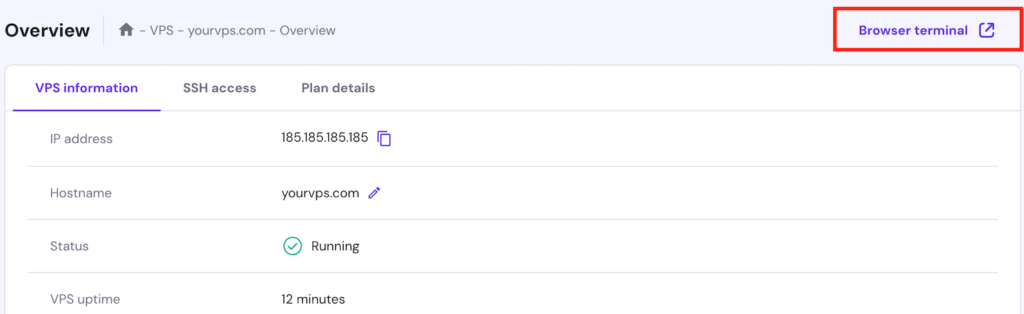
You will log in as root automatically without having to enter the password, making the process more efficient.
Once connected, you’ll need to install the necessary tools and software. Configuring Bolt.new requires the following:
- Git – a tool for fetching Bolt.new files from its repository
- Node.js – a JavaScript runtime environment for running Bolt.new
- npm and pnpm – JavaScript and Node.js package manager for installing bolt.new dependencies
- GNU screen – a terminal multiplexer for running Bolt.new in the background
As your server runs Ubuntu, you’ll use the apt package manager to install the above tools. Follow these steps to do so:
- Enter this command to update your system’s package repository, ensuring you download the newest version of all software:
sudo apt update
- Install git using this command:
sudo apt install git
- Install Node.js and npm by running the following:
sudo apt install nodejs npm
- Configure pnpm using this command:
npm install -g pnpm
- Install Screen by running this command:
apt install screen
That’s it! Next, run these commands one by one to verify if each software package is configured correctly.
screen –v

nodejs -v

pnpm -v
If the software packages are configured properly, your command-line interface will return the version number of each package. Otherwise, you will encounter the “command not found” error, meaning you must repeat the installation steps.
2. Download and install Bolt.new
Once your server is ready, you can set up Bolt.new. To begin, download the program files from the git repository using this command:
git clone https://github.com/stackblitz-labs/bolt.diy.git
Wait until your system finishes downloading the files. Then, navigate to the repository folder by running the following:
cd bolt.diy
Once you are inside the repository folder, switch to the main branch by running:
git checkout main
Then, install Bolt.new and its dependencies using pnpm. Here’s the command:
pnpm install
3. Start Bolt.new
Once the dependency setup and installation are finished, you can start Bolt.new. You’ll need to do so in a virtual terminal instance using GNU Screen.
Starting Bolt.new directly in your VPS’s main shell is unreliable since the application will stop when you close the SSH session.
GNU Screen lets you run Bolt.new in a virtual terminal, allowing you to detach from the SSH session anytime without interrupting the application.
Here’s how you start Bolt.new using GNU Screen:
- Start the virtual terminal session by running this. Replace session1 with your desired name:
screen -S session1
- Start Bolt.new using the following command:
pnpm run dev
- Detach from the session by pressing Ctrl-a, then d.
If you want to return to the Bolt.new shell, enter the following command with session1 being your actual session name:
screen -r session1
Bolt.new is now running on the localhost address. By default, you can’t access it from other systems apart from the host VPS.
To access bolt.new from another computer, you must forward your VPS port. Before doing so, enable passwordless SSH authentication since using a password can be unreliable.
Once you’re ready, enter the following command on your local machine’s command-line application. Remember to replace 185.185.185.185 with your VPS IP address and the path with your SSH keys’ actual location.
ssh -i "C:\path\to\rsa_key" -L 5173:localhost:5173 root@185.185.185.185
Enter your VPS root password to authenticate the process.
Important When running Bolt.new, you have the option to expose the host server to 0.0.0.0. This allows you to access Bolt.new from any system without forwarding it.
However, we don’t recommend doing so since it will make your AI agent public. This can reveal sensitive data – like API keys – online.
4. Configure Bolt.new
Before using Bolt.new, we must configure a few settings via the web interface.
To do so, access the following address in your web browser. Replace 185.185.185.185 with your VPS’ actual IP address.
185.185.185.185:5173
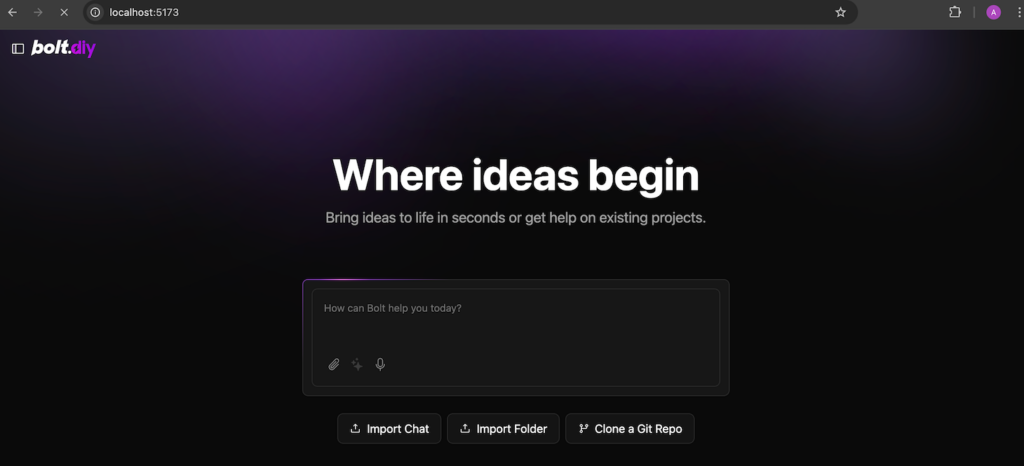
In the Bolt.new dashboard, hover your cursor over the left sidebar and click the gear icon at the bottom. Here, you will find several settings.
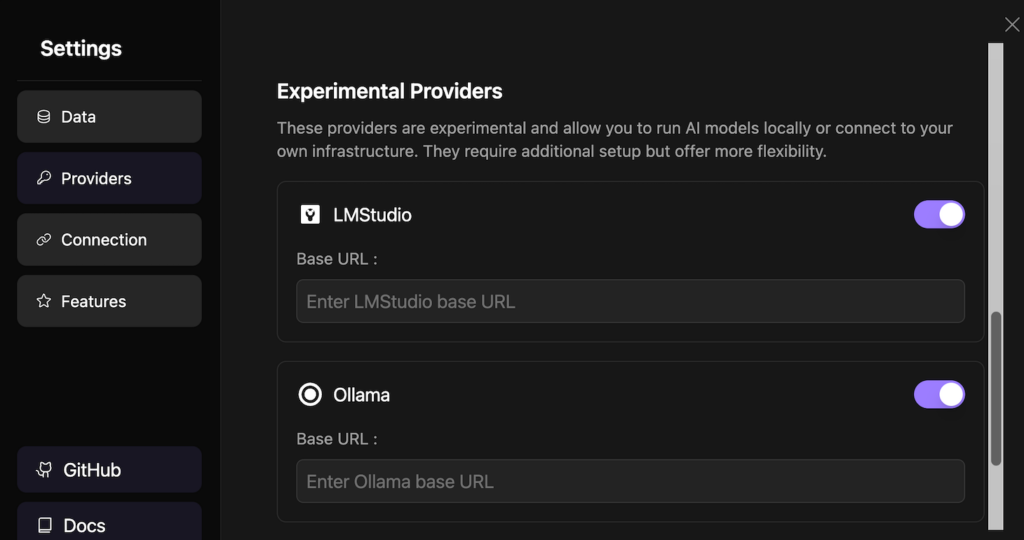
An important configuration is Providers, which define the AI model to use. By default, all providers are enabled, but you can switch any of them off by clicking on its toggle.
This menu is especially important if you plan to use AI providers with custom base URLs like Ollama since you need to enter the URLs from this menu.
After selecting your desired large language model (LLM) providers, head back to the main dashboard. In the main prompt box, you will see a pair of drop-down menus for selecting the provider and the model.
Pro tip
Your AI provider, model, and AI prompting technique will significantly affect the generated code quality. When writing your prompts, provide as much context as possible to get accurate results, and be direct to reduce the risk of ambiguity.
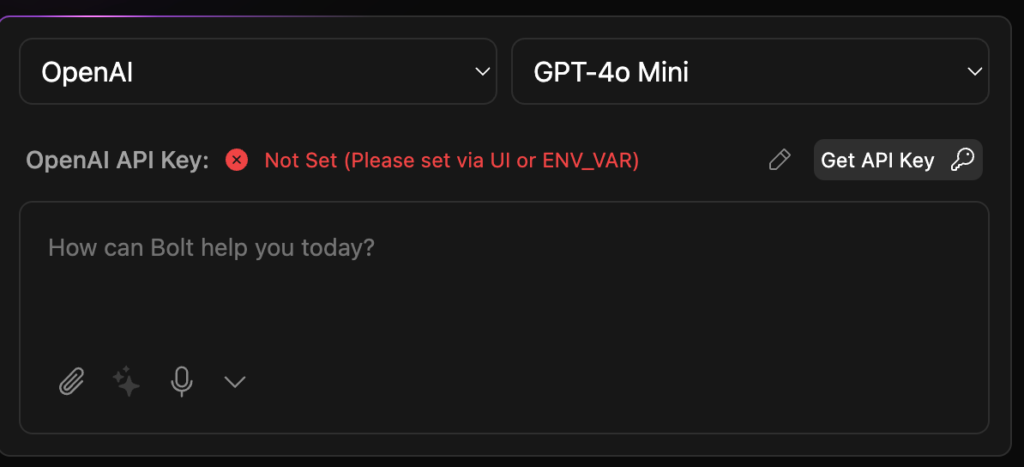
Next, connect Bolt.new with the chosen AI model using its API. Here’s how to do so:
- Click Get API Key. You should be redirected to the AI provider’s website.
- Log in to your account and generate the API key. Note that the steps will vary by provider.
- Copy the API key. Remember to save it in a safe location since you won’t be able to reaccess it later.
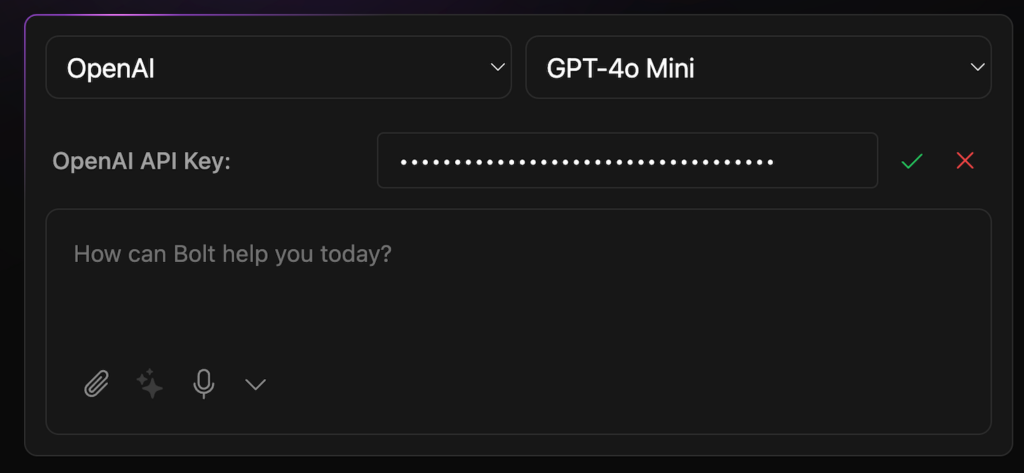
- Head back to the Bolt.new dashboard and click the pencil icon.
- Paste the API key and hit the checkmark.
If you plan to store the generated code on GitHub, connect your repository to Bolt.new so you can push the project directly from the Bolt dashboard.
To do so, access the Settings menu and click Connection. Enter your repository username and password, then click Connect.
That’s it! The next step is to test Bolt.new to verify its functionality.
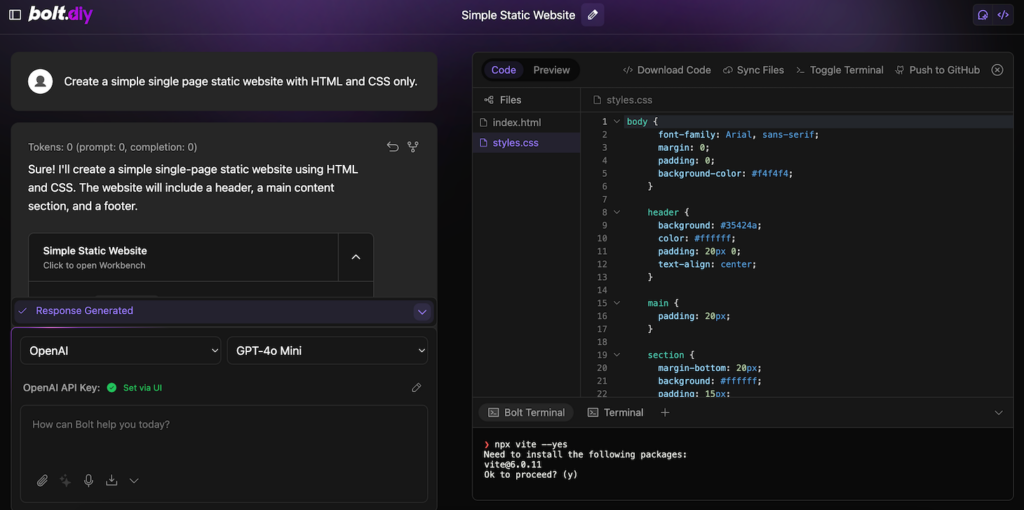
5. Test your installation
The easiest way to check if Bolt.new is running properly is to enter a prompt. For example: “Create a single-page static website using only HTML and CSS.”
You should then see Bolt.new outputting the code in the window on the right.
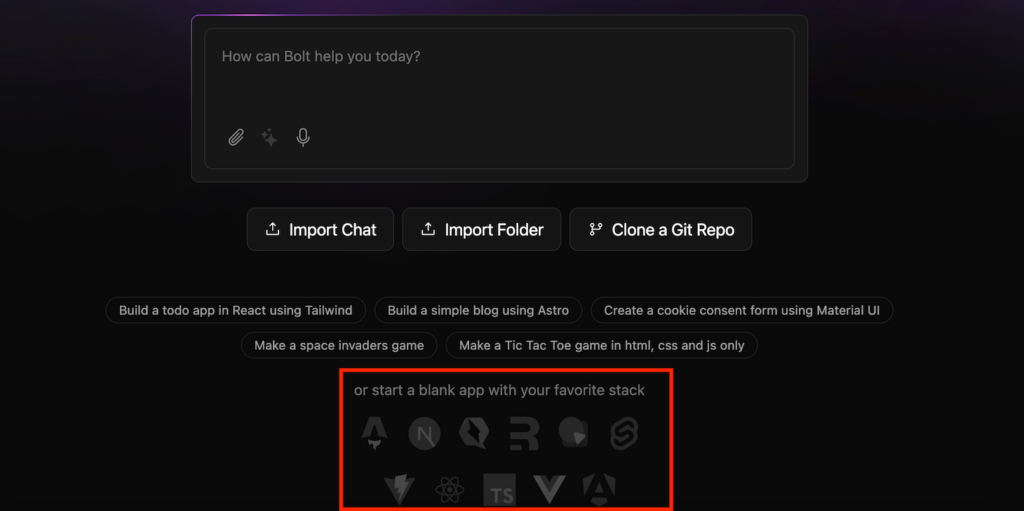
Alternatively, you can ask Bolt.new to create an empty project template for different frameworks or applications. You can do so by clicking its respective icon at the bottom of the Bolt.new dashboard.
If you don’t see an error, it means Bolt.new can make the API call with your AI provider. However, remember that this test will consume some AI account credits.
Another way to test Bolt.new is using pnpm’s test script. To do so, return to your Screen session where Bolt.new is running.
Then, execute the following command:
pnpm test
Pnpm will run the test suite using Vitest. If the results show as passed, your Bolt.new instance works properly.

Bolt.new also supports other scripts for different tasks:
- pnpm run dev – starts the development server.
- pnpm run build – builds the project.
- pnpm run start – runs the built application locally using Wrangler Pages.
- pnpm run preview – builds and runs the production build locally.
- pnpm run typecheck – runs TypeScript type checking.
- pnpm run typegen – generates TypeScript types using Wrangler.
- pnpm run deploy – deploys the project to Cloudflare Pages.
- pnpm run lint:fix – automatically fixes linting issues.
Deploying Bolt.new using Docker
In addition to running Bolt.new directly on your VPS, you can also set it up using Docker – a containerization platform that lets your application run in an isolated environment.
Docker packs your Bolt.new instance and its dependencies into an image, which you can easily move and distribute between systems. It streamlines the setup process for users wanting to deploy multiple instances of Bolt.new.
Moreover, Docker enables Bolt.new to run in the background without using a terminal multiplexer like Screen.
Here’s how to deploy Bolt.new using Docker:
- Install Docker and Docker Compose on your server. Hostinger users can do so using the VPS template.
- Install Git, Node.js, and npm using this command:
sudo apt install git nodejs npm
- Download Corepack and pnpm by running these commands subsequently:
npm install -g corepack

npm install -g pnpm
- Fetch Bolt.new from its repository:
git clone https://github.com/stackblitz-labs/bolt.diy.git
- Navigate to the Bolt.new folder:
cd bolt.diy
- Build the Docker image using this command:
npm run dockerbuild
- Create the .env.local file to store your AI API key. We will leave it empty since you can add the key via the dashboard.
touch .env.local
- Run the Bolt.new container using this command:
docker compose --profile development up
If you encounter the “Docker build error” or “Error: Cannot find matching keyid” errors, go to the next section to learn more about the solution.
Troubleshooting Bolt.new issues
While setting up Bolt.new is straightforward, a few issues may arise due to misconfiguration. Here are some common errors that we found during setup and testing.
Unable to build the Docker image
“Docker build error” and “Error: Cannot find matching keyid” errors might show up when building the Bolt.new Docker image.
This bug occurs due to a version mismatch between Corepack and pnpm. A quick solution is to edit the Dockerfile to use a specific pnpm release without corepack.
Here’s how to do so:
- Navigate to the bolt.diy folder.
- Open the Dockerfile using a text editor like Nano:
sudo nano Dockerfile
- Find and remove the following line:
RUN corepack enable pnpm && pnpm install
- Replace the removed line with the following:
RUN npm install -g pnpm@8.4.0 && pnpm install
- Press Ctrl + X, Y, and Enter to save the changes.
Now, try to build the Docker image, and the issue should be resolved.
Bolt.new is inaccessible
If you can’t access Bolt.new after running pnpm run dev, forward the port of your VPS to your local machine. Refer to the third step above to learn more about how to do so.
This happens because Bolt.new runs on the localhost address by default, meaning you must redirect the request to the remote machine via SSH.
Should the error persist, make sure you use and forward the correct port, which is 5173 by default.
Error when making a request
The error that shows up when entering prompts into Bolt.new happens due to an invalid API key or insufficient credits.
Double-check the credentials you entered. If you don’t have access to the old API key, generate a new one.
Also, make sure you have purchased AI credit from your chosen LLM provider. While you can generate an API key for free without buying a plan, a free API key won’t work in Bolt.new.
Custom error: Token is too large
The number of API request tokens varies depending on your AI model. Typically, a more advanced version like OpenAI’s 4o mini has a higher token limit per request than its older counterparts, such as GPT 3.5 Turbo.
If you choose a model that supports fewer tokens per request, the “Token is too large” error might show up.
To resolve the issue, try a newer AI model. Note that this can consume more AI account credit and incur extra costs.
Conclusion
Bolt.new is an AI agent for full-stack development that you can self-host on a personal machine like a VPS. To set it up, you need a system running Linux with at least 100 GB of storage, 16 GB of RAM, and a 4-core processor.
Once you have a server that meets the requirements, connect to it via SSH and follow these steps to install Bolt.new:
- Prepare the server by installing dependencies like Node.js, NPM, and pnpm.
- Download the Bolt.new repository and install the components using pnpm.
- Start Bolt.new using pnpm and forward its port to make the application accessible via your local machine.
- Access the Bolt.new dashboard and add the AI API key of your preferred model.
- Test Bolt.new by entering a prompt and running the built-in test script.
Once Bolt.new is running, you can start developing your own application. You can also employ other AI tools like Hostinger’s Kodee if you’re a beginner who needs more guidance.
How to install Bolt.new FAQ
What is Bolt.new?
Bolt.new is an AI agent that helps you build a full-stack application, from writing the code to deploying it to your repository. It supports various AI providers and models, such as OpenAI o1 and Claude 3.5. This tool can be self-hosted, meaning you can set it up on a virtual private server (VPS).
What are the minimum system requirements for installing Bolt.new?
Bolt.new is a resource-demanding application. It requires at least 100 GB of storage, 16 GB of RAM, and 4 CPU cores. For complex tasks, you might need a server with double this amount of RAM and CPU cores.
Which AI models work best with Bolt.new?
The Claude and OpenAI models have been found to be the best at generating code, making them well-suited for use with Bolt.new. The newer versions, like OpenAI o1 or Claude 3.5 Sonnet, are generally more accurate and reliable, and less prone to error.

Aris is a Content Writer specializing in Linux and WordPress development. He has a passion for networking, front-end web development, and server administration. By combining his IT and writing experience, Aris creates content that helps people easily understand complex technical topics to start their online journey. Follow him on LinkedIn.
