phpBB tutorial: how to install it and start using it to make an online forum
For bloggers and content creators, setting up an online forum is a great way to establish a strong community. Even if you are not a developer, you can easily set up one using a tool like phpBB.
In this phpBB tutorial, we will explain the software’s prerequisites and how to install it. You will also learn about the tool’s basic configurations so you can start your online forum effortlessly.
What is phpBB
phpBB is an open-source forum software that lets you create a bulletin board website where registered users can post threads and messages.
This software is free and beginner-friendly. It comes with various extensions that easily add new functionalities to your forums without coding. The pre-made templates also simplify phpBB customization.
Prerequisites
To install phpBB, you need a virtual private server (VPS) running a newer version of a Linux operating system, like Ubuntu 22.04.
Since phpBB is relatively lightweight, a basic VPS plan should be sufficient. Also, ensure your hosting provider offers root access to avoid permission issues when setting up the software.
Based on the requirements, Hostinger VPS hosting is a great choice. Starting at RM23.99/month, our phpBB forum VPS plans provide features that help simplify the software configuration process and Kodee, a VPS AI assistant.
phpBB also requires a web stack consisting of a database, the latest version of PHP, and a web server. At Hostinger, you can install them without commands using the VPS Operating System templates. We’ll explain how to do so later.

In addition, ensure you have a domain name pointing to your VPS IP address. If you don’t have one, we recommend purchasing it from Hostinger.
Installing phpBB
Here are the steps for installing phpBB on Hostinger’s VPS. Before proceeding, we recommend downloading our cheat sheet below since the process involves various Linux commands.
1. Install the operating system and web stacks
Before installing phpBB, set up the required web stack. You can configure different software, but we will use Ubuntu, MySQL, Apache, and PHP. Here’s how to do so on Hostinger’s virtual private server:
- Open hPanel and click VPS from the top menu.
- From the list, click Manage on your VPS.
- Navigate to the sidebar → Settings → OS & Panel → Operating System.
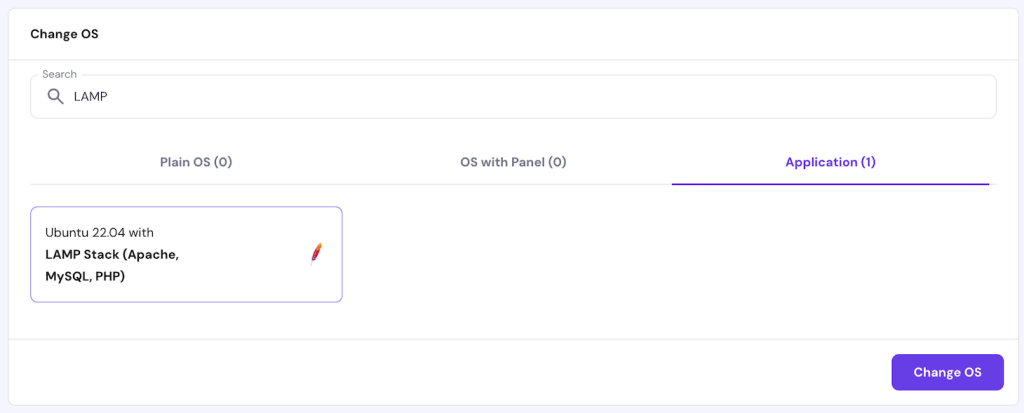
- Click the Application tab and select Ubuntu 22.04 with LAMP Stack (Apache, MySQL, PHP).
- Hit Change OS.
- Check the box to acknowledge data deletion and click Next.
- Enter a new root password and click Confirm.
New Hostinger VPS users will go through the steps above during onboarding. If you have already chosen the same template, you don’t need to reinstall it.
For non-Hostinger users, configure Apache, MySQL, and PHP packages manually using commands. To learn more about the steps, check our guide on how to install the LAMP stack on Ubuntu.
2. Log in to VPS via SSH
Installing phpBB on a VPS requires remote command execution. To do so, you can use an SSH client like PuTTY, Terminal, or Hostinger’s Browser terminal.
We recommend the Browser terminal since it is more convenient. This tool also works similarly regardless of your local computer’s operating system. Here’s how to use the tool to connect to your server:
- Open hPanel → VPS → Manage.
- Go to the SSH Access tab to obtain the root username and password.
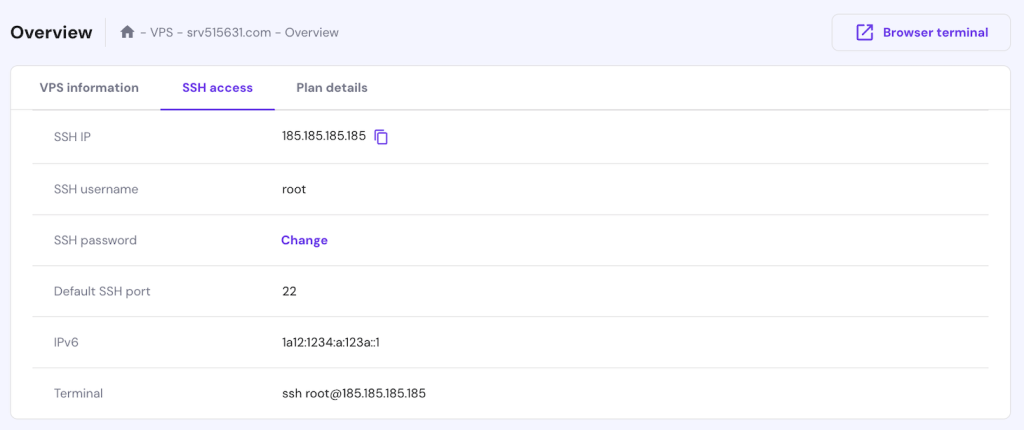
- Click the Browser terminal button on the top right. If your web browser asks for pop-up permission, click Allow.
- Enter the root username and password to log in.
The root login credentials are the same if you use other tools like Terminal or PuTTY. However, you will also need the VPS IP address, which you can obtain from the SSH Access tab.
3. Prepare phpBB database and PHP modules
Once connected to your server, create a new database and install several PHP modules. If you don’t have them, phpBB will return an error message during installation.
Let’s start by creating a new database. To do so, enter MySQL by running the following command. You should see the shell changes to mysql>:
mysql
Once logged in to MySQL, enter the following commands one at a time to create a new database and user. Replace phpbb_db, phpbb_user, and password with your desired value:
CREATE DATABASE phpbb_db;

CREATE USER 'phpbb_user'@'localhost' IDENTIFIED BY 'password';
You should get a confirmation after entering each line.
Now, run these commands to assign the new user as the database administrator, reload the privilege settings, and quit MySQL:
GRANT ALL PRIVILEGES ON phpbb_db.* TO 'phpbb_user'@'localhost';

FLUSH PRIVILEGES;

EXIT;
Remember, the commands might differ if you use another database management system like MariaDB and PostgreSQL. Now, let’s configure the PHP modules by running these commands:
apt install php8.1-mbstring

apt install php-xml
4. Download phpBB
After preparing the database and modules, let’s install phpBB. To do so, download it from the official link using this command. Replace the URL if you want to use another version:
wget https://download.phpbb.com/pub/release/3.3/3.3.12/phpBB-3.3.12.zip
Wait until your system finishes downloading the installer. Then, extract the archive using the unzip command:
unzip phpBB-3.3.12.zip
If you encounter the “Command not found” error, install the unzip utility using this command:
apt install unzip
Now, move the extracted items to the Apache folder to make phpBB accessible via the internet:
mv phpBB3 /var/www/html/phpbb
Change the ownership and permission of the folder to ensure Apache can serve it. Run these commands subsequently:
chown -R www-data:www-data /var/www/html/phpbb

chmod -R 755 /var/www/html/phpbb
Now, let’s create an Apache virtual host file to make phpBB accessible using your domain name, preventing it from conflicting with another application. Here’s the command:
nano /etc/apache2/sites-available/phpbb.conf
Copy and paste the following configuration into the Nano text editor window. Remember to replace example.com with your own domain name:
<VirtualHost *:80>

    ServerAdmin admin@example.com

    DocumentRoot /var/www/html/phpbb

    ServerName phpbb.example.com

<Directory /var/www/html/phpbb>

    Options FollowSymlinks

    AllowOverride All

    Require all granted

</Directory>

    ErrorLog ${APACHE_LOG_DIR}/phpbb_error.log

    CustomLog ${APACHE_LOG_DIR}/phpbb_access.log combined

</VirtualHost>
Press Ctrl + X, Y, and Enter to save the changes. Then, enable the phpBB virtual host and Apache rewrite module by running these commands subsequently:
a2ensite phpbb

a2enmod rewrite
Lastly, restart the Apache service to load the changes using this command:
systemctl restart apache2
5. Install phpBB
After configuring phpBB in your VPS, let’s finish the installation using your web browser. To do so, enter the following into your address bar with domain.tld being your actual domain name:
http://domain.tld/phpbb/install/app.php/install
Navigate to the Install tab and click Install. Now, phpBB will check whether your system meets the requirements. If you see an error, we recommend asking Kodee – Hostinger AI assistant for the solution.
Important!If the phpBB installation site won’t open, check the DNS settings to see if you point the domain name correctly.
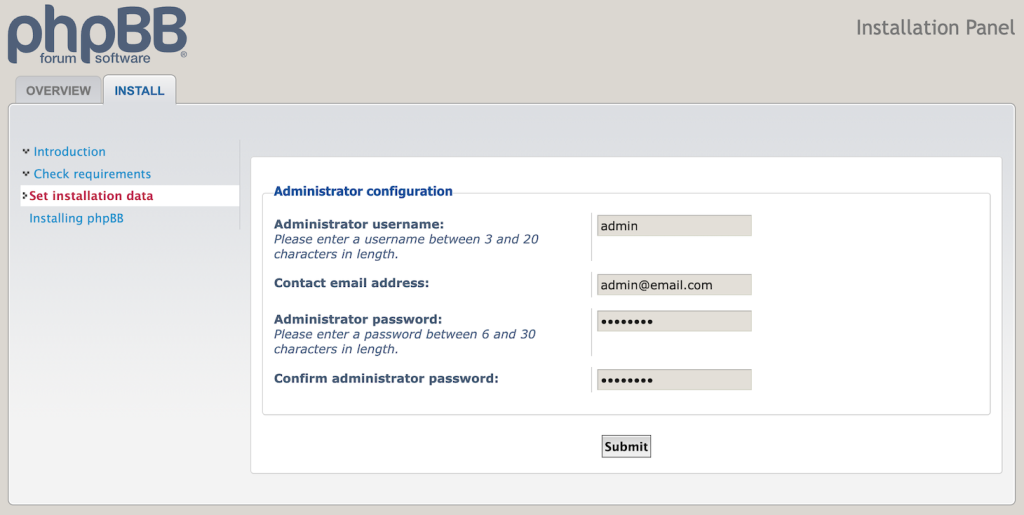
Otherwise, phpBB should redirect you to the Administrator configuration menu. Fill out the forms and click Submit to confirm. Then, configure the database using the information from the third step.
Next, enter information about your server and SMTP email. Press Submit to use all the default settings. If you want to change the configuration, read the phpBB installation manual to learn more about it.
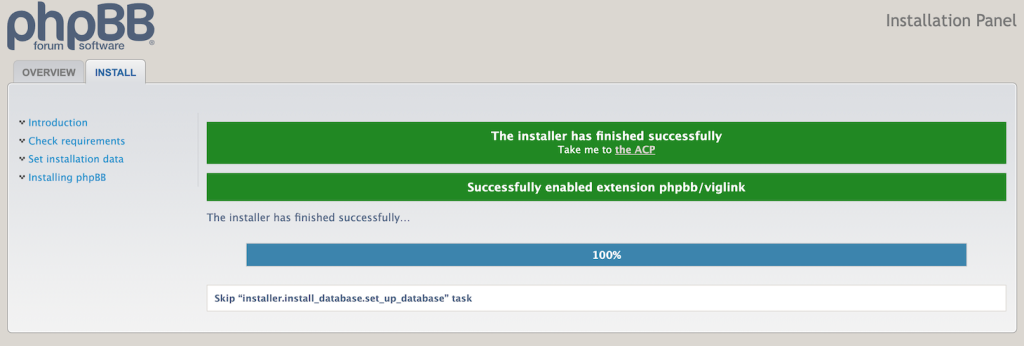
Lastly, enter information about your forum, including its language, title, and description. Click Submit and wait until the installation process is complete. Once done, you should see a confirmation screen.
Now, head back to your VPS command-line interface and run the following command to remove the Install directory:
rm -rf /var/www/html/phpbb/install
Removing the Install folder ensures you can access the phpBB admin area without triggering the installation wizard. To access your new forum, enter yourdomain.tld/phpbb.
Basic usage and configuration
Let’s explore phpBB’s basic usage and configuration.
Navigating the Admin Control Panel
phpBB provides an administration control panel (ACP) where you can manage various settings, including the server and user configuration.
To access it, open your forum and scroll down to the login fields. Enter your admin credentials and click Login. Then, click ACP with the gear icon from the top menu.
phpBB will redirect you to the admin control panel. From this menu, you can navigate to different configuration categories by clicking the tabs at the top. Meanwhile, go to the sidebar to check more detailed settings.
Creating and managing forums
To create forums in phpBB, open the admin control panel and navigate to the Forums tab. At the bottom, enter a name in the field and click Create new forum to confirm.
Configure your forum rules, description, and appearance. If you are unsure about the settings, check the explanation under each parameter. Once finished, scroll down and click Submit.
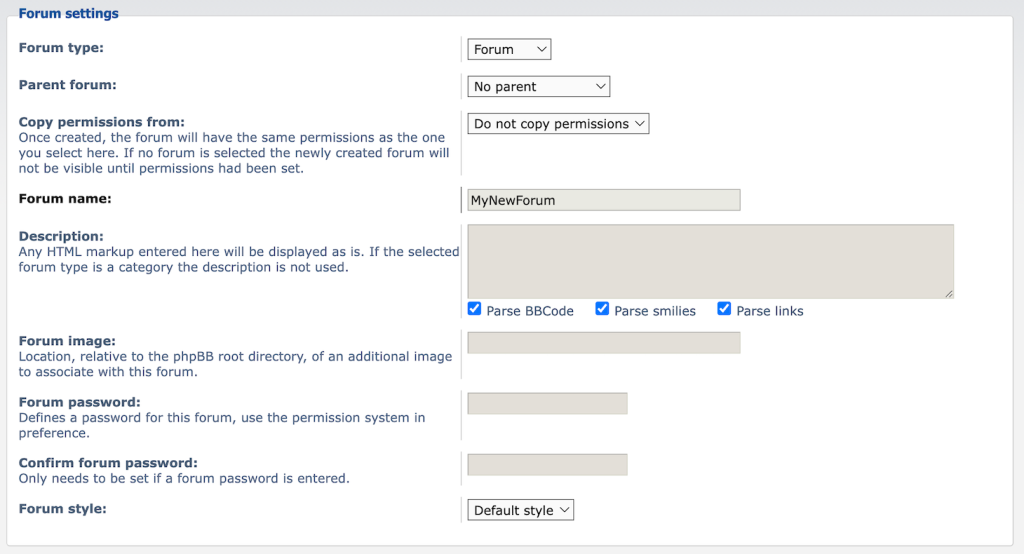
That’s it! If the creation process is successful, phpBB will show a confirmation message and redirect you to the permission management page. Remember to assign the correct privileges to ensure your new forum appears on the front page.
To manage your forums, navigate to the Forums tab’s sidebar → Manage Forums. Click the gear icon to change its settings, the x button to delete it, or the arrows to move the order.
Managing user registration
Changing the default user registration settings is important for spam protection, preventing bots from flooding your forum. Such an issue can waste server resources, potentially slowing down the performance.
You can adjust the settings by going to ACP → General → Sidebar → User registration settings. From the Account activation drop-down menu, choose whether new phpBB users can authenticate by themselves or via administrators.

From this menu, you can also adjust other user registration settings, including minimum password length and complexity. Once finished, scroll down and hit Submit to save the changes.
Customizing your forum
To customize your forum, head to ACP → Customise. From this menu, you can modify your phpBB board functionality using an extension or its appearance using a style.
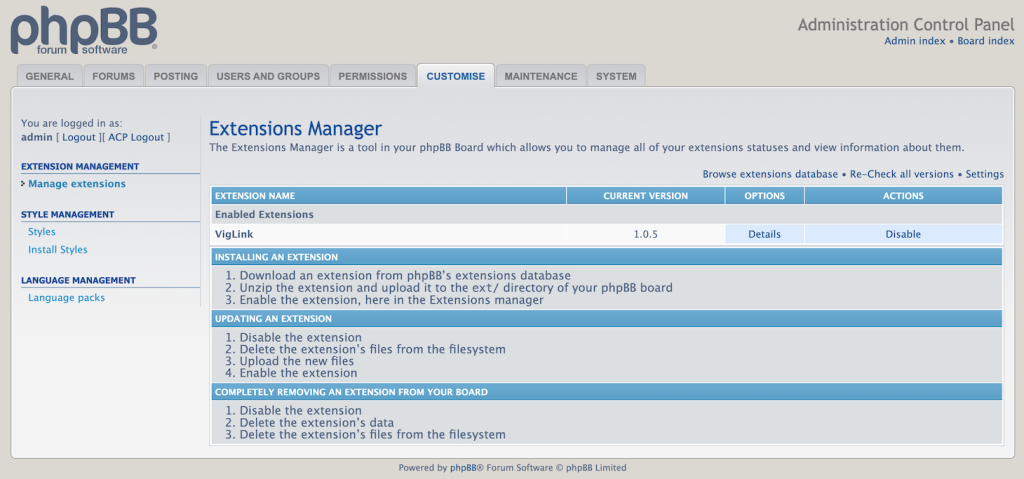
Installing phpBB extensions and styles requires connection via a secure file transfer protocol (SFTP) client like FileZilla. Alternatively, you can use the scp command via SSH, but this method may suit more advanced users.
While you can download extensions and styles from various sources, phpBB recommends the official customization library to ensure safety.
To install phpBB style, upload the theme you have downloaded to the /var/www/html/phpbb/styles path. Then, head back to ACP → Customise → Sidebar → Install Styles.
Meanwhile, extensions go to the /var/www/html/phpbb/ext path. Depending on their vendor, some add-ons require different installation locations. For example, install extensions called foobar in phpbb/ext/acme/foobar and ones named acme in phpbb/ext/acme.
Once uploaded, install and manage them by going to ACP → Customise → Sidebar → Manage Extensions.
Conclusion
phpBB is an open-source bulletin board software for creating an online forum. To install it, you need a VPS with a newer version of a Linux distribution, a web server like Apache, a database, and PHP.
At Hostinger, you can install these software components in one click using the LAMP operating system template. After setting them up, connect to your VPS via SSH or our Browser terminal.
Now, create a new database and install additional PHP modules. Download the latest version of phpBB and extract the installer package. Move the extracted folder to Apache’s root directory and change its permissions.
Create an Apache virtual host configuration and restart the web server. Then, open phpBB in your web browser to complete the installation wizard. Finish by deleting the installation folder to ensure the forum is accessible online.

