How to write a blog post: 9 steps to create engaging content

Did you just start a blog but are still unsure how to write proper posts? Many bloggers have been where you are, and it’s completely normal to feel uncertain at first. I’m here to help!
I’ve spent over three years writing blog posts for Hostinger. Now, I will share with you how to write a blog post in nine easy steps.
9 steps to write an engaging blog post
From planning to execution, let’s go over the nine steps on how to write a blog post.
1. Plan your blog topics
Back then, I used to update my personal blog only when the mood struck. It was counterproductive – my blog was going nowhere.
After becoming a Hostinger Tutorials writer, I have blog topics planned. This increases my productivity and helps eliminate writer’s block, as I always know what to write next.
When I say planning, it doesn’t have to be extravagant. It can be as simple as having the next topics prepared and a regular writing schedule.
So, how do you come up with some writing topics?
As we go about our daily lives, blog post ideas often pop into our heads randomly. To make sure I don’t lose them, I always keep a note-taking tool nearby – you can do the same!
These are some of the ways you can discover blog post topics and finalize the ones you already thought of:
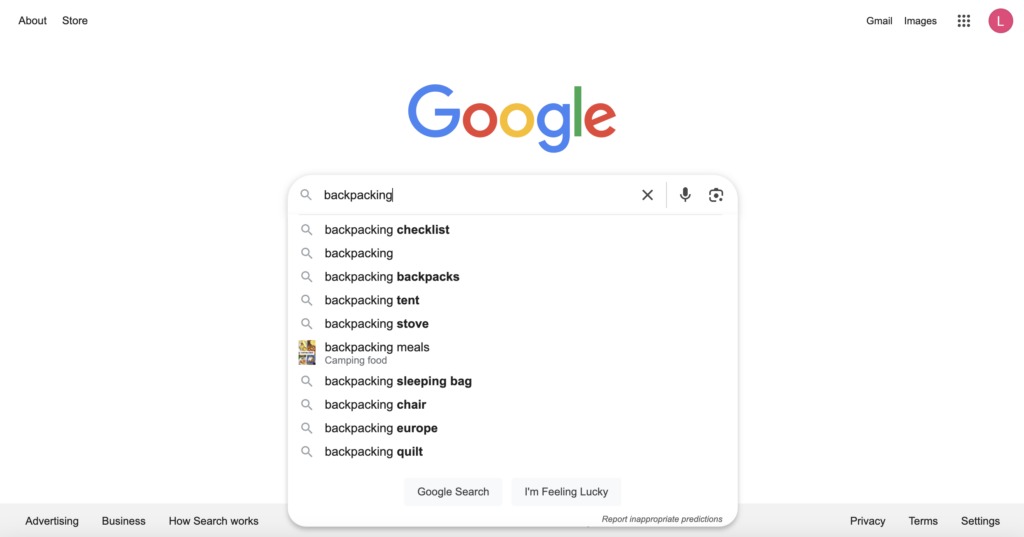
- Check search engine predictions – enter a general topic in your niche into the Google search bar, and look at the search predictions to spark ideas.
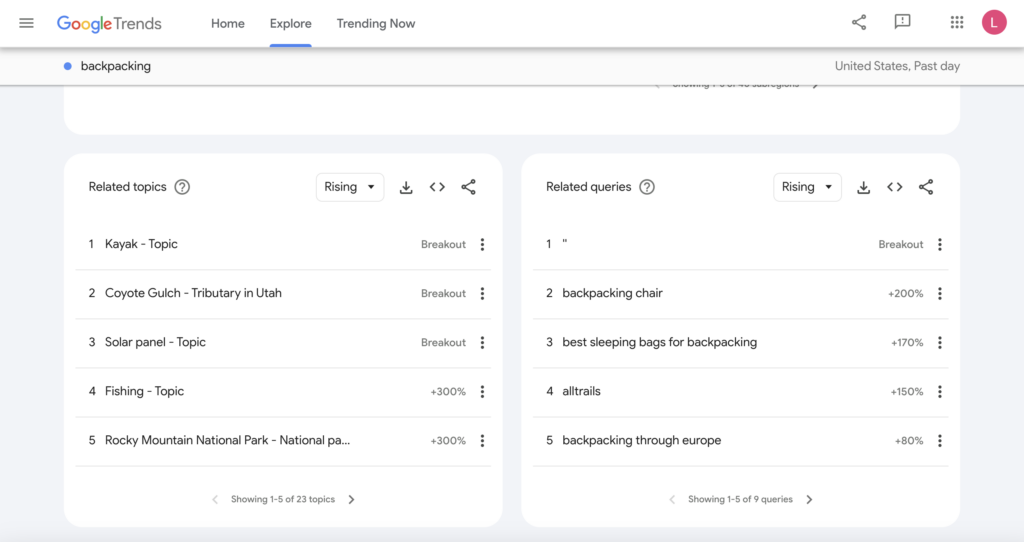
- Consult Google Trends – go to Google Trends’s Explore tab and search for any term. Scroll down a bit to find related topics and queries that are commonly searched.
- See what other bloggers are doing – reading popular blogs in your niche can inspire fresh ideas to turn into writing. Perhaps you can offer a different perspective on the same topic?
- Browse social media and forums – Reddit, Quora, and Facebook groups are goldmines for topic ideas. They can reveal questions that your potential readers actually ask about.
- Share your own experiences – think about challenges you’ve faced, lessons you’ve learned, or advice you wish you had. I often scroll through my phone gallery, revisit my old journals, or random memories to help recall personal insights I can share.
- Ask your audience – if you already have loyal readers, engage with them through surveys, comments, or social media to learn what topics they wish to read about from you.
After getting some general topics, research keywords to identify the most common search queries people use related to those topics. Tools like Google Keyword Planner, Ahrefs, and Ubersuggest can help you find keyword ideas, analyze search traffic, and assess the competition.
Let’s use the “backpacking” topic as an example. Typing it into Ahrefs’ Free Keyword Generator will show you multiple keyword results.
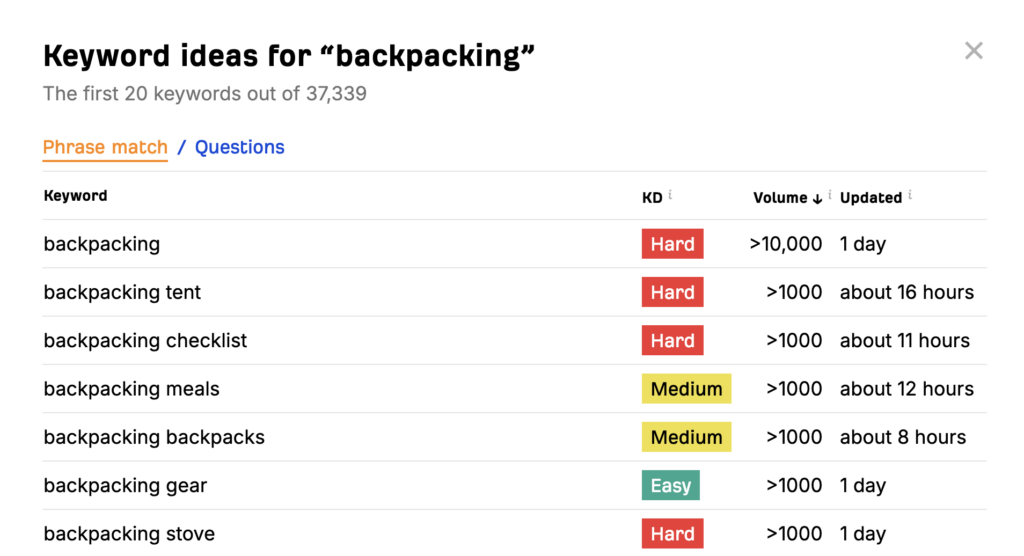
The KD column stands for Keyword Difficulty, or how competitive a keyword is to rank on search engines. Meanwhile, Volume shows how many people are searching for that keyword.
I recommend targeting Easy keywords with decent traffic volume. This balance improves your chances of ranking higher and confirms the growing interest.
After that, compile the keywords in a list or distribute them in your content calendar. In my experience, it’s better to create a schedule for writing, editing, and publishing blog posts to establish a routine you can stick to.
Make a copy of our content calendar template and tweak it as you see fit.
Or, stick to a scheduling method that works best for you. If you prefer planning your writing workflow with Google Calendar, Trello, or Notion, use them!
2. Create an outline
Just like creating a blueprint before building a house, making an outline of your blog post will make writing easier as you’ll have a clear plan to follow.
Ideas often jump around when I write spontaneously in my personal journals. Since I’m the only one reading it, I’m perfectly aware of the context, so this isn’t an issue.
Writing for other people is completely different. You have to help readers follow your train of thought, and an outline can help with that. Try these steps to create a clear blog post outline:
Conduct initial research
You can use tools like Ahrefs Content Helper or On-Page.ai to identify key points to cover in your blog post. These tools analyze top-ranking articles to reveal common topical coverages for a given keyword.
Alternatively, simply search for your focus keyword on Google and read the first articles that appear on the result pages.
You’ll start noticing recurring points – take note of the ones that appear in most articles. These indicate key topical coverage that search engines prioritize for ranking.
Incorporate your focus keyword naturally
Try to include the keywords you’ve researched in headings, subheadings, and body text. This will help search engines understand what your content is about (more on this later).
However, use the keywords only where they naturally fit. Forcing them in can make your blog post read awkwardly and may come across as keyword stuffing.
If your focus keyword is grammatically incorrect, use the proper version. Don’t worry – search engines can recognize similar phrasing and intent.
Decide on a writing angle
As you already know what your competitors write, avoid repeating the same information. Make your blog post stand out by:
- Combining popular topics into a single post. For example, if “how to start a blog” and “how to monetize a blog” are trending, you can write about “how to start a blog that makes money.”
- Sharing personal experiences.
- Offering a unique perspective.
- Experimenting with a different tone or style.
Identify the key points
Arrange your flow of ideas logically so it’s easy to follow and engaging for readers. Make sure all of these points answer your reader’s search intent (the main reason they’re looking for information in the first place).
Structure your sections
Dividing content into headings will guide readers through your post more effectively. Using the proper heading hierarchy also makes it easier to generate the table of contents and optimize your blog post for search engines.
Add supporting details
Include examples, statistics, or insights to strengthen your key points. If you lack expertise in a topic, ask for insights from someone who does. They can give you unique perspectives that will be more valuable for your readers.
These are three ways you can approach a subject matter expert:
- Send an email or a direct message on LinkedIn stating your intention and questions. Don’t overthink it – at worst, you might be ignored, but at best, you’ll get valuable insights.
- Post on your social media that you’re seeking expert insights and would love to connect with knowledgeable people.
- Use platforms like Help a B2B Writer, Featured, or Qwoted to connect with professionals.
Here’s an outline example I would make to target the “backpacking tips for beginners” focus keyword:
Headline (Heading 1)

Introduction hook
Briefly introduce the concept of backpacking for beginners and why it's exciting yet challenging.

5 essential backpacking tips for beginners (Heading 2)

1. Research your destination (Heading 3)
Explain the importance of understanding the terrain, weather, and necessary permits.
Provide examples of useful websites or apps for researching different backpacking locations.

2. Pack light, but smart (Heading 3)
List essential items to bring, like a lightweight tent, sleeping bag, and versatile clothing.
Offer packing tips to avoid overpacking.
Mention the importance of a well-fitted backpack.

3. Invest in quality gear (Heading 3)
Highlight the importance of durable footwear, a reliable backpack, and other key gear.
Share tips on finding good deals for beginner-friendly, high-quality gear.

4. Learn basic navigation skills (Heading 3)
Discuss the importance of understanding maps, compasses, and GPS for navigating trails.
Offer advice on how beginners can practice navigation skills before the trip.
Share the beginner mistakes I experienced during my first time backpacking.

5. Stay safe and be prepared (Heading 3)
Cover the basics of backpacking safety, such as knowing first aid and staying aware of wildlife (sharing external resources will be helpful).
Mention emergency essentials, like a whistle, knife, and firestarter.
Find expert insights from healthcare professionals who are experienced in handling backpacking safety.

Conclusion (Heading 2)
Recap the key points: research, gear, navigation, safety, food, and mental preparation.
Add a call to action promoting other blog posts about the best beginner-friendly backpacking destinations.
We use sentence case headings in Hostinger Tutorials to comply with web accessibility guidelines. Feel free to use the formatting that matches your blog’s style.
Treat your outline as a writing guideline instead of a definitive set of rules. Adjustments are often needed as you uncover new information during your research and writing process.
3. Write the main content
Answering the search intent should be the priority when writing a blog post. Readers may quickly leave if it’s hard to find what they need, so it’s important to convey your ideas without unnecessary fluff.
Here are some tips for writing blog posts:
Use a word-processing tool you’re comfortable with
A familiar tool lets you write smoothly without spending extra time figuring out features. Whether it’s Google Docs, Microsoft Word, or Notion, a tool that fits your workflow lets you focus on refining content.
You can also immediately write in your blogging platform’s post editor if you’re comfortable with that. This saves time and prevents formatting issues.
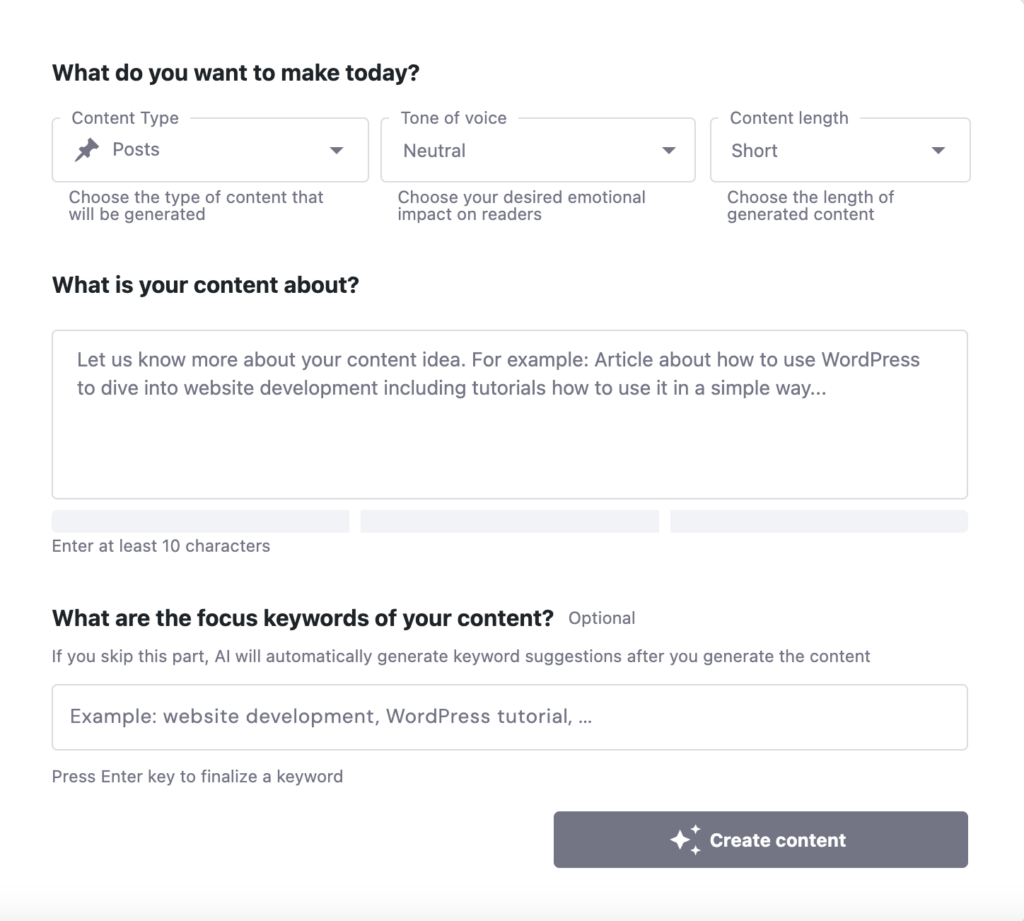
If you use our Managed WordPress hosting to power your blog, we have a handy AI Content Creator tool included with the Business and Cloud plans. Activating the Hostinger AI WordPress plugin will integrate it into your WordPress admin dashboard.
Simply go to Hostinger → AI Content Creator. Then, paste your outline, set the content type, tone, and length, and click Create content. You’ll get a draft ready to be refined and moved to the post editor.

Hook the readers with an attractive introduction
With today’s overflowing information, people tend to have a shorter attention span. That’s why crafting an introduction that encourages them to continue reading is essential.
Try these tips to write an introduction that keeps your audience interested:
- Start with a hook – capture your audience’s interest with an engaging opening. It can be a surprising statistic, a thought-provoking question, a relatable statement, or a bold claim.
- Address your readers’ pain points – dig deeper into the challenge your audience faces. Let them know you understand their struggles.
- Preview the value of your post – highlight the key takeaways they’ll learn from your blog post. Keep it concise but compelling enough to reassure them that reading further is worth their time.
- Make it short and sweet – readers want to get to the main content quickly, so avoid unnecessary fluff.
Write in your language
Staying true to your natural style makes writing feel effortless. Moreover, writing in a consistent tone of voice creates authenticity that can make your blog stand out.
When you’re writing, imagine explaining something to a friend. This will help make your writing approachable and relatable. Avoid using jargon or complex sentences, as they can make your writing feel detached.
Expert tip
No matter how interesting the subject is, people won’t bother to read your blog if reading it requires a lot of effort. Make sure your sentences aren’t long, the paragraphs are 3-4 lines max, and the language used is simple. Even the most complex topics can be explained in a simple and natural way. Also, using bullet points or numbered lists for key takeaways makes them easily skimmable.

Consider sharing personal anecdotes to connect with your readers better. Mention your experiences, struggles, or lessons learned. Readers are more likely to engage when they see the real person behind the words.
Minimize distractions
Avoid overthinking details or trying to write perfect sentences. Instead, focus on getting your ideas down naturally. Let yourself write freely, knowing you can refine and polish later during editing.
Here are some strategies on how to minimize writing distractions:
- Create a distraction-free environment – find a quiet space, use noise-canceling headphones, or play background music that helps you concentrate.
- Schedule your focus time – I use a timer to track my focus hours. It helps me understand my most productive periods so I can schedule deep-focus writing accordingly. If this doesn’t sound like you, try other productivity methods.
- Turn off notifications – silence emails, social media, and other alerts to prevent interruptions. Sometimes, I even tuck my phone away in a drawer to resist the temptation of checking notifications.
Add a call to action
Encourage readers to engage by including a call to action (CTA) in your post, such as subscribing to your newsletter, purchasing a product, or leaving a comment. This helps build a connection with your readers, increasing the chances they’ll return to your blog.
4. Include visuals and multimedia
High-quality blog posts often have relevant media to add visual appeal and break up text. These are some of the visual elements you can add to a blog post:
- A featured image is like your blog post’s cover that will grab people’s attention. It also makes your post more appealing in link previews when shared, potentially increasing clicks and engagement.

- Video content makes your blog more engaging by providing visual and auditory explanations. If you have a YouTube channel, embedding your video can also signal credibility and authority to search engines.
- As an alternative to stock images, creating illustrations helps enhance your explanation of a concept or story.
- Screenshots help readers follow the correct steps in a how-to guide.
- Graphs or charts make numerical data more appealing to readers. Aside from using standard graphic design software, you can use Tableau Public to visualize data effortlessly – just upload your data source, and it will do the rest.

Expert tip
When adding images, prioritize clarity and relevance over complexity. Make sure they enhance understanding and directly support the content. Also, avoid overly designed or decorative visuals that don’t add value.

5. Craft an engaging headline
Your blog post is the first thing your audience reads on search results, so it can influence their decision to click.
You might already have a placeholder headline when writing your main content, but I recommend refining it afterward. Once your content is complete, it’s often easier to craft a headline that accurately reflects its key ideas.
Here are some ways to make your headline even stronger:
- Avoid ambiguity – always remember that clarity is key to making a compelling headline. Avoid vague wording that could have multiple meanings.
- Make it short – aim for 60 characters or less to prevent it from getting cut off in search results pages.
- Use additional power words – inserting words like “ultimate,” “essential,” “proven,” “step-by-step,” or “best” makes your title more enticing.
- Be specific – instead of a vague title like “How to cook pasta,” make it more specific by adding details, like “How to cook perfect al dente pasta in 10 minutes.”
- Use numbers – numbers stand out visually, so it can make your headline eye-catching. Adding numbers also lets your readers know what to expect from the post.
- Include a question sentence – questions spark curiosity and engagement, such as “Want to start a blog? Here’s what you need to know.”
- Create a sense of urgency – adding urgency in your headline, like “Don’t miss these 5 must-know SEO tips for beginners!” encourages immediate action.
- Pick the best of the best – listing multiple headline variations gives you confidence in choosing the most effective one.
6. Edit and proofread the content
You’re closer to publishing your post! Let’s refine it first.
I usually take some time away from my blog post after writing it – I love to call this the process of marinating my words. If your deadline allows, I recommend leaving it overnight. This way, you can distance yourself from your writing and return with fresh eyes.
Refine your content with two different approaches: editing and proofreading. If you’re unfamiliar with the difference, let me explain.
Editing focuses on improving the quality of your writing, like the sentence structure, flow, and clarity. Therefore, it may involve reorganizing content, rewriting sentences, or adding missing information.
During this step, I read my sentences out loud to check if they are easy to follow and not wordy.
I use Hemingway Editor to check the readability of my blog post. However, trying to aim for a perfect score with this tool can make your content sound robotic. So, instead, treat it as a guide to spot significant issues so you can refine your writing while keeping it authentic.
Once the editing is done, proofreading focuses on catching surface-level errors like typos, grammar mistakes, and punctuation issues. During this step, make sure your blog post is polished and error-free.
Editing and proofreading checklist
After you’ve written your blog post, make time to focus on the bigger-picture issues:

7. Optimize for search engines
Implementing search engine optimization (SEO) means making your content easily recognizable for search engines. It can increase your chances of ranking higher in search results, which can widen your reach.
Even if search rankings aren’t your priority, optimizing your blog for SEO is still a good idea, as many of the best practices suggest enhancing the reader’s experience.
After getting the entire blog post ready, implement these essential on-page SEO best practices:
Add a meta title and meta description
Your blog post’s metadata appears in search results as a preview of your blog post. They are what people see when browsing articles on search engines. The clickable headline is the meta title, while the summary below is the meta description.
If you don’t add a meta title and description yourself, search engines will automatically pull content from your blog post, which may not always be the best representation.
Add internal and external links
Linking to other relevant posts helps search engines better understand your article. At the same time, it can keep your readers engaged as you provide them with additional valuable content.
Internal linking involves adding links to your other blog posts, which helps create a network of related content. Consistently doing this builds your blog’s topical authority, which signals your expertise and credibility in a niche to search engines.
Meanwhile, external linking can help you explain concepts outside your blog’s niche or add credibility by supporting your claims with outside data.
Keep these in mind when adding internal and external links to your blog post:
- Use relevant anchor text that indicates what readers will find when they click the link. For example, instead of linking “click here,” use “how to start a blog” as the anchor text.
- Integrate the anchor text smoothly into your sentence. If it doesn’t fit your writing flow, don’t force it.
- Avoid using the same anchor text for multiple links, as it weakens their relevance and makes it harder for search engines to understand your content.
- Don’t link to the same page more than once in a single blog post to avoid decreasing link value and confusing readers.
- When linking to external sources, make sure they are high quality, credible, and useful to your readers.
Optimizing images
Large image files can have slow loading speeds, harming your blog’s user experience. To optimize images on your blog post, use tools like TinyPNG or ImageOptim.
Before uploading images, ensure they are properly named. Search engines and screen readers rely on file names to understand pictures. Instead of keeping a generic file name like IMG1234.jpg, rename it with a clear, keyword-rich description like homemade-matcha-latte.jpg
In addition, make sure every image has an alt text. It helps visually impaired users understand images and allows search engines to interpret your content better.
If you’re using WordPress, you’ll see a text box for alt text when adding an image to the media library.
Make your image alt text concise, relevant, and naturally contain keywords. For a picture of a matcha latte, you can write, “A homemade matcha latte in a ceramic cup with latte art.”
Add FAQs
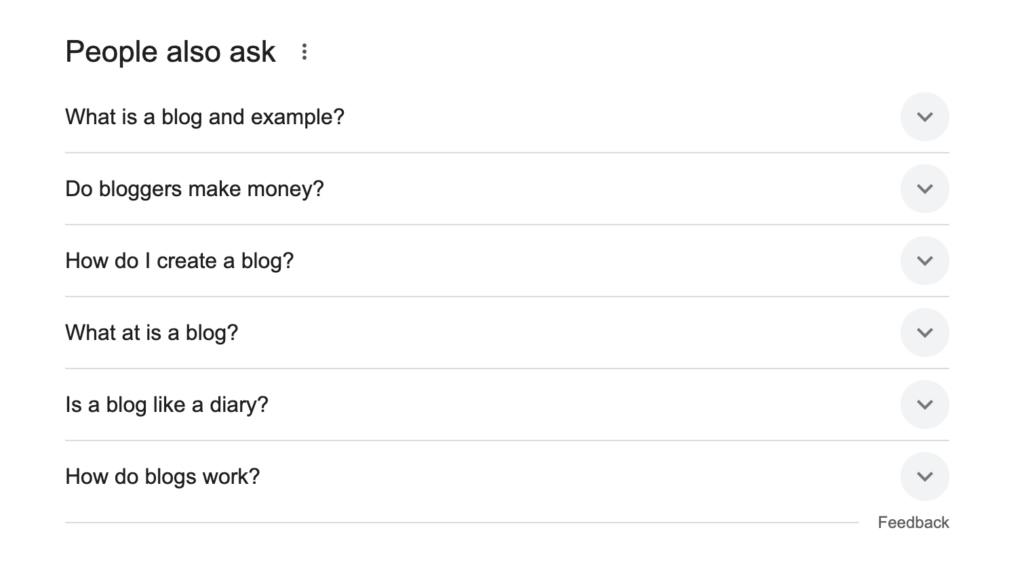
Adding FAQs at the end of your blog post improves user experience by providing quick answers and increases the chances of appearing in Google’s People also ask section.
To create an FAQ section, you can check the AnswerThePublic website to collect common questions. Pick the most relevant ones to your blog post, then provide direct and concise answers.
If you use WordPress, activating an SEO plugin lets you optimize your FAQs to enhance visibility in search results.
Make your blog post permalinks user-friendly
A permalink (short for permanent link) is the full URL of your blog post. It remains unchanged over time, making it a reliable way for users and search engines to access your content.
A well-structured permalink helps users understand the page’s topic at a glance. So, instead of an unclear URL like yourblog.com/?p=12345, make it clean and descriptive like yourblog.com/how-to-start-a-blog.
If you’re using a WordPress SEO plugin, you’ll find the settings to add your post’s slug. This will change the default permalink. Alternatively, navigate to Settings → Permalinks from your WordPress dashboard.
8. Publish the post
You’re now ready to publish your blog post. Congratulations on making it to this exciting step!
If you use another writing software, make sure the post formatting works as expected in your blogging platform’s post editor after copy and pasting.
I also recommend cleaning unnecessary code, such as & (non-breaking space) and <br> (line break) in WordPress. Too many & can create awkward spacing, while excessive <br> tags can make formatting inconsistent.
To do this, open the WordPress code editor, CTRL + F the problematic code, and delete them.
Once you’ve done this, preview your blog post once more. Make sure that every image has alt text, and that every link directs users to the right page.
Also, consider creating a publishing checklist to be sure you’re not missing anything.
Once everything looks good, hit Publish!
9. Promote your blog post
Promoting your blog post is essential for growing your audience, especially if you plan to make money through blogging. Relying solely on search engines can limit your reach, so actively sharing your content helps attract more readers.
Here’s what you can do to promote your blog post:
- Share your blog post on social media – it’s the easiest way to promote your content. If you’re hesitant, remember that most people don’t really care about other people’s feeds. At worst, they’ll scroll past it. At best, they’ll share it with their friends and followers if they find it valuable.
- Send email newsletters – build an email list to share your latest posts with subscribers and keep them engaged.
- Engage in online communities – share your post in relevant Facebook groups, Reddit threads, and forums where your target audience hangs out.
- Repurpose content – turn key insights from your blog into social media posts, infographics, or short videos.
- Encourage readers to share – add social sharing buttons and a call to action that invites readers to spread the word.
- Notify the experts you feature – if you’ve included an expert’s insights in your blog post, email them once it’s published. They’ll likely share it with their audience, helping you reach more readers.
Conclusion
That’s all the tips I have for you on how to write a blog post. I hope you gain some helpful insights to keep improving your blog.
Remember that writing a great blog post takes practice (I am still practicing and improving every day, too!). The more you write, the better you’ll get.
You can start by focusing on delivering valuable content and structuring your post for readability. Then, keep refining your process by experimenting with different approaches, learning from feedback, and keeping the quality consistent.
Every unique voice and insight matters – you just have to make them compelling to read. Good luck with your blog post-writing journey!
How to write a blog post FAQ
What is a blog post example?
This article is an example of a how-to blog post. You can also write a listicle, a product review, or an opinion piece. If you need more inspiration, check out these blog examples.
Can you make money from a blog post?
Yes. It’s possible to earn money from a blog post through affiliate marketing, displaying ads, or selling products. If you want to make it a steady income stream, come up with strategies to grow your platform and explore multiple blog monetization strategies.
How long should a blog post be?
There’s no set rule for blog post length. Whether it’s 500, 2,000, or 7,000 words long, what matters most is addressing your audience’s search intent. If your blog post is well-structured and offers added value, readers will engage with it regardless of the word count.

Larassatti Dharma is a Content Writer with 3+ years of experience in the web hosting industry. She’s also a WordPress contributor who loves to share helpful content with others. When she's not writing, Laras enjoys learning foreign languages and traveling. Follow her on LinkedIn


Comments
March 18 2022
Thank you so much Hostinger for a perfect blog for beginners.
March 22 2022
Happy to hear it was useful :)