Minecraft server properties: Optimizing your server

The Minecraft server.properties file stores important settings and configurations that control your Minecraft server’s behavior, performance, and gameplay experience. You can use it to configure game rules, security features, and world customizations to suit your specific preferences.
In this guide, we’ll explain how to access and configure your Minecraft server.properties file using the Hostinger Game Panel and FTP. We’ll also explore how to optimize your settings depending on the gameplay and server performance you want.
What is the Minecraft server.properties file?
The server.properties file is the configuration file that’s automatically generated when you set up a Minecraft server. It contains game difficulty, player limit, and world data options, controlling technical performance and gameplay.
For example, you can define game rules and modes such as Player versus Player (PvP) or the Nether, configure world data settings like spawn protection or seed selection, and set difficulty levels and player limits to enhance player experience.
Beyond adjusting gameplay, the server.properties file plays a role in optimizing security and server performance. Fine-tuning settings such as online mode and whitelisting players increases security while adjusting tick rate, maximum players, and view distance can help you reduce server lag and improve the multiplayer experience, even under a heavy load.
Here’s an overview of what you can control using the server.properties file:
- Game mechanics such as difficulty, player limit, game mode, PvP settings, and spawn locations
- Performance adjustments like tick rate, view distance, maximum players, entity distance, and chunk loading
- World creation and customization, including seed, spawn protection, world border, level type, and biome generation
- Security settings like enabling online mode, whitelisting players, IP banning, spawn protection level, and enforcing game mode
How to access the server.properties file?
To make any changes to your server’s settings, you need to access the server.properties file. You’ll usually find this file in the directory of your Minecraft Java server. This is the same directory where you’ll find your server.jar and other server configuration files like banned-players.json and ops.json.
Depending on where you installed your Minecraft server, you’ll generally find the file in one of two locations:
If you installed the server on your computer:
For locally hosted servers, you can find your server.properties file in the following location:
- Open your file manager (Finder on Mac or File Explorer on Windows).
- Navigate to the directory where you set up your Minecraft server.
- Look for the server.properties file in the same folder as minecraft_server.jar.
If you installed the server on Hostinger VPS:
For servers hosted on a Hostinger Minecraft plan, your server.properties file is found with the rest of your hosted server’s files in the Game Panel’s File Manager. You can also use an FTP client to access the file.
How to access the Minecraft server.properties file through the Hostinger Game Panel
The Hostinger Game Panel provides an intuitive interface, making it easy to access and configure settings directly from your browser without requiring any technical experience.
Follow these steps to find your server’s properties file using Game Panel:
1. Go to the Hostinger website and log into your Hostinger account with your details. You can purchase a Hostinger Minecraft server hosting plan here, too, if you haven’t already.
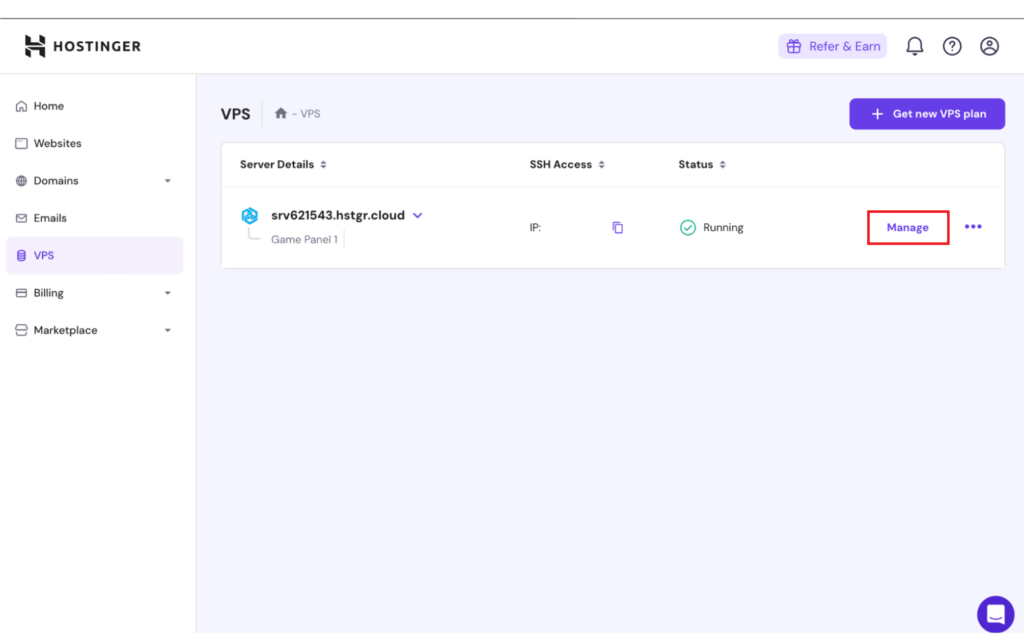
2. Go to VPS from the left-side menu and click Manage to access the Hostinger Game Panel.
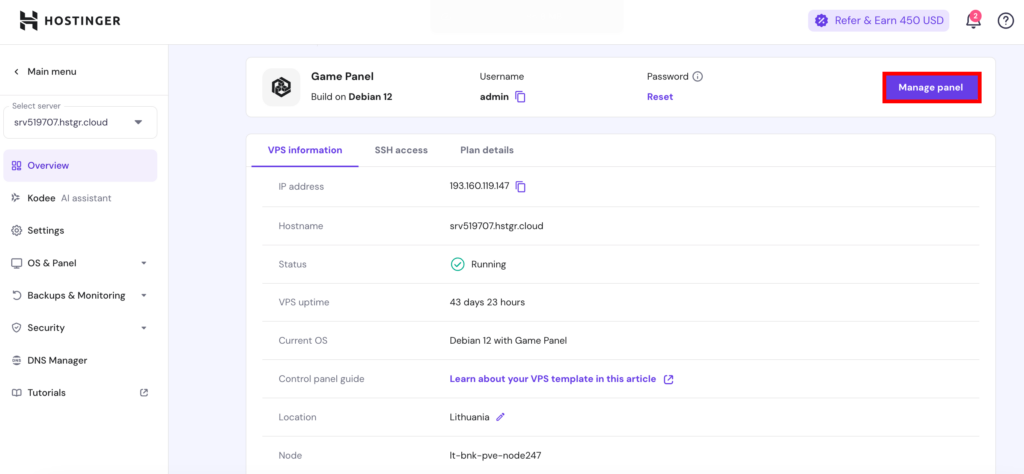
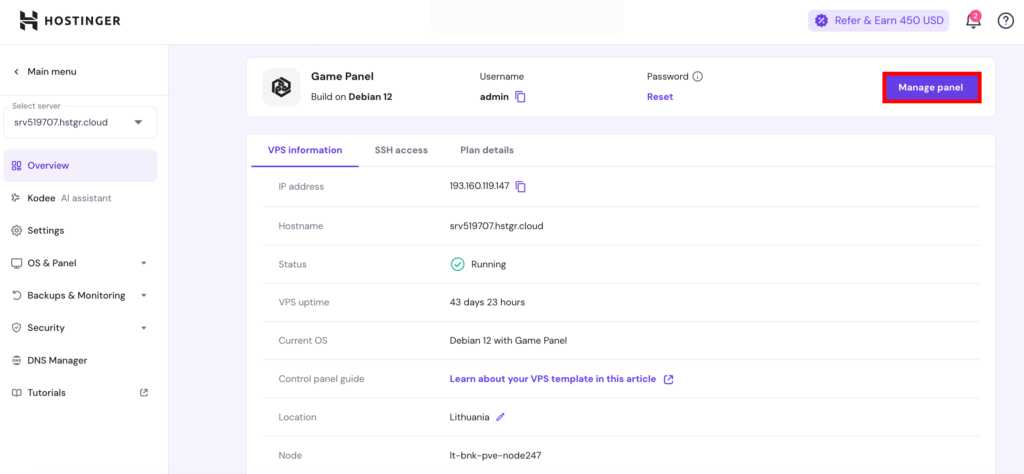
3. Next, click Manage panel, then enter your Username and Password and click Login to enter Game Panel.
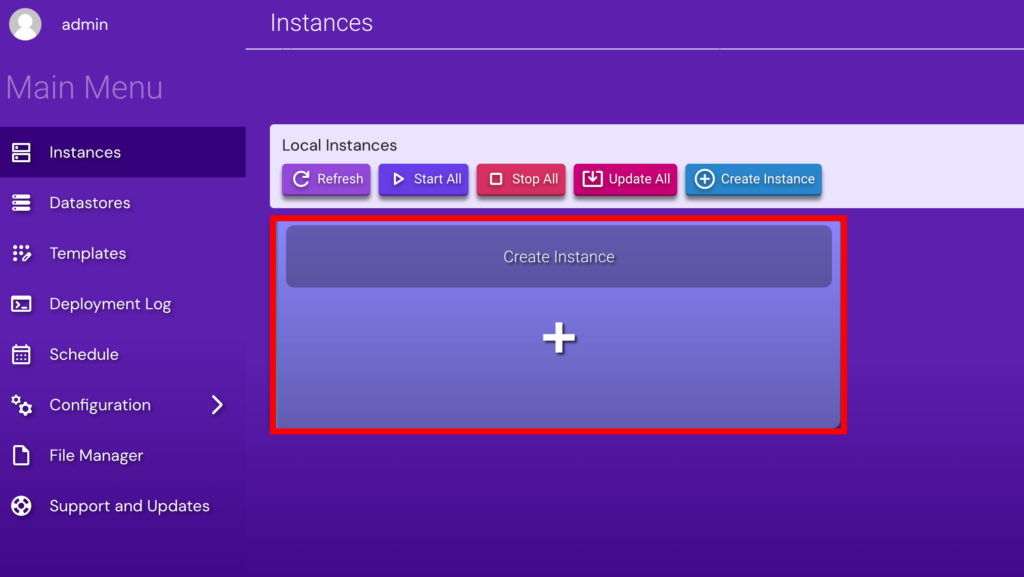
4. Click the plus (+) sign to create a brand-new instance where you’ll install your Minecraft server.
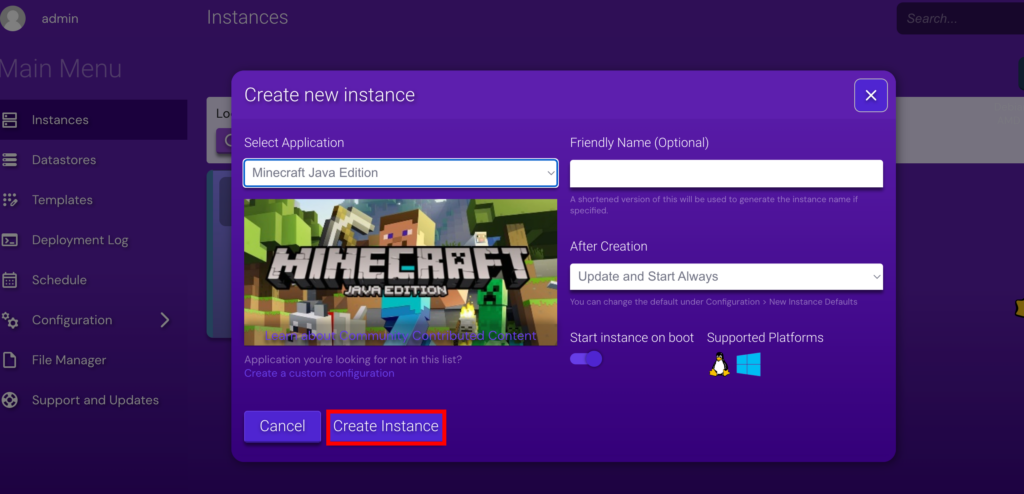
5. From the Select Application drop-down, select Minecraft Java Edition. Then click Create Instance to continue.
Need help getting started? Check out our guide on how to set up a Minecraft server.
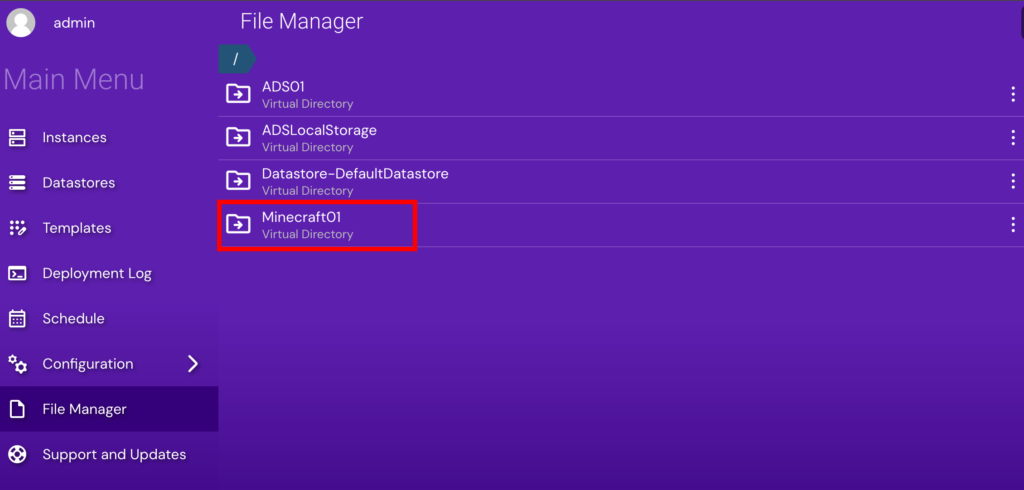
6. To locate the server.properties file, click File Manager in the left-hand menu, and click the directory of the Minecraft instance you created and named.
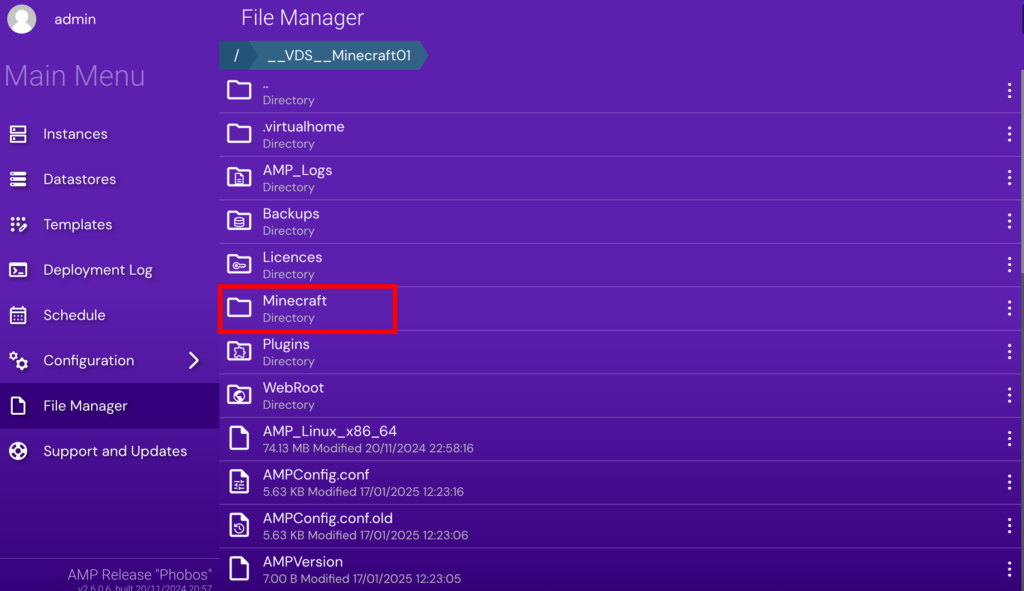
7. In the virtual directory you opened, find and open the Minecraft folder.
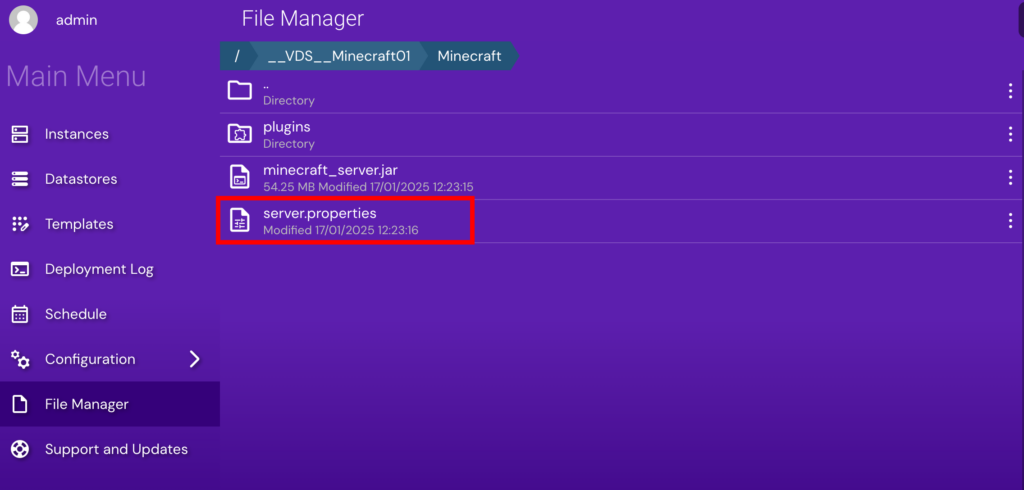
8. Double-click the server.properties file to open it directly in your browser – there’s no need to download it first.
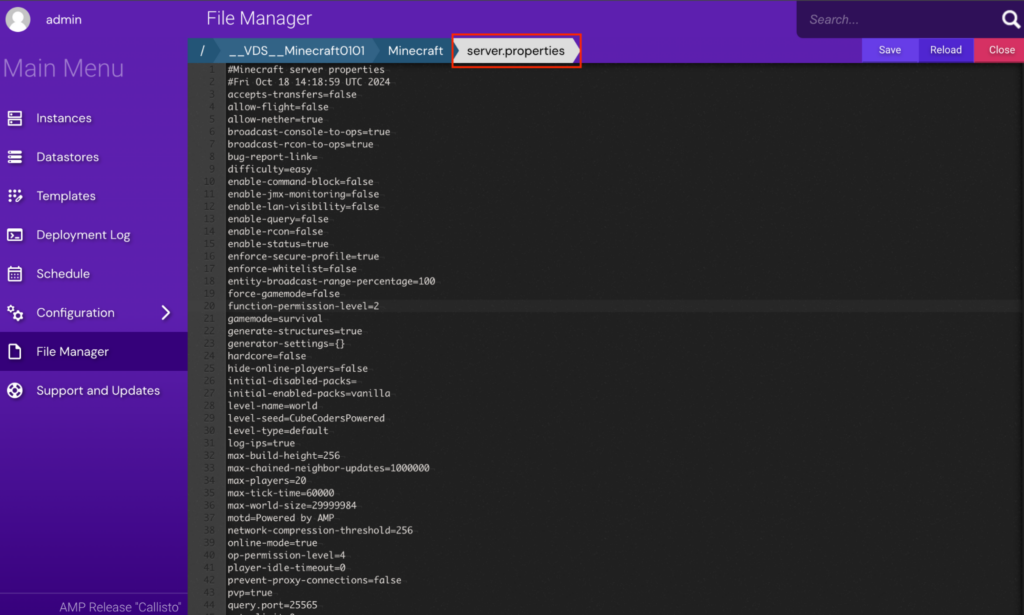
9. Double-clicking the server.properties file opens a text editor where you can make the changes you want, such as tweaking difficulty, changing game mode, or enabling a player whitelist. Be sure to save the file after making the changes.
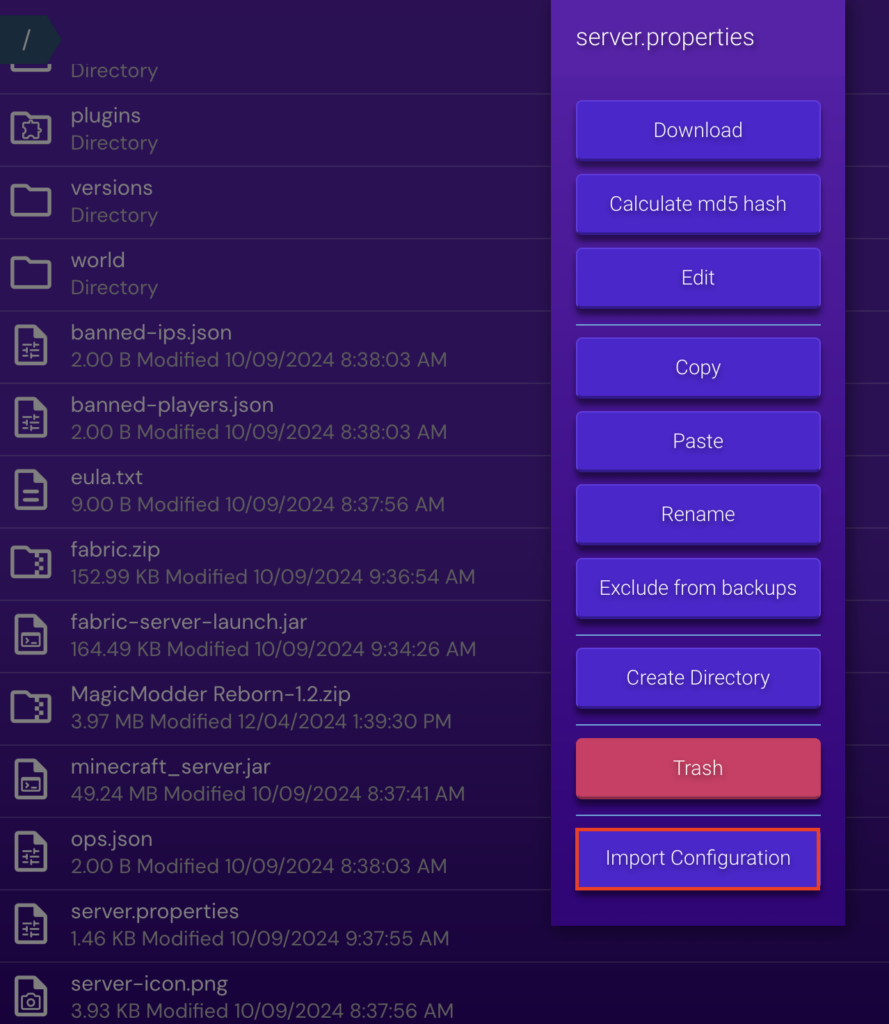
10. After saving your changes, import the configuration to make it the new source of truth for Game Panel. Right-click the server.properites file and select Import Configuration from the options.
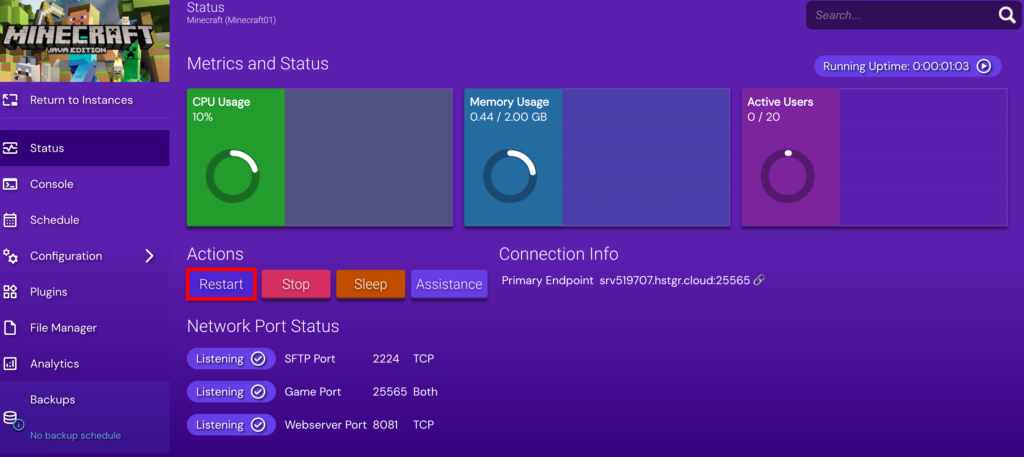
11. Once the configuration is imported, click Instances in the left-hand menu and click Restart to apply the changes you made to your Minecraft server.

How to access the Minecraft server.properties file through FTP
You can also access the server.properties file by configuring an FTP like FileZilla. Here’s how to do that:
1. First, find your connection details in the Hostinger Game Panel. Open your Game Panel by logging into your Hostinger account, then going to VPS in the left-side menu. Click Manage next to your VPS server info, then on the next page, click Manage panel next to your Game Panel information.
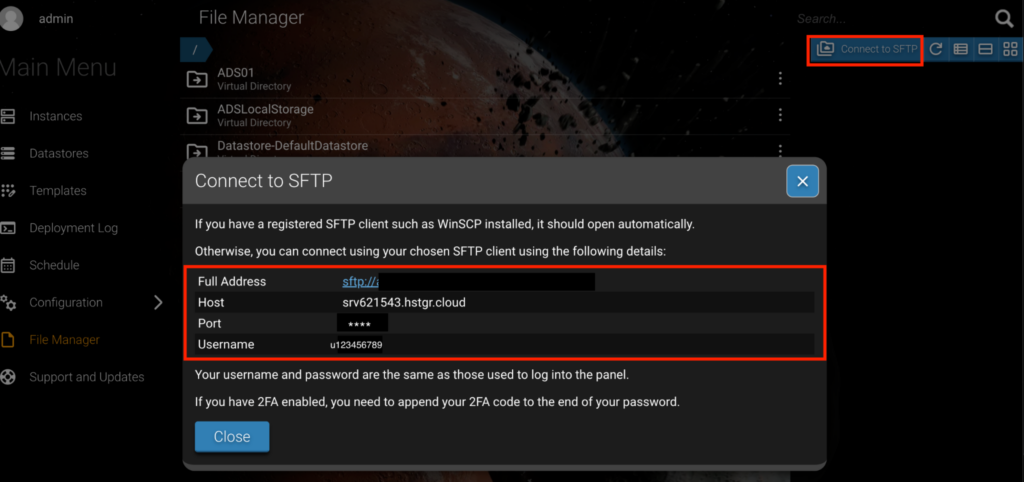
Next, log into your Game Panel and navigate to File Manager in the left-hand menu. Click Connect to SFTP in the top right-hand corner. This opens a new pop-up window with FTP information – keep these details handy for the next steps.
2. Launch your FTP client. We’ll use FileZilla in this step-by-step guide.
3. In FileZilla, connect to your Minecraft server by going to File → Site Manager and clicking New Site.

4. Select SFTP – SSH File Transfer Protocol in the drop-down menu.

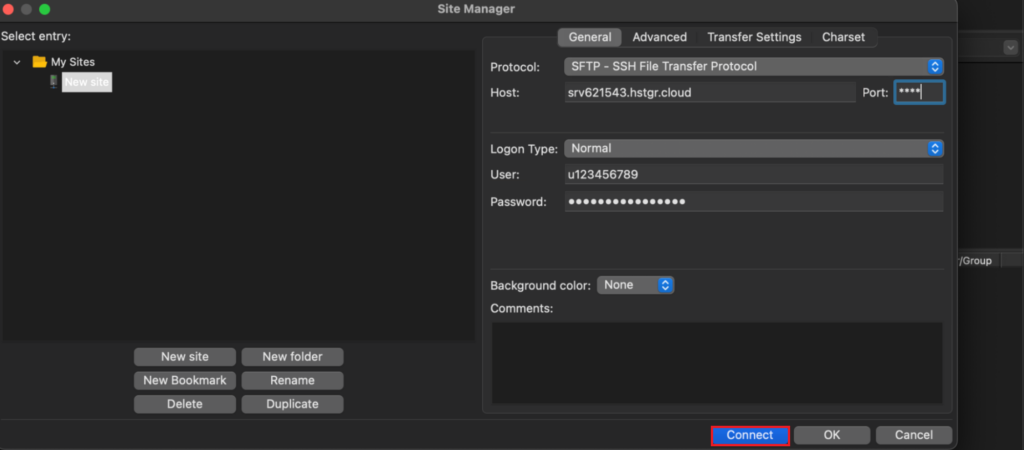
5. Enter your connection details (host, username, password, port, and protocol). Then click Connect.
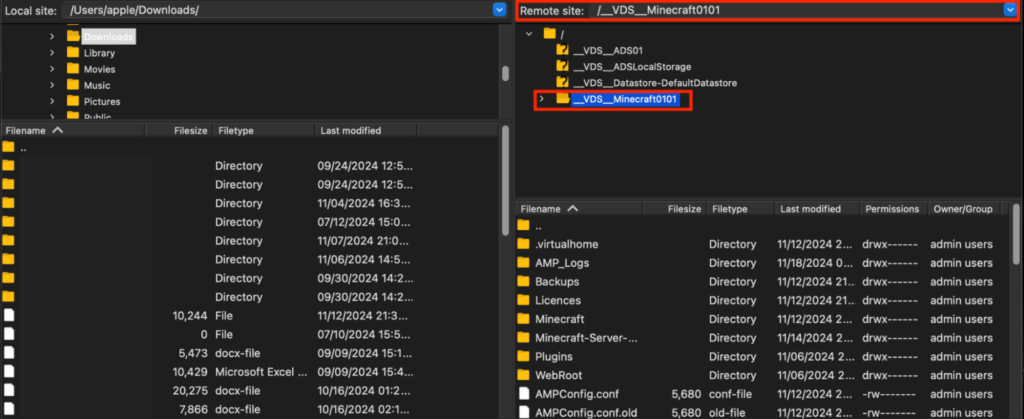
6. Once connected, you should see a directory of all your server files in the right-hand panel (Remote site). Look for a folder named after your Minecraft server or the root directory where the server’s files are located, such as __VDS__Minecraft0101. You should find the server properties file inside.
Key settings in the server.properties file
Now that you’ve located the server.properties file, let’s get into the key server settings and what they control. Here are some of the most important options you can adjust to enhance your server and customize gameplay:
difficulty
The difficulty setting determines how challenging the game is for players. It affects everything from how much damage mobs deal to player hunger depletion rates. There are four difficulty levels: 0 (peaceful), 1 (easy), 2 (normal), and 3 (hard).
max-players
This controls how many players can connect simultaneously. The default is set to 20 players, but you can adjust the number of players depending on your server’s resources. The more players you allow, the more resources (CPU, RAM, and bandwidth) your server needs.
allow-nether
This toggle controls whether or not players can enter the Nether dimension (true or false). It’s advisable to disable it if you’re on a small server to simplify your gameplay.
white-list
When enabled (true), this restricts access to only players whose usernames are on a whitelist. When disabled (false), any player can join, provided they have the server’s IP address and port number. This command is a good option for private or invite-only servers where you want to control access.
To add and remove players from your whitelist or view players who are currently whitelisted, use these in-game commands:
- Add a player to the whitelist:
/whitelist add [player name] - Remove a player from the whitelist:
/whitelist remove [player name] - View all whitelisted players:
/whitelist list
pvp
Use this to enable or disable player-versus-player combat. Setting this to false prevents fighting among players, ensuring peaceful gameplay. Setting it to true allows players to combat each other.
spawn-protection
This setting controls the radius around the world’s spawn point where players cannot destroy or build blocks. It prevents griefing and ensures the spawn area stays intact for new players.
Setting it to 1 protects a 3×3 area around the spawn, 2 protects a 5×5 area, 3 protects a 7×7 area, and so on. Some server admins may want to disable spawn protection entirely (set to 0) to allow experienced players more freedom or to encourage building right from the spawn point without restrictions. This is especially useful for smaller, tight-knit servers.
level-seed
This option allows you to customize world generation by specifying a seed that determines how the Minecraft world looks.
Leaving this field blank means the server generates a seed randomly. Setting a specific seed guarantees the server generates the same world every time. You can check out this list of popular world seeds to find one that matches the experience you’re aiming for.
gamemode
The gamemode setting determines the default mode for new players when they join the server (0 = survival, 1 = creative, 2 = adventure, 3 = spectator). However, this default applies only to new players – server admins can manually change the mode for individual players if needed.
So while this command sets the starting mode, you can have one player in creative mode and another in adventure mode at the same time.
Key Minecraft server properties
| Setting | Values | Description |
difficulty | 0 (peaceful), 1 (easy), 2 (normal), 3 (hard) | Sets the game’s difficulty level, affecting mob damage and behavior |
max-players | Any positive number | Sets the maximum number of players allowed on the server at once |
allow-nether | true or false | Grants or denies players access to the Nether dimension |
white-list | true or false | Restricts access to only players on the whitelist |
pvp | true or false | Enables or disables player vs. player combat |
spawn-protection | Any positive number | Sets a block radius around the spawn where players can’t build or destroy |
level-seed | Any alphanumeric string | Defines the world’s seed, which determines the layout and biome distribution |
gamemode | 0 (survival), 1 (creative), 2 (adventure), 3 (spectator) | Sets the default mode for new players on the server |
How to configure the server.properties file
Configuring the server.properties file is simple once you understand the core settings. Let’s break down how you can update the server.properties file and apply your configurations.
Before you start making changes, always stop your server and create a backup of the server.properties file. This way you can revert to the default settings if something goes wrong.
How to create a backup using the Hostinger Game Panel
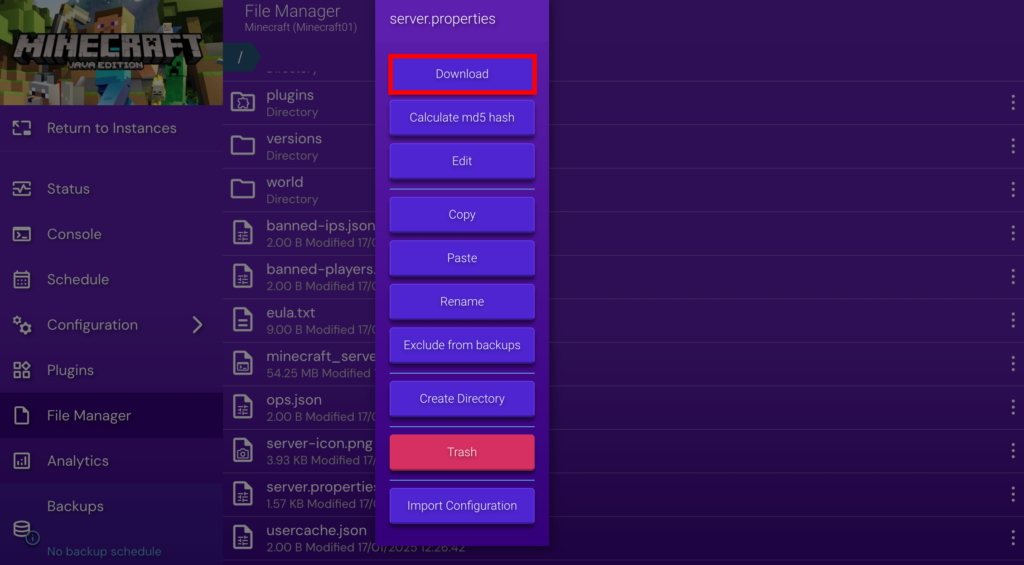
If you’re using the Hostinger Game Panel, open the File Manager in the left-hand menu and right-click on the server.properties file. Select Download to create a backup on your local machine.
How to create a backup using an FTP client
1. If you’re using an FTP like FileZilla, connect to your Minecraft server via File→Site Manager.
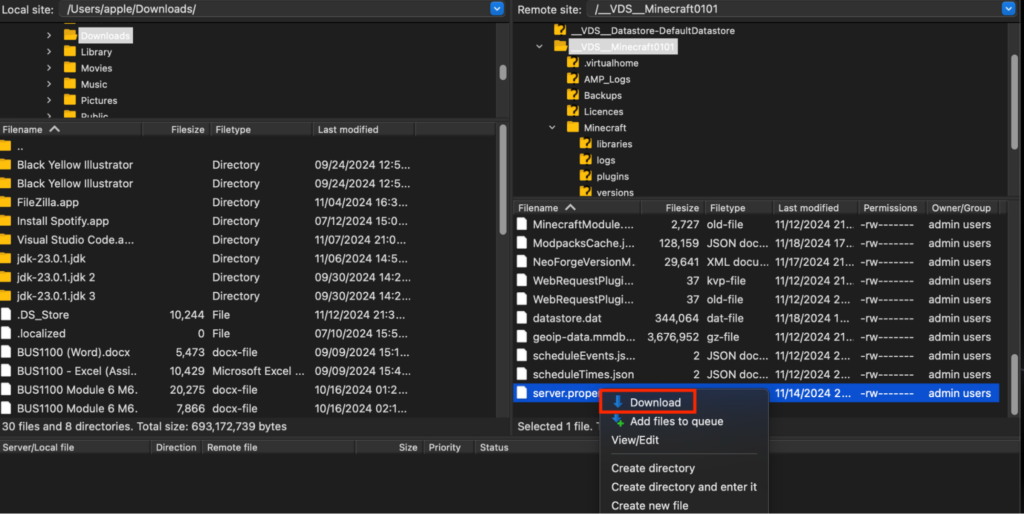
2. Once your Minecraft directory is open on the right-hand side (Remote site), right-click the server.properties and select Download.
Modifying the server.properties file
1. Open the server.properties file from your local download. You can also directly edit the file by opening it in the Hostinger Game Panel’s File Manager or by right-clicking the server.properties file in your FTP client and choosing View/Edit. This opens up your local text editor where you can edit the file.
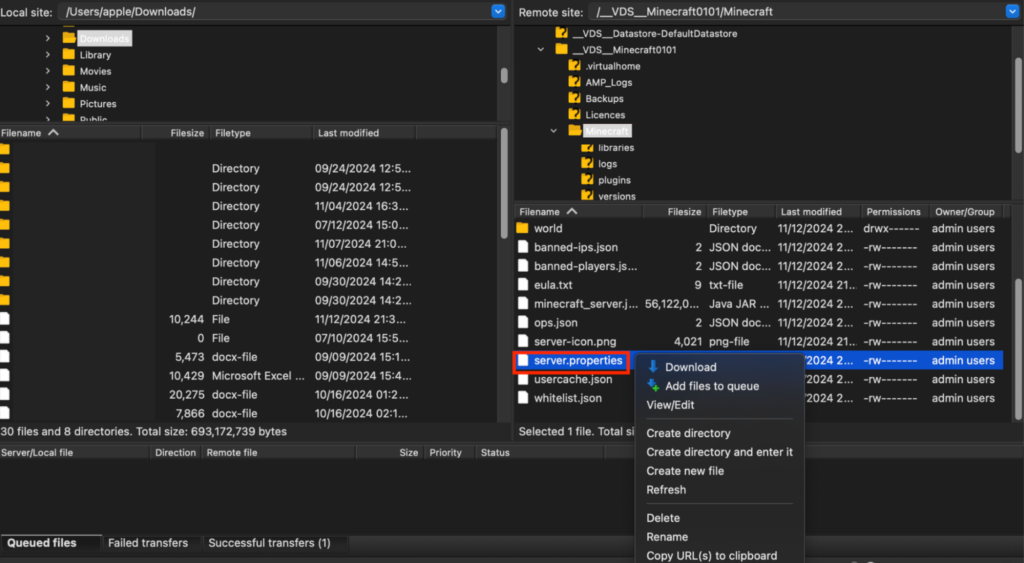
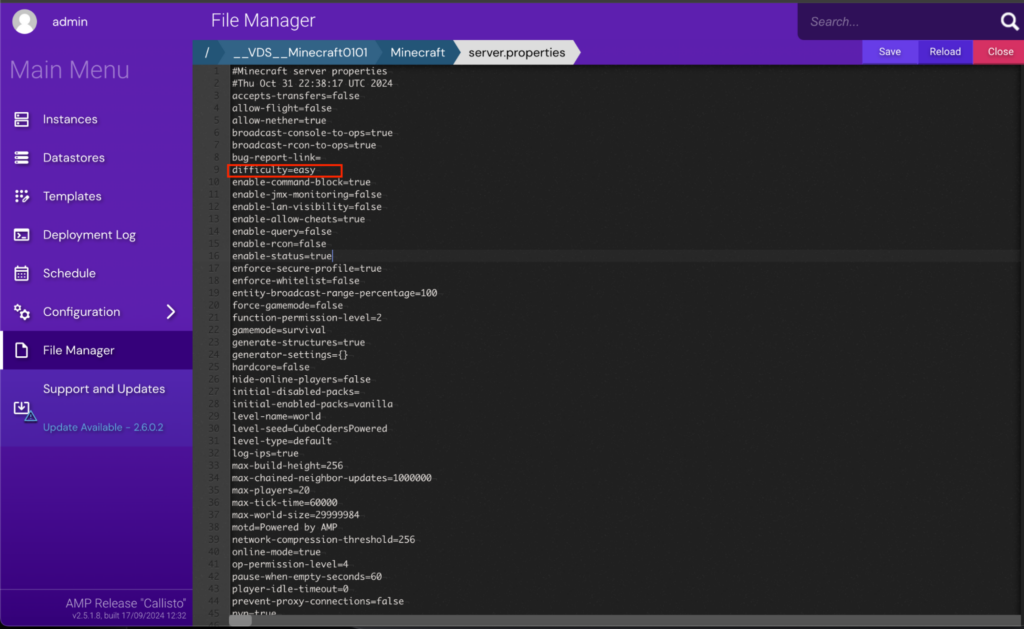
2. Find the properties you want to change. Each property has a key-value pair that controls different server settings. For example, the server difficulty setting looks like this in Hostinger’s game panel:
difficulty=easy
You can change the difficulty value to:
peacefuleasynormalhard
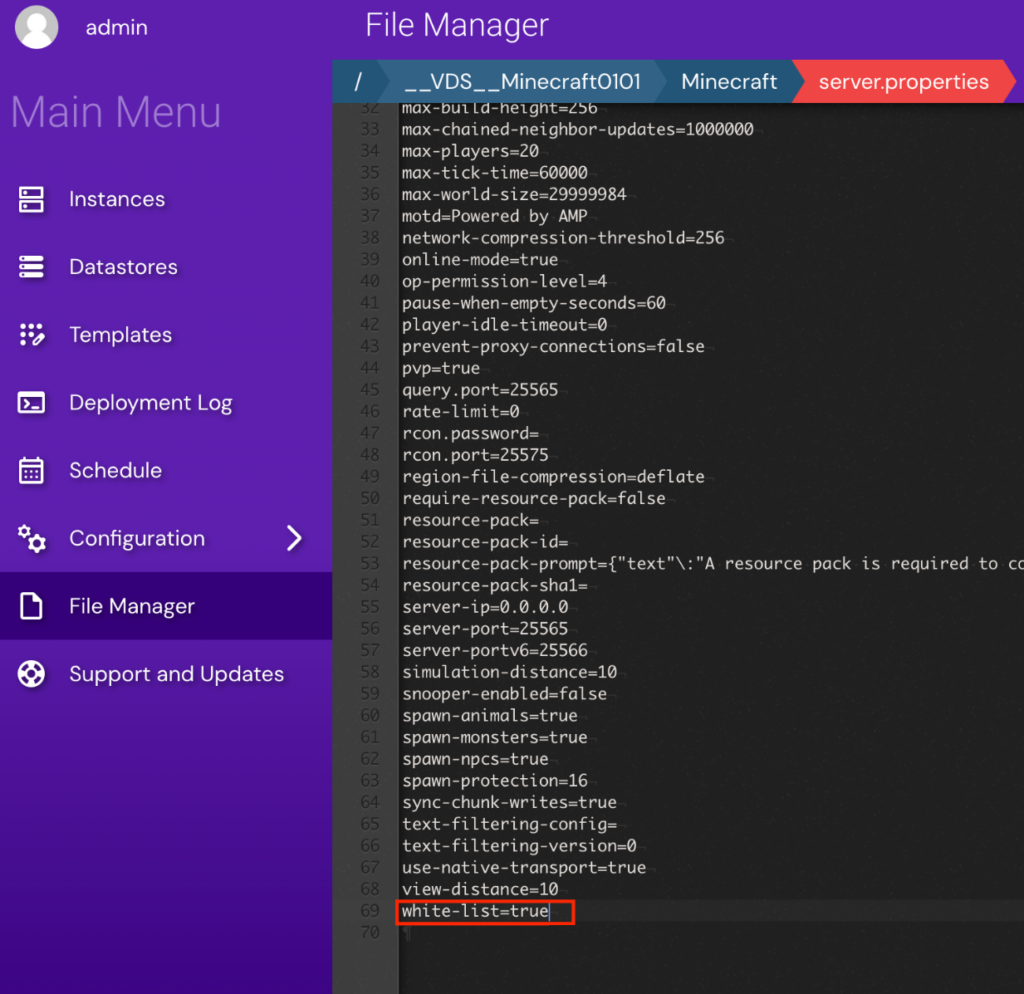
Some properties use a true or false value, like the command that enables or disables a player whitelist:
white-list=true
When the whitelist is set to true, only players on the whitelist can join the server.
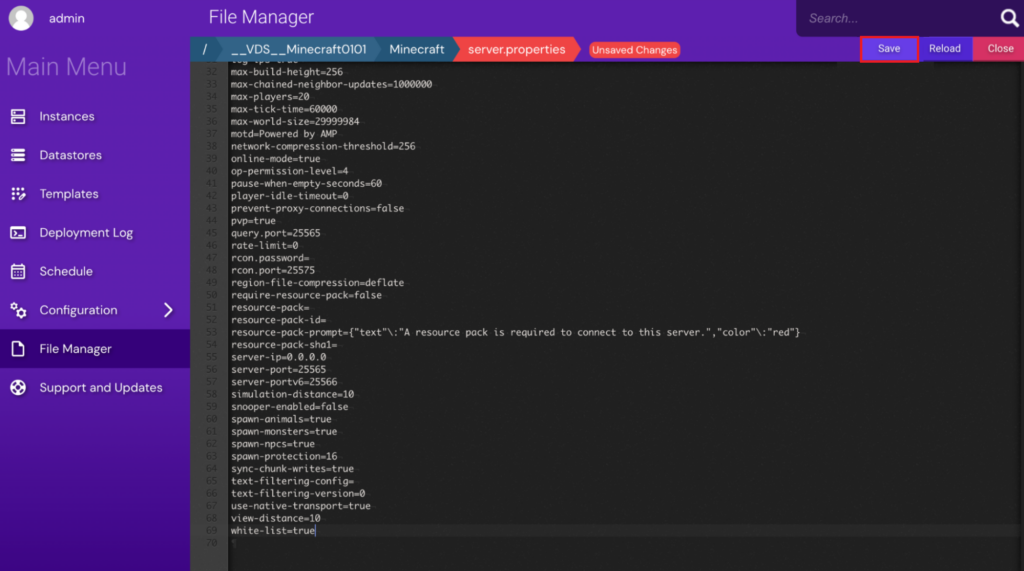
3. Next, save your changes. If you edited your file using the Hostinger Game Panel’s File Manager, simply click Save at the top right to apply changes.
If you edited your server.properties file locally on your computer, you’ll need to upload it back to the server using an FTP service.
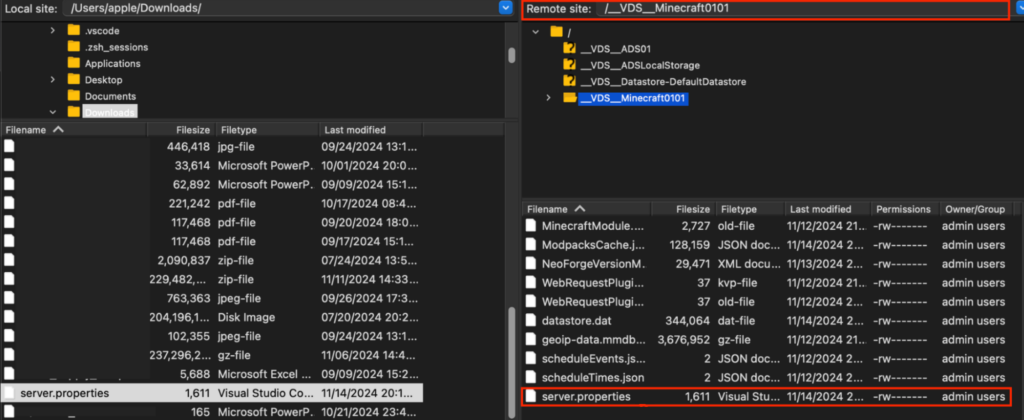
You can do this in FileZilla by dragging the edited file from the Local site (left panel) and drop it into the same folder you downloaded it from on the right panel (Remote site). In our example, that’s the /__VDS__Minecraft0101 folder. Once the upload is complete, FileZilla displays a “Status: File transfer successful” message.
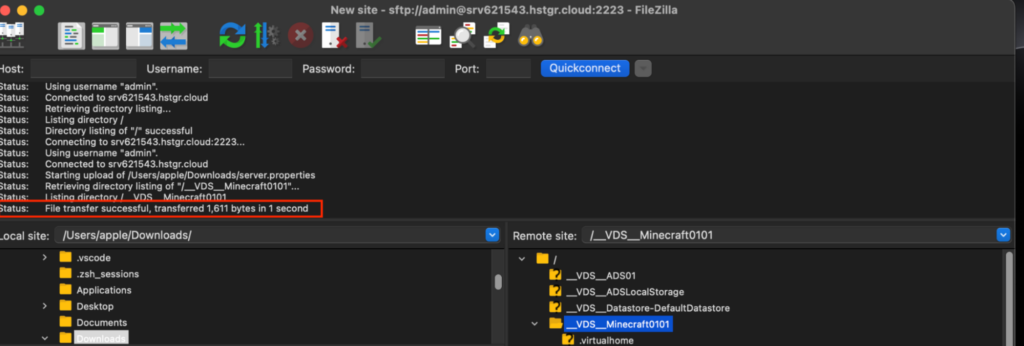
Ensure the file appears in the Remote site panel to confirm it uploaded successfully.
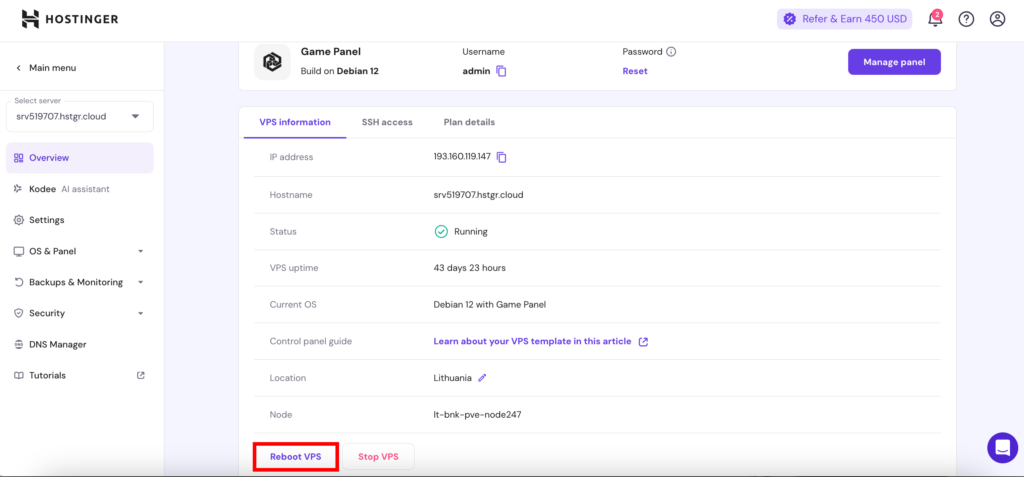
5. Finally, you need to restart your Minecraft server to apply the changes. Log into your Hostinger hPanel and click VPS from the left-hand menu. Click Manage next to your game server.

6. Click Reboot VPS in the game server overview tab.
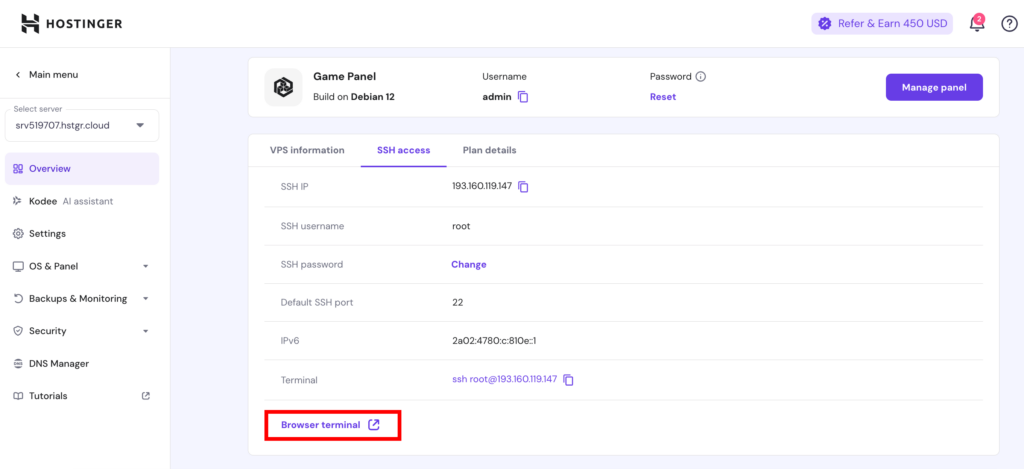
7. Alternatively, you can issue a restart command, systemctl restart minecraft, via the Terminal or Command Line if you have SSH access. SSH allows remote server management, giving you direct control over files and commands.
To access SSH through the Hostinger hPanel, click VPS in the left-hand menu, then select SSH access and click Browser terminal.
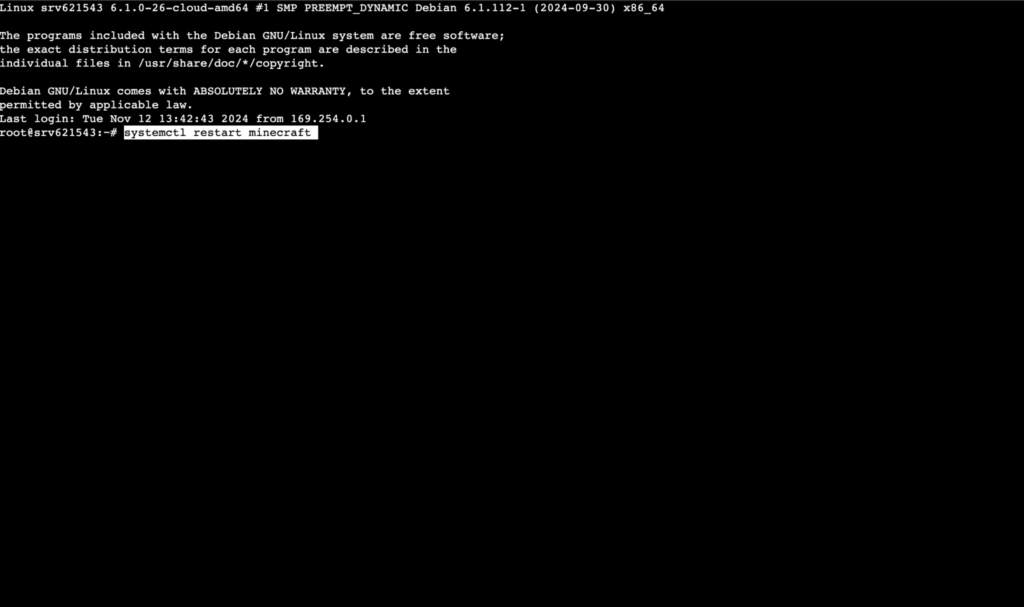
8. In the new browser terminal window, enter systemctl restart minecraft to restart the server.
Access the server console
You can also monitor changes and configurations directly through the server console to ensure everything is running smoothly. Follow these steps to access the server console using the Hostinger Game Panel:
1. Log into your Hostinger account and click VPS in the left-hand menu, then click Manage panel to access the Game Panel.
2. Click Console in the left-hand menu. Opening this lets you see real-time logs and messages from your server.
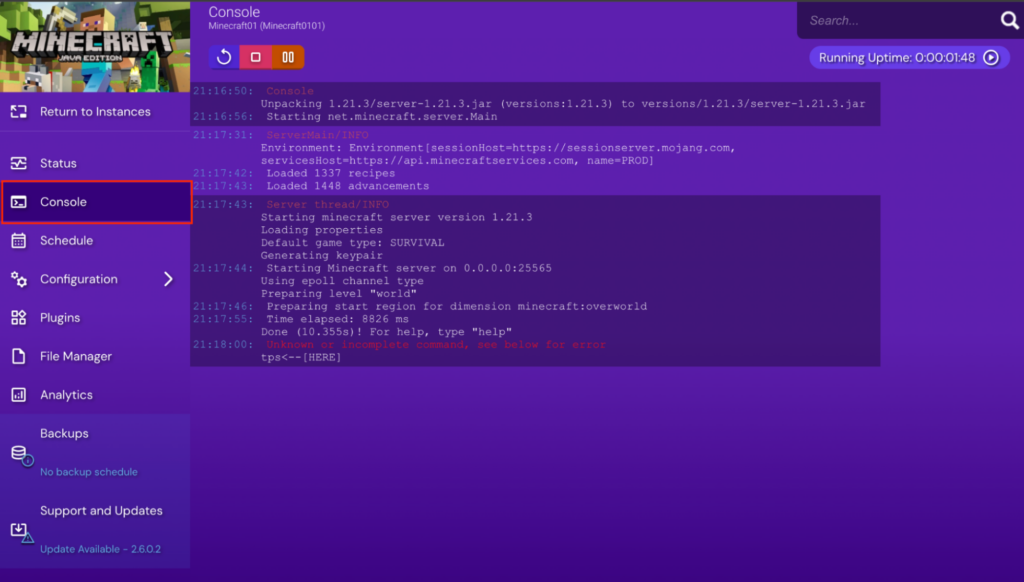
Things you can do in the server console
The server console is your main control center for managing a Minecraft server. It allows you to monitor server activity, troubleshoot issues, and run commands, all without needing to log in as a player.
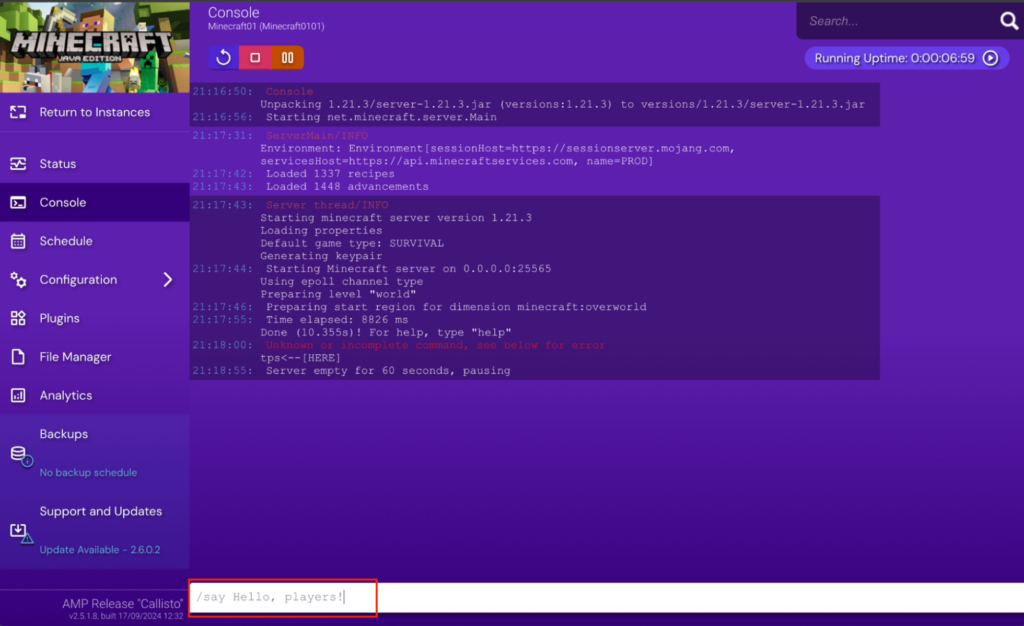
Execute commands: You can type commands directly into the white text box at the bottom of the console. Here are some examples:
/say Hello, players!– Sends a custom message to everyone on the server/give [player] [item] [quantity]– Gives a player an item, such as a command block/save all– Saves the current world to prevent data loss/list– Shows all players currently connected to the server
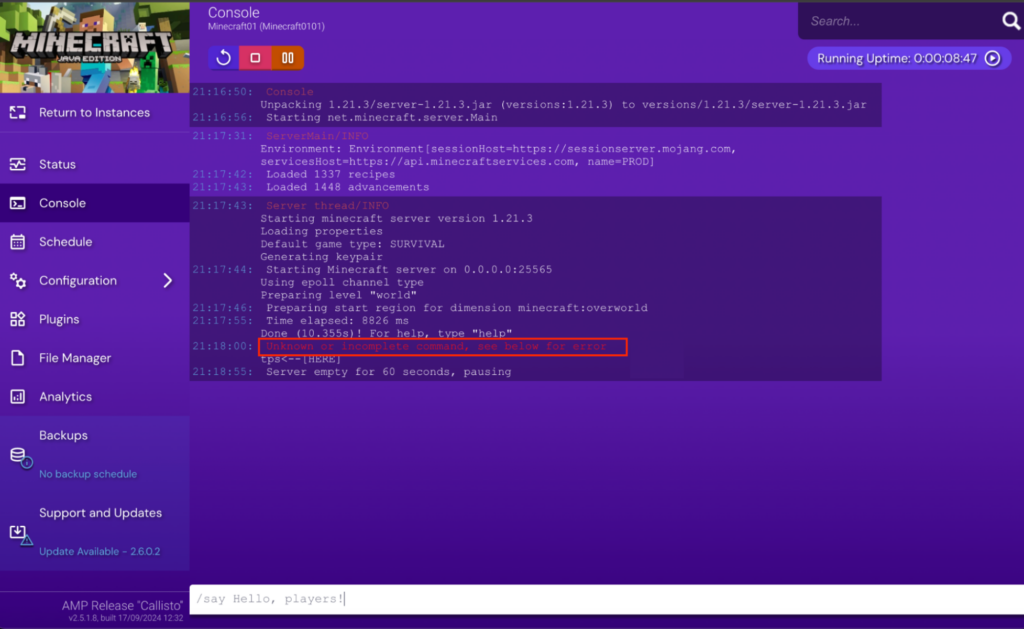
Monitor performance: Keep an eye on the logs for any error messages or warnings. It’s a great way to catch issues before they become bigger problems.
Check server performance: Some hosting services also show you how your server is performing, like CPU and memory usage, which is helpful to know. Others, like Hostinger’s hPanel, display this information in your main server dashboard.
Check configuration changes: After you change anything in your server properties – like switching game modes or enabling cheats – you should see a message in the console confirming that those changes were successful.
Tips for modifying the server.properties file
Here are some key tips to ensure a smooth process while modifying your Minecraft server’s settings:
- Avoid changing too many settings at once, especially if you’re unfamiliar with them. This will help you spot misconfiguration issues quickly.
- Always keep a backup of the file before any major adjustments so you can easily revert to the original when you need it.
- Some settings like
view-distancehave a direct effect on your server’s performance. If you’re not sure about a certain setting, start with the default value and adjust from there.
Examples of Minecraft server configurations
Let’s explore some different configurations you can use depending on the type of server you’re running:
Survival server configuration
gamemode=0

difficulty=normal

max-players=10

pvp=true

spawn-protection=16

white-list=false

allow-nether=true
This configuration sets up a survival mode gameplay experience at a normal difficulty level. It allows up to 10 players to join the server, enabling PvP combat. Players can explore the Nether, adding an extra layer of adventure and challenge.
Spawn protection ensures new players have a safe area to begin their journey while the whitelist feature is disabled, making the server open to everyone.
Creative server configuration
gamemode=1

difficulty=peaceful

max-players=20

pvp=false

spawn-protection=16

white-list=false

allow-nether=true
This configuration enables a creative gameplay mode, allowing players to freely build and experiment without survival constraints. The difficulty is set to peaceful, which means there are no hostile mobs to interfere with creativity.
Up to 20 players can join the server, and PvP is disabled to ensure collaborative gameplay. Players can explore the Nether while spawn protection keeps new players safe.
Roleplay server configuration
gamemode=2

difficulty=easy

max-players=25

pvp=false

spawn-protection=0

white-list=true

allow-nether=true
This configuration sets the server to adventure mode, promoting roleplay with limited item usage. The difficulty is set to easy, allowing 25 players to join, while PvP is disabled for peaceful gameplay.
The whitelist is enabled to ensure only approved players can access the server, and the Nether is enabled for exploration and storytelling.
Optimizing your Minecraft server through the server.properties file
Apart from customizing your gameplay options, you can also optimize your Minecraft server for better performance and security using the server.properties file.
Performance optimizations
To reduce and ensure a smooth experience for all players, here are some settings to focus on:
view-distance
- Recommended value:
6-10
The server-side viewing distance command determines how many chunks the server loads around each player, directly affecting performance. While the default value for view distance is 10, a lower setting like 6 helps reduce the strain on your server.
max-tick-time
- Recommended value:
30000 milliseconds
This sets the maximum amount of time a tick can take before the server considers itself overloaded. In Minecraft, a tick is the game’s internal clock cycle, occurring 20 times per second. The default setting for max-tick-time is usually 60000 milliseconds (60 seconds).
To improve server performance and prevent lag spikes, you can set it to 30000 milliseconds (30 seconds). This is a good balance for most Minecraft servers. However, if you’re running a server with heavy modpacks, consider disabling this limit by setting it to -1. This helps maintain server performance using heavy modpacks.
max-players
- Recommended value:
20
When you limit the number of players that can connect to your server, you help manage the load on the server’s CPU and memory. You can set max-players according to your server’s capacity, but 20 is a good starting value.
Security optimizations
Ensuring your server is secure is just as important as optimizing it for better performance. These are some key settings for improving server security:
white-list
Enable this to restrict access to only trusted players.
online-mode
When you enable this, the server verifies players’ accounts through Mojang’s account database, allowing only players with verified Mojang accounts to access the server and keeping fake accounts out.
op [username]
This command gives the specified player operator (OP) status, allowing them to access special commands and permissions that regular players don’t have. To enhance your server’s security, you can use various server commands alongside op [username]. Implementing these measures helps prevent unwanted players and cheaters from accessing your server:
ban-list:View and manage banned players to keep your server secureenable-status:Allows players to see the server’s status and informationenable-rcon:Enables remote access, allowing server management from outside the gameop-permission-level:Set the permission level for online operators to control their capabilities on the serverprevent-proxy-connections:Block players attempting to connect through proxy servers, enhancing security against potential threats.
Combine these with in-game anti-cheat commands and server.properties settings to help maintain server integrity.
Custom gameplay tweaks
These are the properties to adjust to enhance the experience of players:
pvp
Set pvp=true to allow players to attack each other.
enable-command-block
Setting this to true lets you create custom adventures with commands like teleporting players.
Conclusion
Configuring your Minecraft server.properties file is straightforward. By understanding how to optimize and customize this file, you can improve your players’ gameplay experience. Since these customizations can affect performance, you’ll need a VPS to ensure your server can handle increased traffic.
If you’re using Hostinger’s Minecraft Hosting for your server, you’ll benefit from a 300 Mb/s network and NVMe SSD storage, creating a seamless and high-performance environment that supports almost any server customizations you can think of.
Don’t hesitate to try out different settings in the Minecraft server.properties file to customize your server for players. You can tweak these configurations to allow you to shape the gameplay, performance, security, and atmosphere of your server.
Minecraft server properties FAQ
Where to find server properties in Minecraft?
You can find the server.properties file in the working directory, where you’ll also find the minecraft_server.jar file.
How to reset server properties in Minecraft?
To reset the server properties, you can delete the server.properties file and restart your Minecraft server. This generates a new file with default settings automatically.
Another method is to manually reset specific values by editing your Minecraft server.properties file. It’s also good practice to create a backup of the current file in case you need to revert to your previous configurations.
Can I change the game mode in server properties?
Yes, you can change the game mode in the server.properties file by adjusting the gamemode setting. To change it, open the server.properties file and find the gamemode line. Set the value to 0 for survival, 1 for creative, 2 for adventure, or 3 for spectator mode. Next, save the file and restart your server to effect the changes you made.


