How to install Odoo using Docker on Ubuntu
Odoo is a popular open-source platform that combines Enterprise Resource Planning (ERP) and Customer Relationship Management (CRM) features. It offers 40+ integrated apps, covering various business needs like accounting, inventory management, project management, and ecommerce.
Docker simplifies the process by packaging Odoo and all its dependencies into a single container, ensuring consistent performance across different systems. This makes it easier to manage, deploy, and scale Odoo. It also keeps Odoo separate from other applications on your Ubuntu system, minimizing conflicts and making updates simpler to handle.
This guide will walk you through installing Odoo on Ubuntu using Docker. We’ll show you how to achieve this using two different methods: through Hostinger’s pre-built VPS template for Odoo and manually with Hostinger’s VPS Terminal.
Prerequisites
VPS hosting provides dedicated resources and full root access, allowing you to customize the server environment to optimize Odoo’s performance. This is ideal for businesses with specific needs or those planning to scale over time.
Hostinger’s VPS plans also offer scalable resources, so you can upgrade CPU, RAM, and storage as your Odoo usage grows. This ensures the smooth handling of increased workloads without downtime or complex migrations. And features like automatic weekly backups and real-time snapshots enhance data protection for your Odoo instance.

In short, to install Odoo using Docker on Ubuntu, you need a VPS hosting account with the necessary hardware configuration, SSH access to your VPS server, and a few other software prerequisites depending on your chosen installation method.
Here’s a more detailed breakdown of everything you will need:
- A VPS with at least 2GB RAM and 2 CPU cores (recommended)
- SSH access to your Ubuntu server with root or sudo privileges
- Hostinger’s one-click VPS template for Odoo (if using the automatic method)
- Basic knowledge of Docker and Docker Compose (if using the manual method)
- Docker and Docker Compose already installed on your Ubuntu system (if using the manual method)
How to install Odoo with Docker using Hostinger’s pre-configured VPS template
Hostinger’s pre-configured Odoo on Docker template simplifies the setup process by including Odoo, Docker, and their dependencies. This combines Docker’s containerization benefits with the reliability of VPS hosting for a powerful and efficient Odoo setup.
Here’s how to install Odoo on Docker using Hostinger’s VPS template:
- Log in to hPanel and navigate to VPS → Manage.
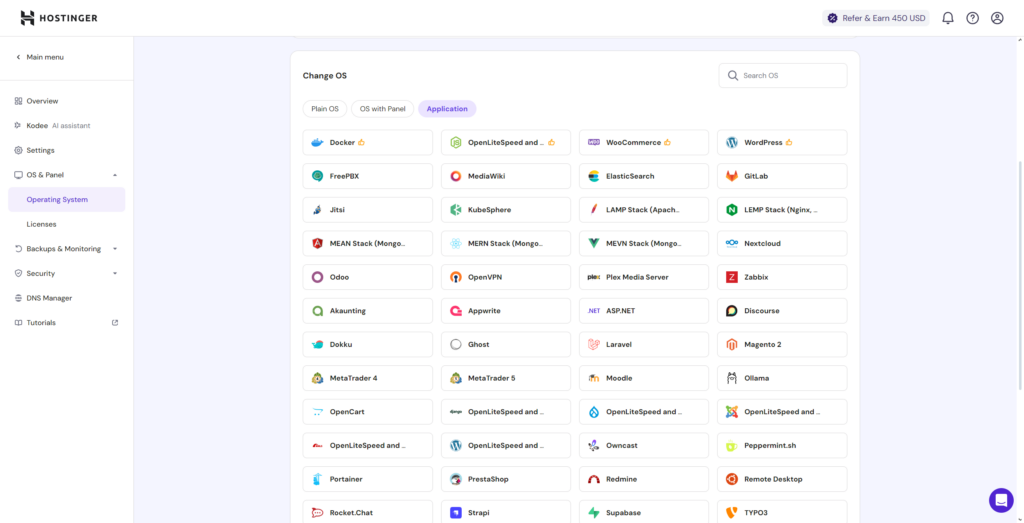
- Go to Settings → OS & Panel → Operating System.
- Select Application. Then, select the Odoo template and click Change OS.
- Tick the box to acknowledge the data deletion. Click Next.
- Enter a new root password for your VPS and hit Confirm.
How to install Odoo with Docker manually
Let’s walk through the steps to install Odoo using Docker. In this guide, we’ll focus on setting it up on Hostinger’s Ubuntu VPS. Keep in mind that to complete these steps, you will need to access your VPS server through Hostinger’s Browser Terminal or connecting to your VPS server via SSH using the terminal on your local machine.
1. Install Docker Compose
To get a head start, we recommend using Hostinger’s pre-configured Ubuntu 24.04 Docker template. This will help you skip past the complex Docker installation process and instead get it ready with just a few clicks. That said, you can also do it manually by following Hostinger’s dedicated Docker setup guide.
The next step to installing Odoo is setting up Docker Compose. This tool makes it easy to manage multi-container Docker applications, which is ideal since Odoo needs both an Odoo container and a PostgreSQL database container.
To install Docker Compose on your Hostinger Ubuntu VPS, start by updating your package list and then install the docker-compose package. Run these commands in your terminal:
sudo apt update

sudo apt install docker compose-plugin
Once installed, check if Docker Compose is set up correctly by verifying its version:
docker compose version
If you see the installed version, the setup was successful!
Important! When using Hostinger’s Docker template, Docker Compose should already be installed on your VPS. To confirm this, you can simply check the version of Docker Compose by running the following command in your terminal docker compose version.
2. Create a Docker Compose file
The next step is to create a Docker Compose file, which will define our Odoo and PostgreSQL services. This file, typically named docker-compose.yml, is a YAML file that specifies the configuration for our containers, including image versions, port mappings, and volume mounts.
First, create a new directory for your Odoo project and navigate into it:
mkdir ~/odoo && cd ~/odoo
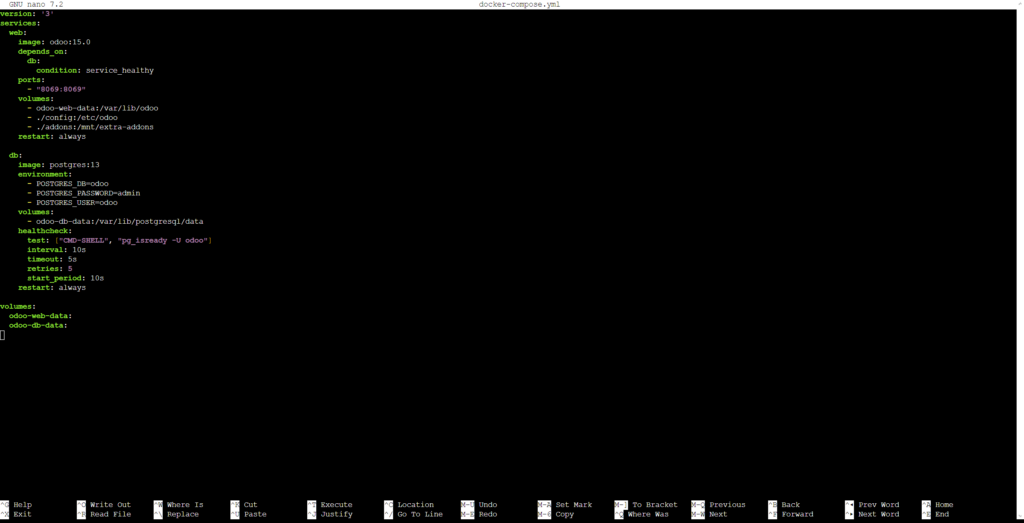
Now, create the docker-compose.yml file using nano docker-compose.yml. Here’s an example configuration:
version: '3.8'

services:

  web:

    image: odoo:15.0

    depends_on:

      db:

        condition: service_healthy

    ports:

      - "8069:8069"

    volumes:

      - odoo-web-data:/var/lib/odoo

      - ./config/odoo.conf:/etc/odoo/odoo.conf

      - ./addons:/mnt/extra-addons

    restart: always

    networks:

      - odoo-net

  db:

    image: postgres:13

    environment:

      - POSTGRES_DB=odoo

      - POSTGRES_USER=${POSTGRES_USER:-odoo}

      - POSTGRES_PASSWORD=${POSTGRES_PASSWORD:-strongpassword}

    volumes:

      - odoo-db-data:/var/lib/postgresql/data

    healthcheck:

      test: ["CMD-SHELL", "pg_isready -U odoo"]

      interval: 10s

      timeout: 5s

      retries: 5

      start_period: 10s

    restart: always

    networks:

      - odoo-net

volumes:

  odoo-web-data:

  odoo-db-data:

networks:

  odoo-net:

    driver: bridge
This configuration sets up two services: ‘web’ for Odoo and ‘db’ for PostgreSQL. It also defines volumes for persistent data storage.
Now, create a .env file in the same directory as your docker-compose.yml file using nano database-credentials.env. Then, paste the following code into the file:
POSTGRES_USER=odoo

POSTGRES_PASSWORD=yourstrongpassword
This will make sure that your database credentials are stored separately from your YML file, to prevent security breaches in production.
Important! Be sure to replace the values for POSTGRES_PASSWORD and POSTGRES_USER with your preferred password and username, since leaving it as it is could pose a security risk in a production environment.
3. Configure Odoo
After creating our docker-compose.yml file, we need to set up the proper configuration for Odoo. Create a directory structure for your Odoo installation and configuration files:
mkdir -p ~/odoo/{config,addons}

touch ~/odoo/config/odoo.conf
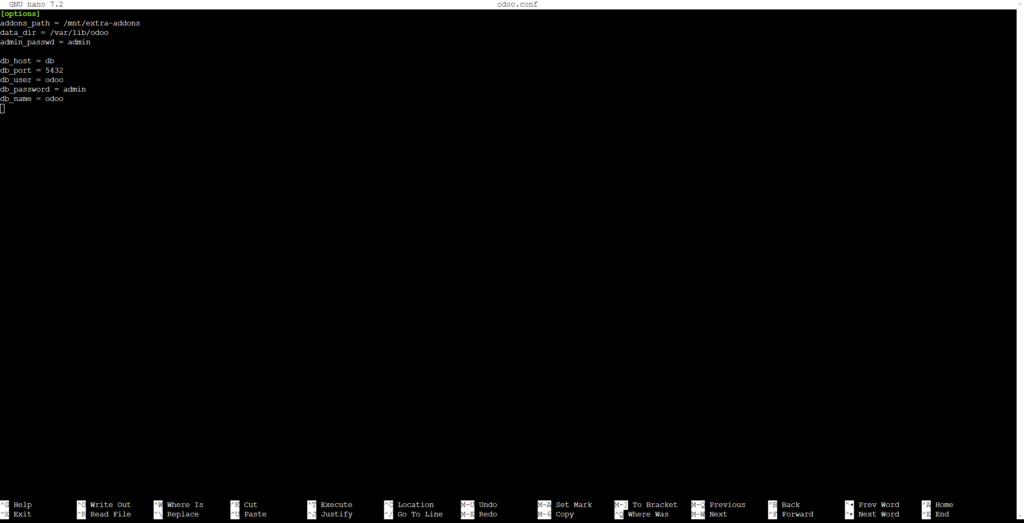
Next, open the odoo.conf file in your text editor and add the following basic configuration:
[options]

addons_path = /mnt/extra-addons

data_dir = /var/lib/odoo

admin_passwd = yourstrongpassword

db_host = db

db_port = 5432

db_user = odoo

db_password = yourstrongpassword

dbfilter = .*
To adjust port mappings and avoid conflicts, you can modify the ‘ports’ section in your docker-compose.yml file. For example, if port 8069 is already in use, you could change it to:
ports:
- "8080:8069"
This would make Odoo accessible on port 8080 of your host machine. But remember to restart your Docker containers per the next steps after making these changes. With these steps completed, you should now have a functioning Odoo installation running on your Ubuntu VPS using Docker.
4. Run Odoo with Docker
Once your configuration files are ready, the next step is to pull the necessary Docker images for Odoo and PostgreSQL.
You don’t need to download them manually – Docker will do it automatically when you start the containers for the first time. The Odoo image includes all the required dependencies and the application, while the PostgreSQL image provides the database backend.
To start the containers, go to your project directory and run the following command to launch them in detached mode:
cd ~/odoo

docker compose up -d
This command will download the images, create the required networks and volumes, and start both the Odoo and PostgreSQL containers in the background. You’ll see progress as Docker pulls the images and sets up the containers.
To check if the containers are running, use the following command:
docker ps
You should see two containers listed: one for Odoo and one for PostgreSQL. The STATUS column should show Up for both, confirming they’re running correctly. If one or both containers aren’t running, use docker ps -a to display stopped containers and troubleshoot any issues.

5. Access Odoo
With the containers running, you can access the Odoo web interface. Open your browser and go to http://your_server_ip:8069, replacing your_server_ip with your VPS’s IP address. If you’ve changed the port mapping in your docker-compose.yml file, use the correct port number.
When you visit Odoo for the first time, you’ll see a database creation screen. Here, you’ll set up your initial database and admin credentials. The master password for managing databases is specified in your Odoo configuration file (the default is often “admin”).
Create your database by entering a name, an email address, and a password for the admin user. You can also decide whether to include demonstration data, which can be helpful for testing and learning.
Once the database is created, you’ll be logged in as the admin user. From there, you can start installing apps, adding users, and setting up your Odoo instance inside the VPS environment.
Make sure to keep your admin credentials secure, as they grant full access to your entire setup.
Conclusion
Installing Odoo with Docker on Ubuntu is an efficient way to deploy this powerful business management tool. By following the steps in this guide, you can quickly set up a production-ready Odoo instance on Docker with your Hostinger VPS.
Docker simplifies deployment by handling dependencies and ensuring consistent performance across different environments. It also makes it easier to back up, update, and scale your Odoo installation as your business grows. Plus, the isolation provided by containers enhances security and stability.
Once you’re comfortable with your Odoo setup, explore its wide range of modules and features. Whether you need tools for accounting, inventory management, or ecommerce, Odoo’s modular design lets you expand your system to fit your business needs.
How to install Odoo with Docker FAQs
Can I run multiple Odoo instances with Docker?
Yes, you can run multiple Odoo instances by creating separate docker-compose configurations with unique port mappings and volume names. Each instance needs its own PostgreSQL container and configuration files to stay isolated and prevent conflicts.
How do I configure Odoo in a Docker container?
You can configure Odoo by using environment variables in the docker-compose.yml file or by mounting a custom configuration file. Create an odoo.conf file and mount it to /etc/odoo/odoo.conf in the container. This allows you to adjust settings like database connections, logging, and server parameters.
How do I update Odoo running in Docker?
To update Odoo, change the image version in your docker-compose.yml file, then run docker compose pull and docker compose up -d. Always back up your data before updating, and check that your custom modules are compatible with the new version.

Ritoban Mukherjee is a freelance tech and innovations journalist from West Bengal, India. His work focuses on reviews, guides, and features about consumer and business software, such as website builders, hosting services, and cloud storage — among other things. He has been published on Tom's Guide, TechRadar, Creative Bloq, IT Pro Portal, Gizmodo, Medium, Quartz, and Mental Floss. Follow him on LinkedIn.

