How to Make a Dedicated Server for Sons of the Forest
Sons of the Forest is a survival horror game where players strive to outlast the dangers on a mysterious island. Hosting your own server for this game offers smoother performance and better control over settings, allowing you to customize the gameplay for you and fellow survivors.
In this article, you’ll learn how to set up a Sons of the Forest server on a Linux virtual private server (VPS) using two different methods: Hostinger’s Game Panel feature and the manual command-line approach. By following our guide, you’ll become ready to create your server for the best possible gaming experience.
Prerequisites
Before setting up your dedicated server for Sons of the Forest, it’s crucial that your system meets the prerequisites. This game doesn’t have official system requirements, but we’ve created this list based on the resources needed to run the server.
- Operating system. Major Linux distributions, Windows 10 or newer, and Windows Server 2016 or later.
- CPU. A minimum dual-core Intel or AMD processor, while a quad-core processor can deliver better performance.
- RAM. At least 8 GB.
- Storage. A minimum of 12 GB of free space.
Additionally, make sure you have a stable internet connection to download the Sons of the Forest server files.
For players installing the dedicated server on a Linux VPS, we suggest having a basic understanding of secure shell (SSH) and Linux commands. These skills are fundamental for remote server setup and management.
How to Set Up a Sons of the Forest Dedicated Server Using Hostinger’s Game Panel
Using Hostinger’s Game Panel is the simplest way to install your Sons of the Forest dedicated server. Available with all our game hosting plans, this intuitive tool allows you to install your game server with just a few clicks.
This method is particularly suitable for beginners or players unfamiliar with the manual setup process. Here’s how you can set up your Sons of the Forest server using Hostinger’s Game Panel:
- Choose a plan that suits your needs. For Sons of the Forest, we recommend the Game Panel 2 plan, which includes a dual-core AMD processor, 8 GB of RAM, and 100 GB of disk space.
- After completing your purchase, follow the onboarding instructions to select a server location close to your player base and create a strong password for your Game Panel profile.
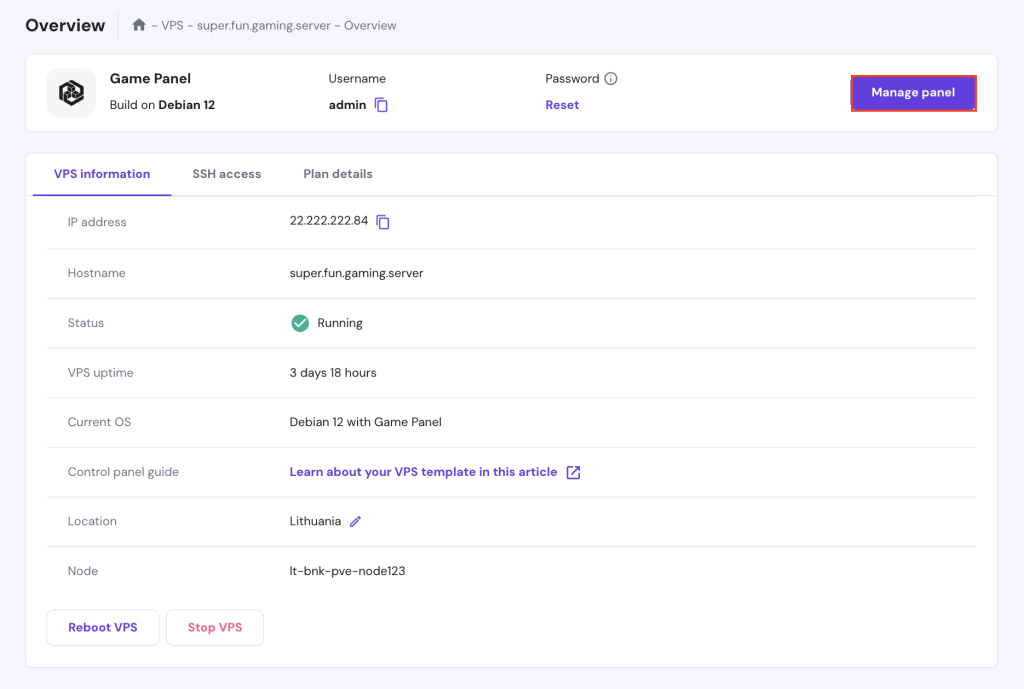
- Navigate to your VPS dashboard and go to the top menu. Click the Manage panel button to open Game Panel.
- Enter your username and password on the login page.
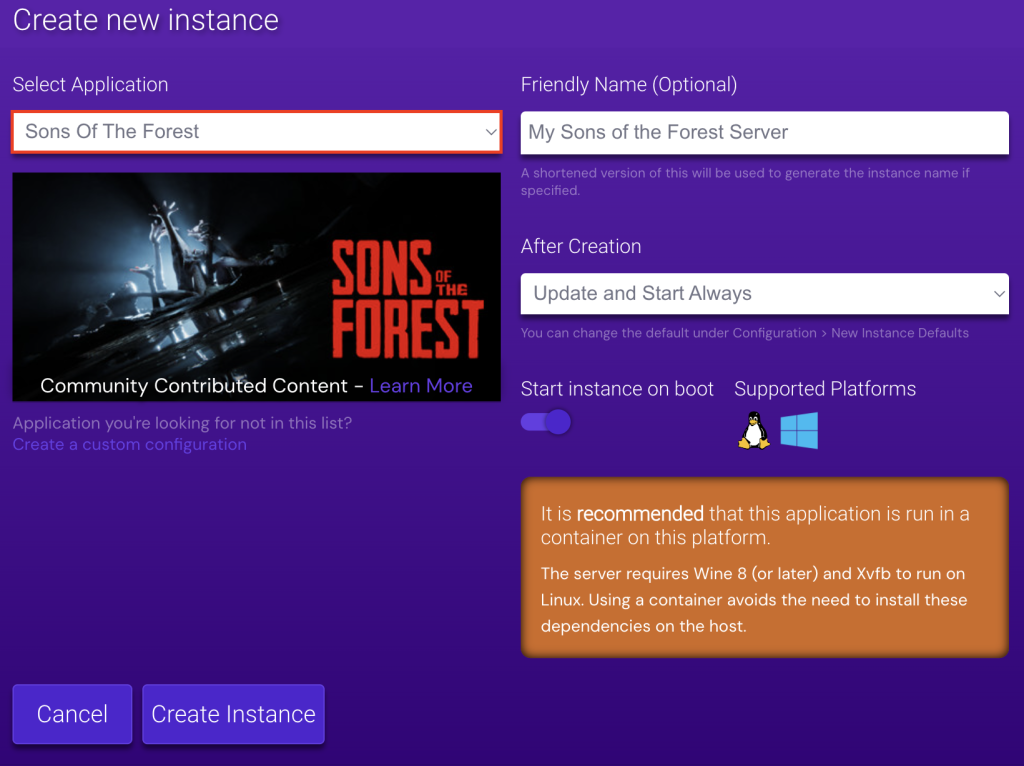
- Once logged in, select Create Instance and choose Sons of the Forest from the drop-down menu. Assign a name to your server and click Create Instance.
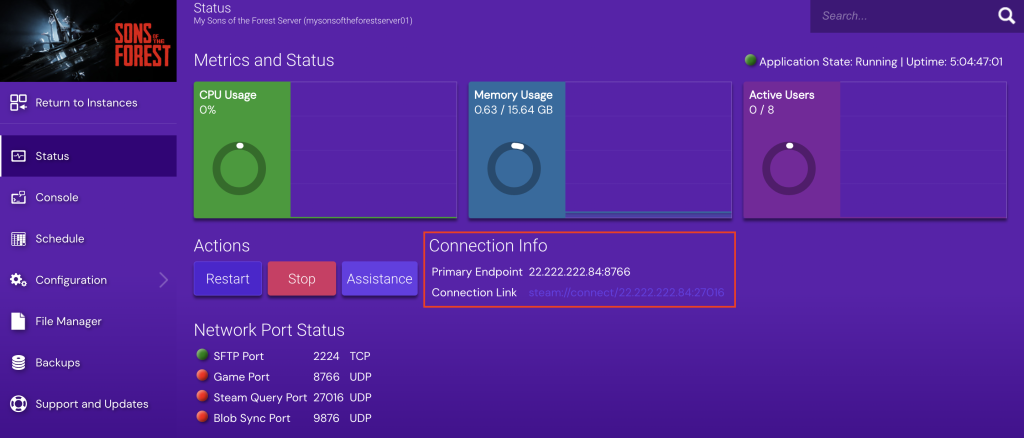
- After the installation is complete, double-click the newly created instance and look for the Connection Info section. Here, you can find the server’s IP address and port for players to join your game server.
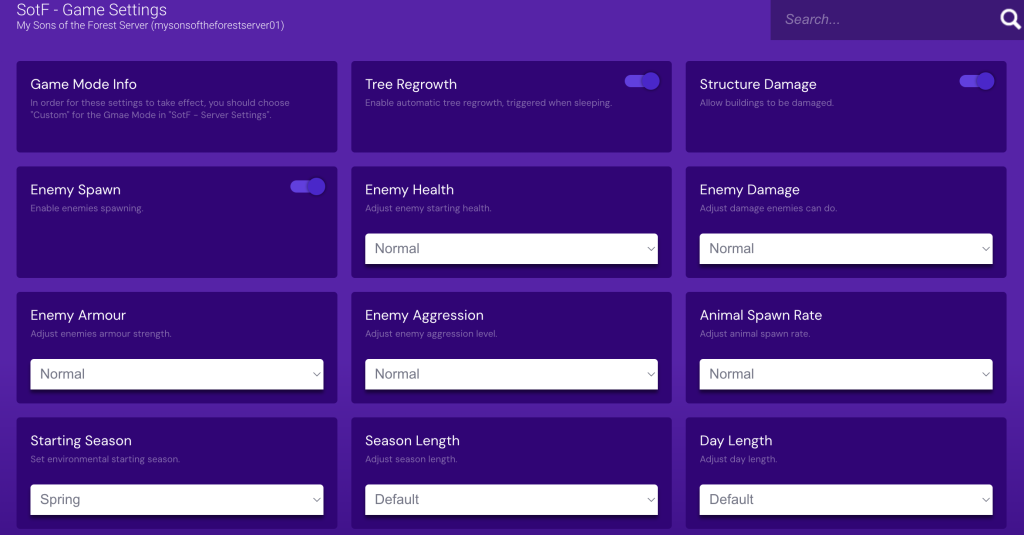
- To customize the gameplay, such as starting season and enemy strength, navigate to Configuration → SotF – Game Settings.
- Go to the SotF – Server Settings menu to configure server-related options, such as server name and maximum number of players allowed.
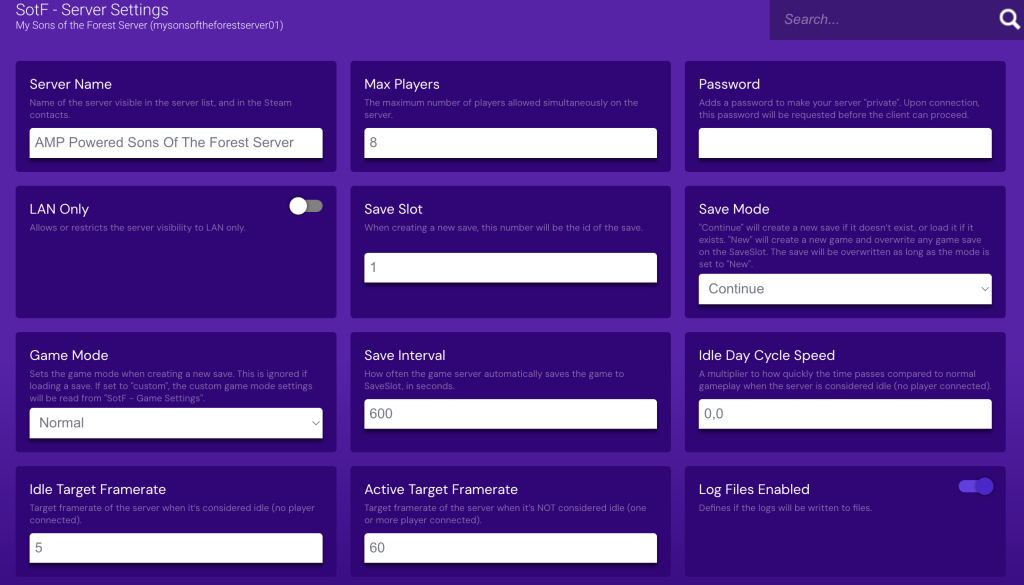
Congratulations on successfully setting up your Sons of the Forest dedicated server. You’re now ready to explore and survive on the mysterious island of Sons of the Forest with your friends.
Suggested Reading
Did you know that Game Panel allows you to install multiple game servers under one account? Check out our curated list of the best games to install on dedicated servers, including Minecraft, Palworld, and Counter-Strike 2.
How to Make a Dedicated Server for Sons of the Forest Manually
Players who prefer a hands-on approach or require custom server configurations can choose the manual method. In this tutorial, we use Debian 12. Please note that the commands may vary with other Linux distributions.
1. Choose the Right Gaming VPS Provider
Choosing the proper gaming VPS provider is crucial for a seamless and responsive gaming experience. Consider the following factors when selecting a provider:
- Performance. Look for high CPU speeds and sufficient RAM to handle the game’s requirements.
- Storage. NVMe SSDs are preferred for faster data access and game load times.
- Server Locations. Choose a provider that offers multiple hosting locations globally.
- Access and Control. Ensure full root access is available to control your server completely.
- Scalability. Select a provider that allows you to upgrade your plan according to your needs.
As the leading game server hosting provider, Hostinger excels in all these areas, making it an ideal choice for your Sons of the Forest dedicated server.
Our game hosting plans offer up to 8-core AMD CPUs, 32 GB RAM, and 400 GB NVMe storage to enhance your server’s performance. You can choose servers in Europe, Asia, North America, and South America, ensuring low latency for players worldwide.
Since our plans are based on VPS technology, you’ll have full root access. This level of control lets you tailor your hosting environment to meet specific needs, such as installing custom mods.
Hostinger’s game hosting service is also scalable, allowing your server to grow with your gaming community. This is particularly valuable as your player base expands or if you want to host servers for other games.
2. Set Up Your Gaming VPS
Once you choose your hosting provider, it’s time to set up your gaming VPS. Follow this guide to ensure your server is ready for Sons of the Forest:
- Open any terminal application on your own computer and access the server using SSH. Replace username and ip_address with your actual credentials:
ssh username@ip_address
- Once logged in, run the following commands to ensure all your dedicated server software is up-to-date:
sudo apt update

sudo apt upgrade
- Some software packages that are not available in the default repositories may be needed. Install these by running the following:
sudo apt install software-properties-common lsb-release wget gcc-multilib lib32z1
- Configure your system to access all necessary components, including 32-bit ones:
sudo add-apt-repository non-free

sudo dpkg --add-architecture i386

sudo apt update
- If you have the Uncomplicated Firewall (UFW) installed on your server, ensure to open the default ports for Sons of the Forest with these commands:
sudo ufw enable

sudo ufw allow 8766/udp

sudo ufw allow 9700/udp

sudo ufw allow 27016/udp
3. Install Wine
Since Sons of the Forest currently lacks native Linux support, you need to use Wine to run the game server as if it were on Windows.
Here’s how to install Wine on your server:
- Create a dedicated folder to store keyrings for Wine:
sudo mkdir -pm755 /etc/apt/keyrings
- Add the repository key to ensure the packages are authenticated and thus secure:
sudo wget -O /etc/apt/keyrings/winehq-archive.key https://dl.winehq.org/wine-builds/winehq.key
- Tailor the WineHQ source list to your system:
sudo wget -NP /etc/apt/sources.list.d/ https://dl.winehq.org/wine-builds/$(lsb_release -is | tr '[:upper:]' '[:lower:]')/dists/$(lsb_release -cs)/winehq-$(lsb_release -cs).sources
- Now that your system recognizes the repository install Wine using the following:
sudo apt update

sudo apt install wine
- Install additional modules to enhance Wine’s compatibility and functionality for gaming:
sudo apt install cabextract winbind xvfb screen
4. Install and Configure SteamCMD
Next, you need to install SteamCMD. It’s a command-line tool of the Steam client for downloading, installing, and updating game server files without using the Steam graphical interface.
Follow these steps to install and configure SteamCMD on your Debian VPS:
- Execute this command to install SteamCMD:
sudo apt install steamcmd
- Since it’s not recommended to run this tool as an administrator, create a new user account named steam for this purpose:
sudo adduser steam
- Switch to this steam user:
sudo su - steam
- You should now be in the newly created user’s home directory. This will be the base for running your game server.
- Optionally, create a symbolic link in the steam directory to make SteamCMD easily accessible:
ln -s /usr/games/steamcmd steamcmd
5. Install and Launch the Sons of the Forest Server
With SteamCMD configured, it’s time to install and launch the Sons of the Forest server. Here are the steps to get your server up and running on Linux:
- Use SteamCMD to download and install the server files:
steamcmd +@sSteamCmdForcePlatformType windows +force_install_dir /home/steam/sotf_server +login anonymous +app_update 2465200 +quit
- Navigate to the server directory where the files are installed:
cd ~/sotf_server
- Start the server using Wine:
xvfb-run --auto-servernum --server-args='-screen 0 640x480x24:32' wine SonsOfTheForestDS.exe -batchmode -nographics -savefolderpath "saves" -configfilepath "config"
- It’s normal to see some errors and warnings in the output. This occurs because Wine is adapting the game’s Windows-based graphical elements to a command-line Linux environment. Make sure these lines appear to confirm that your server is running:

- When you need to stop the server, press Ctrl + C.
Please note that the command above runs the server as a foreground service, meaning it will stop if the terminal session is closed. To keep your server running in the background of your SSH sessions, proceed to the next step.
6. Configure the Server to Run in the Background
Screen is a terminal multiplexer used to run processes in the background and manage multiple terminal sessions from a single window. Since you’ve installed Screen in Step 3, here’s how to use it to keep your Sons of the Forest server operating:
- Start a new Screen session by typing:
screen -S sotf
- Run the server without specifying the saves and config directory inside the Screen session:
xvfb-run --auto-servernum --server-args='-screen 0 640x480x24:32' wine SonsOfTheForestDS.exe -batchmode -nographics -savefolderpath "saves" -configfilepath "config"
- Detach from the Screen session and return to your main terminal without stopping the server by pressing Ctrl + A → D.
7. Connect to the Server
Now that your Sons of the Forest dedicated server is up and running, the final step is for players to join it. This step applies to both Hostinger’s Game Panel and the manual method. Here’s how:
- Launch the Sons of the Forest game client and select MULTIPLAYER → JOIN.
- Change the SOURCE option to DEDICATED.
- Type your server name in the FILTER field.
- Your server should appear on the multiplayer server list. Click JOIN, and you’ll start with the helicopter crash site scene.
You’ve manually created your own Sons of the Forest dedicated server. Now, invite your friends or fellow gamers to join and enjoy the thrilling experience together.
Conclusion
In this guide, you’ve learned how to install the Sons of the Forest dedicated server using Hostinger’s Game Panel and manually. Both approaches offer unique advantages, whether for ease and simplicity or complete control and customization.
Now that your server is operational consider customizing it further to meet the changing needs of your community. You can adjust UDP ports or modify the server config files to fine-tune performance and gameplay.
Have fun exploring, surviving, and building in Sons of the Forest with fellow gamers around the world.
Sons of the Forest Dedicated Server Setup FAQ
This section will answer the most common questions about Sons of the Forest servers.
What Ports Should Be Opened for the Sons of the Forest Dedicated Server?
For a Sons of the Forest dedicated server, it’s important to open these specific ports: 8766 for the game port, 9700 for the blob sync port, and 27016 for the query port.
How Can I Manage Player Access and Permissions on a Dedicated Sons of the Forest Server?
To manage player access and permissions on a Sons of the Forest dedicated server, you can manually edit the server’s config file. For Hostinger users, open Game Panel’s Game Settings and Server Settings menus to customize these options.
Is It Possible to Run Mods on a Dedicated Server for Sons of the Forest?
Yes, it’s possible to run mods on a Sons of the Forest server on Windows. However, since the game lacks native Linux support, you’ll need compatibility layers like Wine to install mods on a Linux server.


