What Is DNS: A Comprehensive Guide to How It Works

Much like a phone book, a domain name system (DNS) bridges the communication gap between humans and computers by matching domain names to their respective Internet Protocol (IP) addresses.
In this in-depth guide, you’ll learn more about what DNS is, how DNS works, the definition of domain nameservers, and how to change them.
Each domain name has a DNS zone that links it to DNS servers, so we’ll cover how you can edit your DNS zone as well. Finally, we’ll go over what DNS propagation and DNSSEC are.
Download glossary for web beginners
Video Tutorial on What Is DNS?
If you want to know an in-depth explanation of what is a DNS and how it works, watch the video below.

What Is DNS?
A DNS or a domain name system is used to translate domain names into IP addresses, allowing the browsers to access other internet resources.
How Does DNS Work?
When users enter a domain name into the address bar of their web browser, they will be taken to the site they want to visit. However, this seemingly instant task consists of several steps known as the DNS lookup or DNS resolution process.
Here’s an example of what the DNS resolution process is typically like to illustrate better how DNS works.
You want to be taken to Hostinger’s website, so you enter the domain name hostinger.com into the web browser’s address bar. What you’re doing here is submitting a DNS request.
Next, your computer will check whether it already stored a DNS entry of the domain you submitted locally. A DNS record is an IP address that matches the fully-qualified domain name.
First, your computer will search its hosts file and cache. The hosts file is a plain text file that maps hostnames to IP addresses in an operating system, while the cache is temporary data stored by a hardware or software component.
Matching IP addresses for the DNS service are commonly found in your browser cache or internet service provider (ISP) cache.
However, if no matching IP address is found in your hosts file and cache, other additional steps will be added to the DNS resolution process.
What DNS Servers Are Involved in Loading a Website?
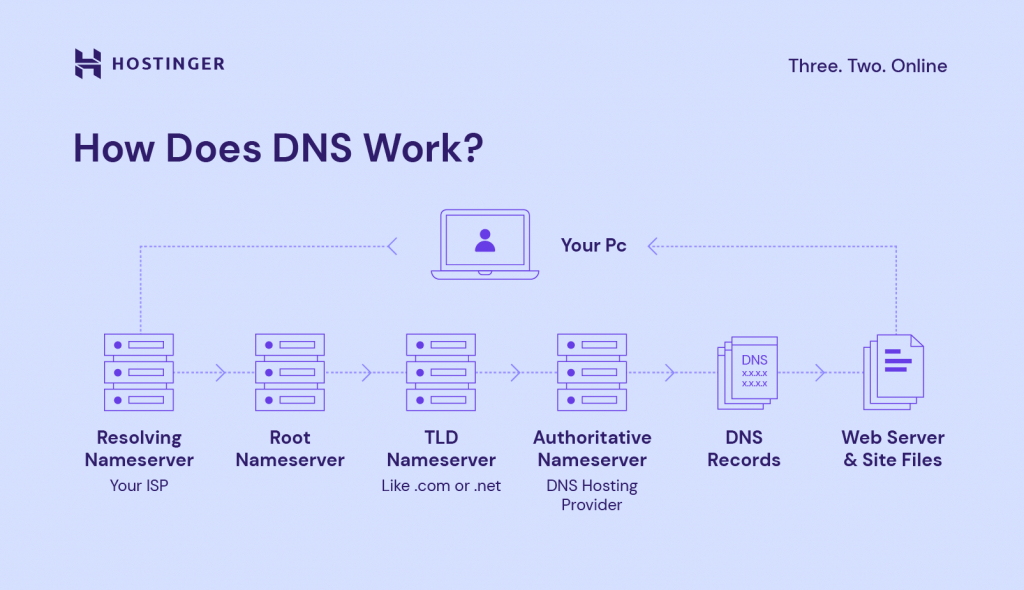
If your computer can’t find a matching IP address in your hosts file or cache, it will submit your DNS query or request to a network of four DNS servers. The following section will cover each DNS server and how they work.
DNS Resolver
The DNS resolver or recursive resolver acts as the primary intermediary between a computer and other DNS servers. Its purpose is to forward a request to other domain name system servers and then send it back once fulfilled.
When the DNS resolver receives a request, it will first search its cache to find a matching IP address for the domain name. If said IP address found, the request sent to the DNS servers ends here, and you will immediately see the site you want to visit.
However, if no match is found in its cache, the DNS resolver will send the request to the next DNS server – the root nameserver.
Root Nameserver
The root nameserver or root DNS server is at the top of the DNS hierarchy. Think of it as a bank of reference.
It doesn’t keep the information you’re looking for, which is the IP address to match the domain name – but it gives directions to where it can be found.
Once the root nameserver receives a request from the recursive DNS resolver, it will identify the top-level domain of the domain name. Then, it will tell the recursive resolver to go to the correct TLD nameserver.
TLD Nameserver
The TLD nameserver is a DNS server function that is responsible for storing and managing information about domain names that use a specific top-level domain (TLD). A TLD is the far end of a domain name, such as .com, .org, .online, and .net.
If your query is to find the IP address of hostinger.com, the root nameserver will redirect the DNS recursive resolver to the .com TLD nameserver. Next, the TLD nameserver will inform the resolver about the location of the matching IP address at a specific authoritative nameserver.
Authoritative Nameserver
The authoritative nameserver or authoritative DNS server is the final authority in the DNS resolution process. It stores all information related to the domain name you want to visit, including its IP address. The recursive resolver will obtain the IP address and send it back to your computer, directing you to the site.
Finally, the domain name system resolver performs DNS caching, storing IP addresses collected from authoritative nameservers as temporary data. In other words, DNS caching makes it so that the next time you want to visit the same site, it will simply send back the IP address match obtained before.
What Are Domain Nameservers?
A domain nameserver’s job is to store all types of DNS records of a domain name. Whenever someone sends a query about your domain name, the nameserver will send back the necessary information of your domain name, allowing them to find your website.
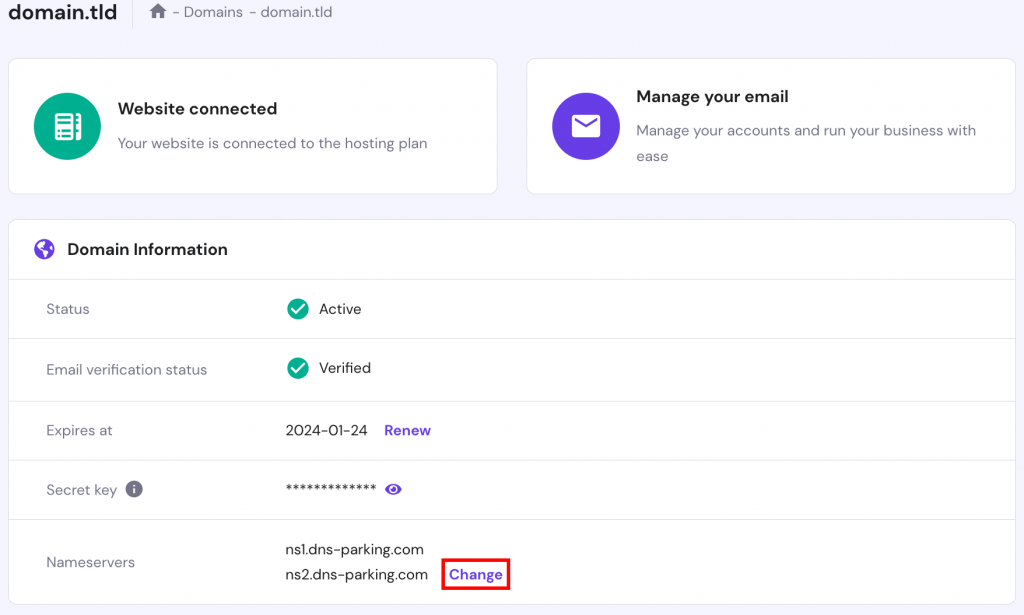
A nameserver address looks similar to a domain name. Hosting providers usually have two or more nameserver addresses. For example, here are Hostinger’s DNS nameservers:
ns1.dns-parking.com
ns2.dns-parking.com
In practice, nameserver addresses are often used to point a domain name to a hosting account via the DNS services.
If you purchased a domain name from a hosting provider, this action is not needed. However, it must be done if the domain registrar isn’t the same as your hosting provider’s. You can check what your currently set nameservers are using DNS checkup tools or Hostinger’s WHOIS.
For example, if you host a website at Hostinger but purchased a domain from Google Domains, you’ll have to change the domain’s nameservers to point it to Hostinger. Only then will the domain name be connected to the website.
Pro tip
Check out our guides for more tips on how to buy a domain name and what to do after you bought a domain name. It includes a step-by-step process for registering a domain and answers other related questions.
How to Change the Nameservers?
You can only change nameservers where the domain is registered. For example, if you purchased a domain name at Hostinger, you can change the nameservers on hPanel. If you bought it from Google Domains, you can only change them on Google Domains.
Domain names purchased at Hostinger use its nameservers by default. There is no need to change the nameservers if you buy a domain from Hostinger.
In the following steps, we’ll show you how to change the nameservers from your hosting account. We’ll use Hostinger as an example, but the steps should be similar across most hosting providers.
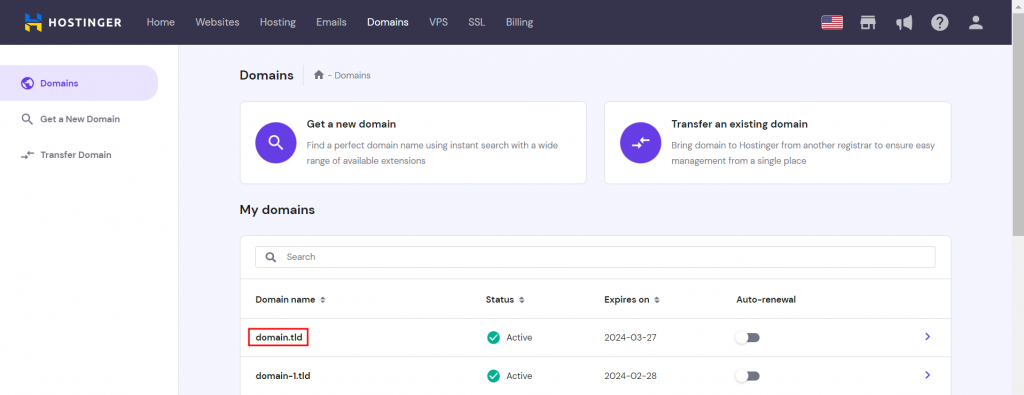
- Log into hPanel, navigate to Domains, and select the domain name you want to edit.
- Under Domain Information next to your Nameservers, select Change.
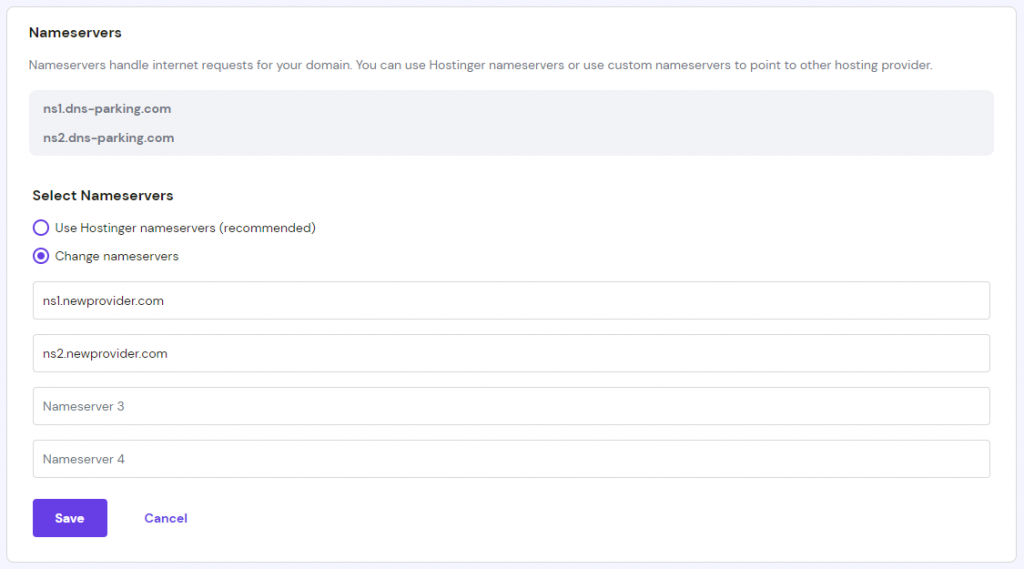
- Under the Select Nameservers section, choose Hostinger nameservers or Change nameservers. The latter allows you to enter custom nameserver addresses. We recommend simply selecting the former if you want to point your domain to Hostinger.
- Save your changes.
Once the nameservers are correctly pointing to your hosting account, you will be able to control the DNS zone from your hosting management panel. For example, if your Google Domains domain is pointing at Hostinger, the DNS zone is now controlled by Hostinger.

What Is a DNS Zone and How to Make Changes for the Domain?
A DNS zone is a portion of the DNS namespace divided up for administrative purposes by a person or an organization. Each DNS zone contains at least one DNS entry.
If you use the web hosting’s nameservers for your domain name, you’ll be able to make changes to the DNS zone using the tools provided. There are different reasons to modify a DNS zone, one of which is to point the domain to another address.
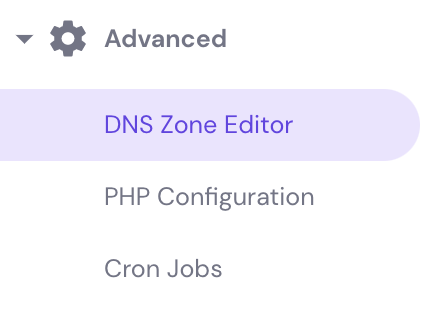
It’s simple to modify the DNS zone files or records using the DNS Zone Editor. If you use Hostinger, find the editor by simply logging into hPanel, and then on the sidebar, go to Advanced → DNS Zone Editor.
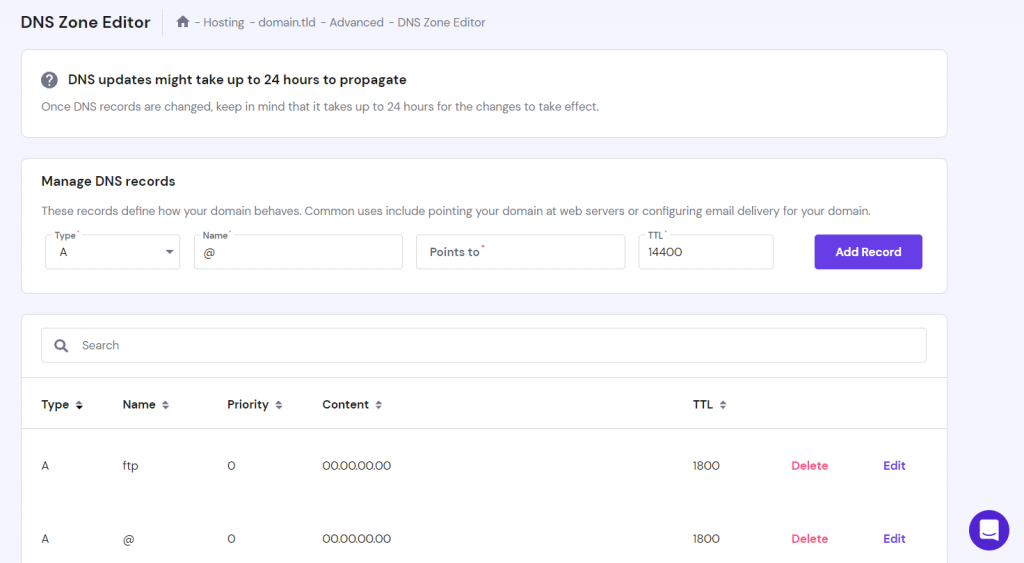
On the DNS Zone Editor page, you’ll see a form to add new DNS records. There are eight types of DNS Records that you can add.
Underneath is a table of existing records. Use the search bar to find the exact DNS zone file you’re looking for, then Delete or modify an existing record by selecting Edit.
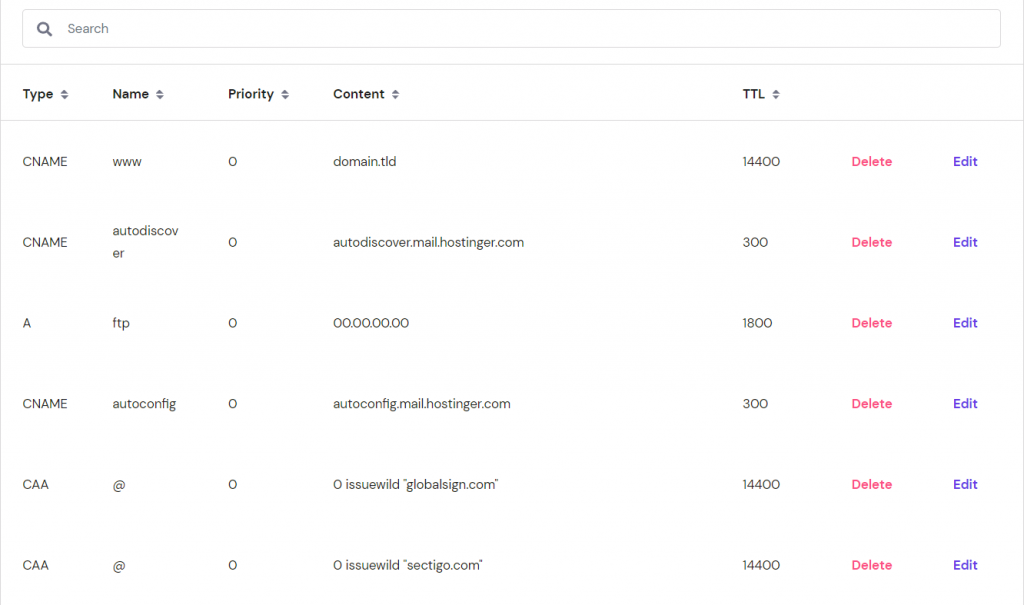
However, before you configure your DNS settings, it’s essential to understand different types of DNS records and the differences between them.
A Record
An A record or a DNS host record points a hostname or domain to an IPv4 address. For example, it converts hostinger.com to 104.19.184.120. An AAAA record works similarly, but it transforms a hostname to an IPv6 address instead.
Each domain name can only have one A record DNS entry. However, by default, there are two A records you’ll find on hPanel, one for your domain (@) and one for FTP. Both point to the same IP address.

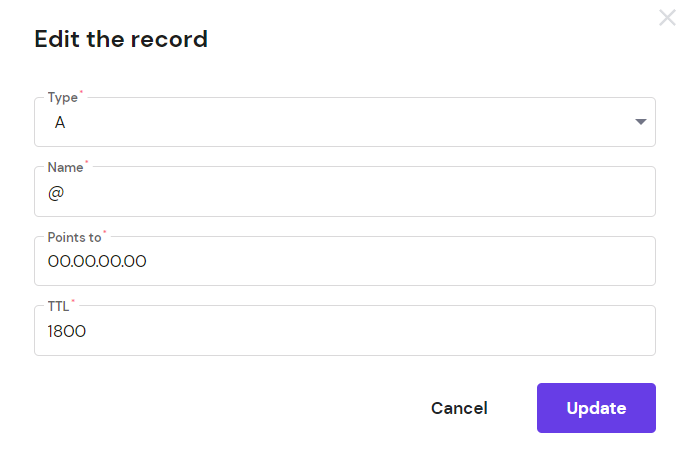
Modifying your A records helps you point your domain name to a different IP address. To do so, simply click Edit and make your changes accordingly in the required fields:
- Type – only change the type to AAAA if the new IP address is IPv6.
- Name – the @ symbol refers to your root domain, for example, yourdomain.com. If you modify the A record of a subdomain, such as sub.yourdomain.com, fill in this field with the subdomain instead.
- Points to – fill in this field with the new IP address.
- TTL – standing for “time-to-live”, the value entered here will tell the DNS resolver how long it must cache a DNS query. The default value is usually 14400 or four hours.
CNAME Records
A CNAME record or a “canonical name” record establishes a particular domain as an alias for another domain. When end-users enter one of the alias domain names in their web browsers, they’ll be taken to the same IP address.
This helps domain administrators because they don’t need to create multiple A records to point multiple domain names to the same IP address.
For example, you want your subdomains alias1.yourdomain.com and alias2.yourdomain.com to point to main.yourdomain.com. Adding a CNAME record for each alias domain will do the job.

When you add a new CNAME record, aside from the TTL, enter the name of the alias domain or subdomain in the Name field, and in the Target field, enter the domain to which the alias domain will point to.
MX Records
An MX record, which stands for mail exchanger, identifies a mail server used to process incoming emails received by a particular domain name. For example, if an MX record was created for yourdomain.com, you’ll be able to receive emails via the @yourdomain.com email address.
Hostinger has two default MX records:
mx1.hostinger.com
mx2.hostinger.com
If you want to use a third-party email client like Google Workspace, you have to change each default MX record to Google’s.
Here’s how to fill the required fields when modifying or adding a new MX record, aside from Name and TTL:
- Mail server – paste the address of the mail server you want to use. For example, if you use Google Workspace, the addresses will look like ASPMX.L.GOOGLE.COM.
- Priority – you can add multiple mail servers and sort them by which one to use first when receiving incoming emails. The lower the number is, the higher it is on the list.

TXT Records
A TXT record allows domain administrators to include readable notes for both humans and machines. It doesn’t directly impact your DNS settings, but it tells other parties important information about your domain. TXT records serve different purposes, and you can have more than one in your DNS zone.
A common purpose of a TXT record is to create a Sender Policy Framework (SPF) record. SPF records specify which hostnames or IP addresses are authorized to send emails on behalf of your domain. If you use Hostinger, you’ll see that there’s one SPF record already created by the domain name system.

Modifying and adding a new TXT record works similarly to other types of records. The TXT value should be filled with the information you want to specify in the entry.
The default TXT value for Hostinger’s SPF record is:
v=spf1 include:_spf.mail.hostinger.com ~all.

SRV Records
An SRV record connects a hostname to a particular service. Compared to other DNS records, SRV records store more information, including the port number. Configuring an SRV record will guide applications to find your preferences for certain services.
If you use Hostinger, there is no SRV Record in place by default, but you can add one. For example, if you want to add an SRV record for an XMPP instant messaging service.

Here’s how to fill each required field aside from TTL and Priority:
- Name – fill in the name of the service in the format of _service._protocol.example.com. For XMPP services, the format would be something like _xmpp-client._tcp.example.net.
- Weight – if multiple SRV records have the same Priority value, Weight will determine which one will go first. The higher the value, the more it will be prioritized first.
- Port – a port is a number that helps a computer differentiate types of traffic. Simply enter the port number that was assigned to the service.
- Target – enter the address of the designated server.
DNS Propagation
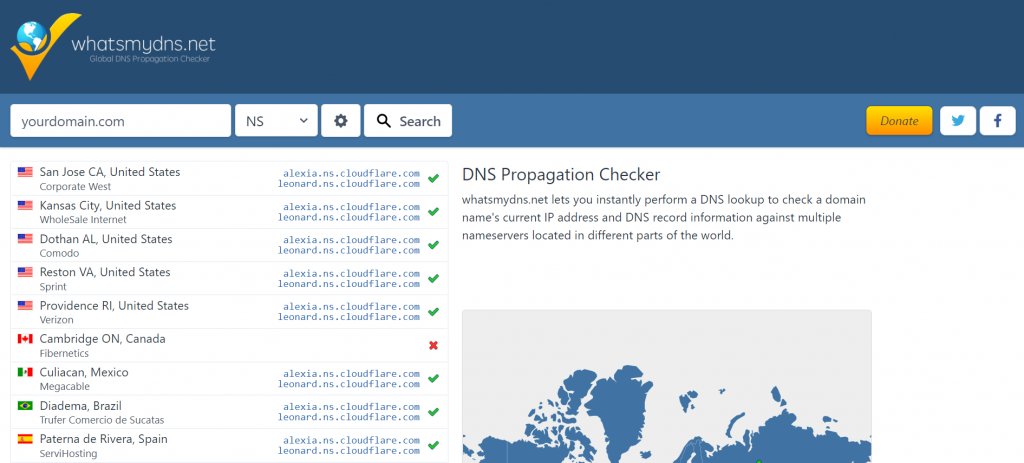
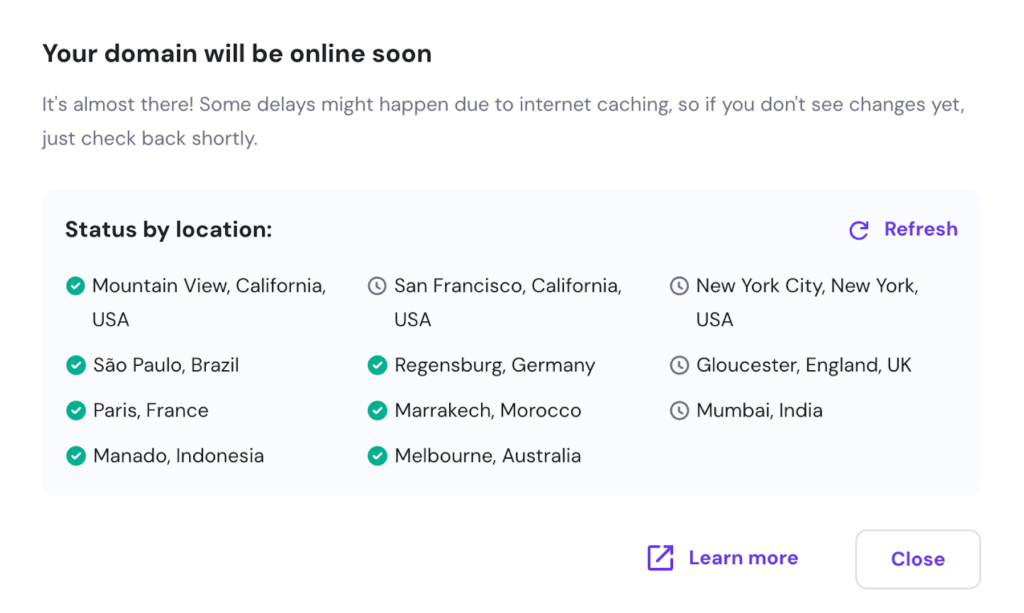
Each time you modify or add a new DNS record, there will be a period where the DNS record is being updated across the world’s servers. This is called the DNS propagation period.
Besides adding or modifying a DNS record, changing your domain nameservers and adding a new subdomain will also trigger DNS propagation.
It may take up to 24 hours for a DNS record to propagate fully. During this time, your site may become unavailable. For domains using Hostinger nameservers, the propagation status will be displayed in the hPanel.
You can also check DNS propagation progress in real-time by typing your domain into a DNS checker like WhatsMyDNS.
DNSSEC
DNSSEC is a security technology for the domain name system. This premium DNS adds a layer of protection to existing DNS records by adding cryptographic signatures for authentication. This can prevent attackers from gaining access to DNS records.
Not all domain names support DNSSEC. For example, on Hostinger, you can only enable DNSSEC for some domains registered to Hostinger and hosted elsewhere.
No matter which hosting provider you use, we recommend contacting their support team if you’re interested in DNSSEC.
Conclusion
DNS matches IP addresses to human-readable domain names, making it easier for people to visit websites. There are four types of DNS servers involved in the resolution process – DNS resolver, root nameserver, TLD nameserver, and authoritative nameserver.
A domain’s nameservers store all the DNS records of a domain name, while a DNS zone is a portion of the DNS namespace divided up for administrative purposes.
On hPanel, you can change your nameservers and add or modify records in your DNS zone. To understand DNS records, there are five primary types you should be familiar with – A, CNAME, MX, TXT, and SRV.
Whenever you make changes to any DNS record, it will take some time for the domain name system to process the changes – this is called DNS propagation.
If you have any more questions regarding DNS, feel free to leave a comment down below.
What Is DNS FAQ
What Is DNS And Why Is It Used?
DNS stands for the Domain Name System, connecting domain names into IP addresses. This way, browsing the internet becomes easier as people can use words to access various websites, rather than the long IP addresses containing numbers.
What Is DNS in Simple Terms?
The DNS is a database storing all the various domain names and their matching IP addresses. DNS makes it easier for people to locate and browse different websites without having to remember the long IP address for the website.
How Do I Check My DNS?
Open your command prompt app, type ipconfig /displaydns and press Enter. You should be able to see your current DNS settings. You can use the command prompt app to flush your DNS records, too.



Comments
May 01 2020
I really don't know how to appreciate you for the complete picture you have given me. I really love it and it helps me a lot to understand how these protocols work. Thanks again.
September 18 2024
I want to deactivate my private DNS
September 20 2024
Hi Shahinur! To deactivate your private DNS, log in to your Hostinger account, go to DNS settings, and remove or disable the custom DNS records. If you’re unsure about any steps, feel free to reach out to our Customer Success team for assistance!