How to create a daily habit-tracking web app
In our increasingly busy lives, building positive habits can be challenging without the right tools. A habit-tracking web app makes it easier to build better habits – whether it’s drinking more water, meditating, or sticking to a workout routine. It helps you stay on track by logging progress, setting goals, and sending reminders.
While many of these web apps already exist, creating a custom solution provides a personalized experience that off-the-shelf options can’t match.
Typically, building one from scratch would mean writing a bunch of code using React or Next.js for a sleek UI, Node.js for real-time updates, and PostgreSQL to store user habits. If this sounds like something that’s way over your head, here’s the cool part: you don’t need to write code at all.
With AI tools like Hostinger Horizons, you describe what you want from a web app, and the tool handles all the heavy lifting.
In this article, I’ll explain how I developed my own habit-tracking web app – from the first idea to getting it live. And don’t worry, even if you’ve never created an app before, you can follow along. The process is simple.
Let’s jump right in!
Planning my habit-tracking web app
I decided to create my own habit-tracking web app because the ones I’d tried before were either too complicated or packed with unnecessary features.
I just wanted something simple and effective that would allow me to:
- Choose from habit recommendations or create my own.
- Track progress daily, whether for single or multi-step habits.
- See everything in a calendar format to help remain consistent.
- Have the login and registration feature, so my friends can use it too.
Since I wanted to bring my idea to life quickly and easily, I went with Hostinger Horizons. Here’s why:
- No coding required. Just describe what you want, and Hostinger Horizons generates it for you. No need to mess with frontend or backend logic.
- Instant refinements. You can tweak features, adjust the design, and fix bugs by adding prompts. Plus, you can test everything in real-time with the live preview.
- One-click deployment. When your web app is ready, just hit Deploy. It goes live instantly on Hostinger’s fast and reliable hosting, and you can even connect your app to a custom domain.
Hostinger Horizons has different plans, starting at RM86.99/month. All plans share the same features, with message limits of up to 1,000 messages/month.
If you already use Hostinger’s web hosting service, you get 5 free messages daily to try out the AI tool.
How I created a habit-tracking web app with Hostinger Horizons
With my plan set out, it was time for the fun part: actually developing my habit-tracking web app. Here’s how it went.
Step 1: Project setup and the first prompt
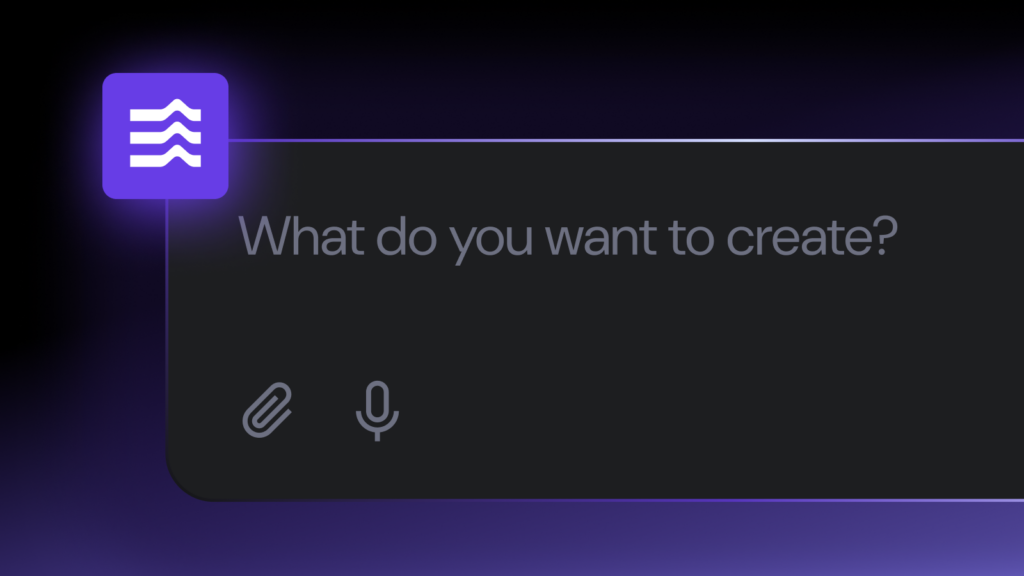
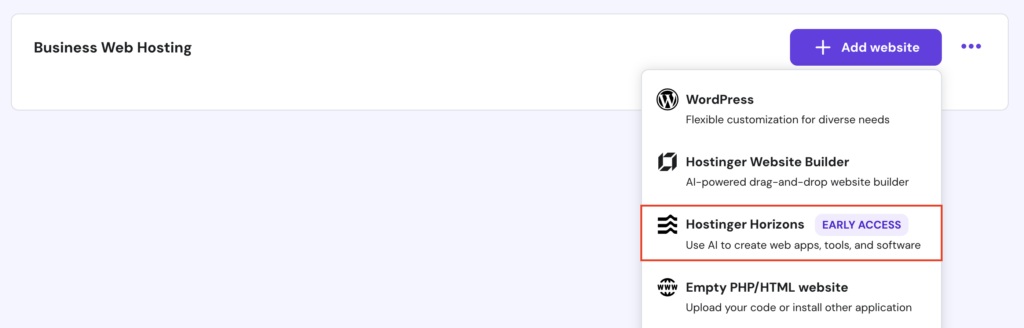
To get started, I opened hPanel with my Hostinger account and navigated to Websites → Websites list → Add website → Hostinger Horizons.
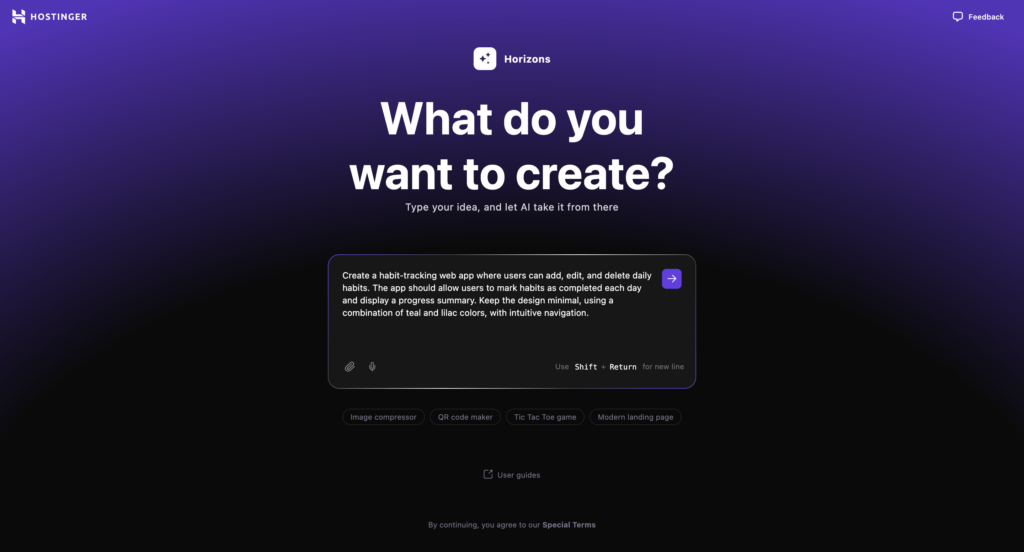
This took me to the Hostinger Horizons start screen, where I typed in my first prompt to set up the core functionality of my habit-tracking web app:
Create a habit-tracking web app where users can add, edit, and delete daily habits. The app should allow users to mark habits as completed each day and display a progress summary. Keep the design minimal, using a combination of teal and lilac colors, with intuitive navigation.
Within seconds, Hostinger Horizons generated a working version of my web app. The interface is split into two views:
- Left pane – where I could refine my prompt and make changes.
- Right pane – a live preview of my app in action.
Here’s how my habit-tracking web app looked right after the first prompt:
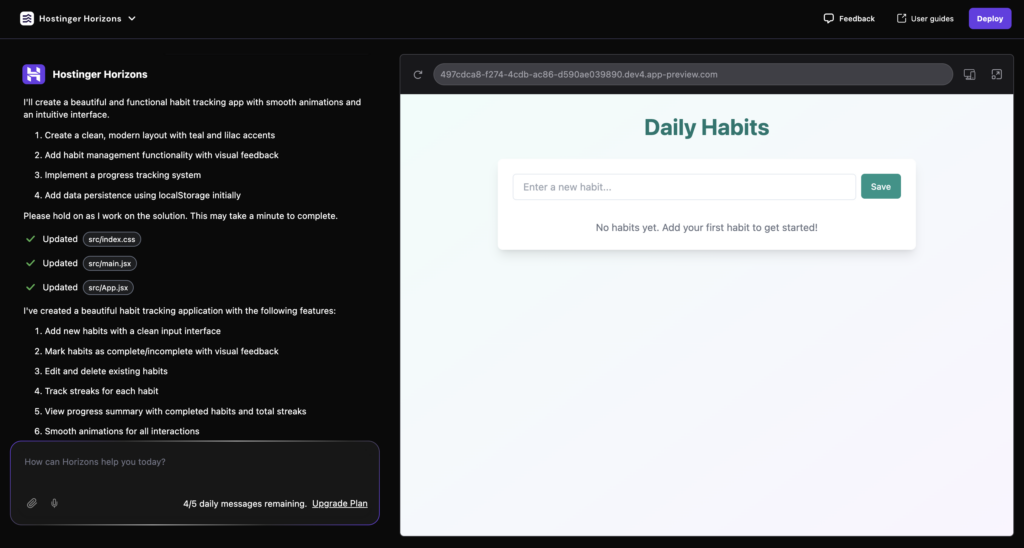
I tested it by adding a new habit through the input field, and it worked just fine.
But I knew this was just the starting point – my web app still lacked some key features I wanted, like habit recommendations and a calendar view.
Step 2: Adding habit recommendations
Next, I wanted to add habit recommendations alongside the custom habit input. I often struggle to decide exactly what to track, so having predefined habit templates would make it easier to get started.
Here’s the prompt I used:
Add a habit recommendation system alongside the existing custom habit input. Users should be able to choose from predefined habit templates categorized into Health & Fitness, Personal Growth, Productivity, Wellness, Social & Relationships, and Mindfulness & Mental Health, each containing relevant subcategories.
Hostinger Horizons successfully generated the habit template system, so I tested it by adding a habit from the list. It worked – but there was one issue: no confirmation message. I had no idea if the action actually went through.
Normally, after adding a habit, the web app should redirect users back to the dashboard and display a confirmation message so they know it worked. Here’s the prompt I used to fix that:
After a user selects a habit from the template, redirect them to the dashboard. Display a confirmation message, such as 'Habit added successfully!' to confirm the action upon returning.
This minor UX tweak made the habit recommendation system work exactly how I wanted.
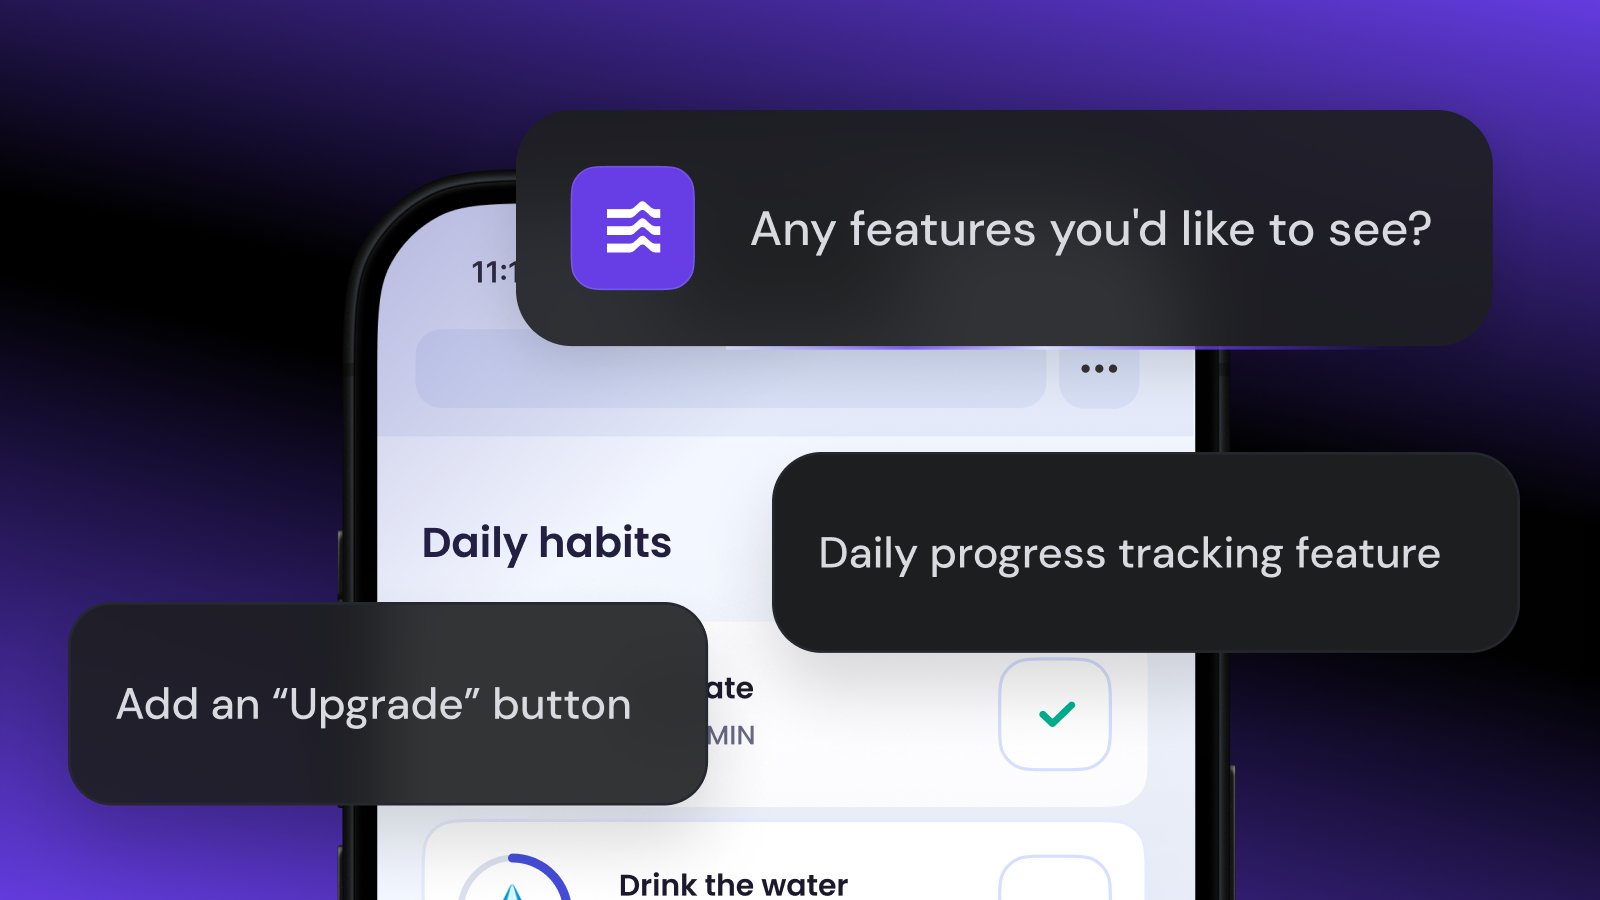
Step 3: Tracking incremental progress
The next feature I tackled was progress tracking. A simple one-click completion works fine for habits that require just one action, such as taking daily vitamins or making the bed.
But what about habits with multiple steps, like drinking eight glasses of water or doing five sets of push-ups? It wouldn’t make sense to mark them as “complete” after just one click. Instead, I needed a system that let me track each step until I finished the habit for the day.
Here’s how I prompted Hostinger Horizons to handle it:
For habits that require multiple steps, implement a step-based tracking system instead of a single-click completion. Users should be able to track progress incrementally (e.g., mark each glass of water, push-up, or page read) until they complete the habit for the day.
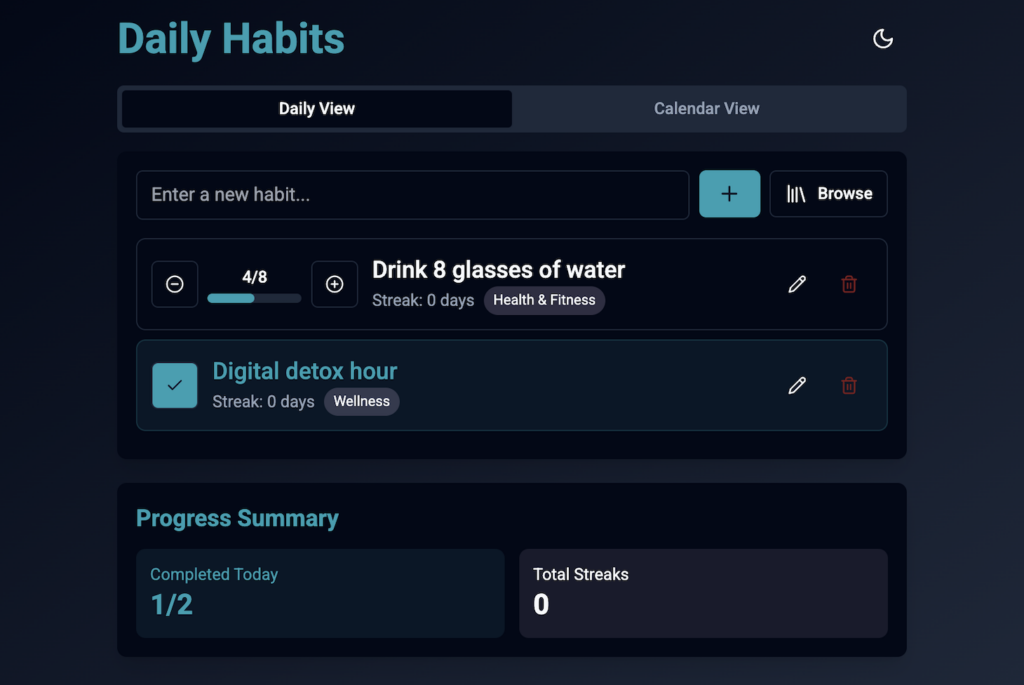
It worked! But there was still room for improvement. The app could look better and feel more intuitive if step-based habits had a progress bar.
So, I added this prompt:
Ensure the dashboard clearly differentiates between single-action and multi-step habits by displaying progress bars for step-based habits.
And just like that, my habit-tracking web app got a nice visual upgrade. Here’s how it looked at this stage:
Suggested reading
Breaking down complex tasks – like when I first asked Hostinger Horizons to add multi-step tracking and then a progress bar in a separate prompt – is just one of the many ways to get better results. Discover more prompting tips and best practices with Hostinger Horizons in my other article.
Step 4: Implementing the calendar view
Another feature I wanted in my web app was a calendar view – something that would let me look back at my progress over time instead of just focusing on daily habits.
To make that happen, I used this prompt:
Add a calendar view to track progress over time. The calendar should reflect real dates, months, and years. Place it in a separate tab to keep the main dashboard focused on daily habit tracking.
But instead of generating the feature, Hostinger Horizons threw a runtime error:
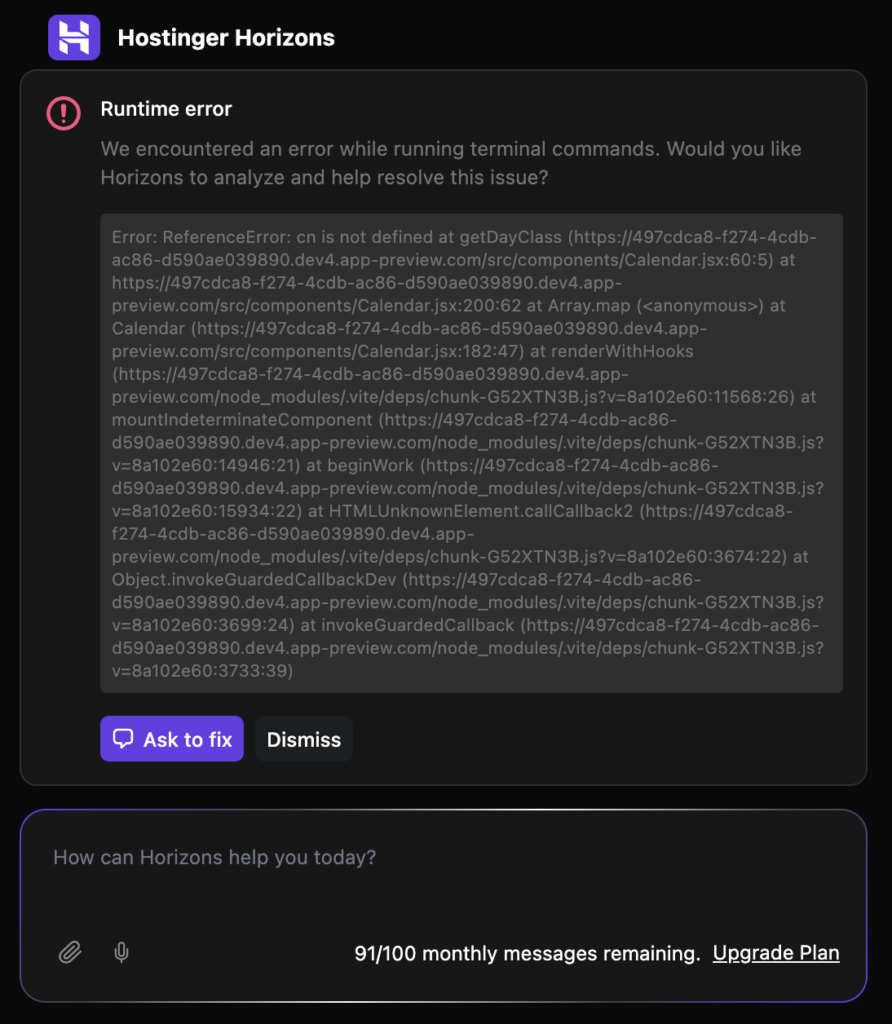
I know that Hostinger Horizons is still in early access, so I expected occasional hiccups. For the impatient ones, there’s even a 30-day money-back guarantee, so there’s no real risk in experimenting with it.
If you ever run into an error like this, don’t panic – just let the tool handle it. I clicked the Ask to fix button and let it do its thing.
The second time’s the charm! My calendar view appeared and worked fine. By clicking on a specific date, I could see which habits I tracked that day and check my progress over time.
Step 5: Improving the design
So far, my application only had the web design that I specified in the first prompt. As you can see in the previous sections, the default visual appearance was okay, but I wanted to improve it further.
Doing so not only makes your application look more appealing but also ensures its design adheres to the best practices for usability and accessibility.
Suggested reading
Read the web application design tips with Hostinger Horizons tutorial to learn more about the areas you should focus on when redesigning your web application and the best prompt to use.
Depending on the initial result, you might need to adjust more visual aspects. In my case, I was quite happy with the design and just wanted some minor improvements.
When refining your web app, I recommend focusing on one design aspect at a time and then moving to another only when you are satisfied with the result.
I started by changing the font for better readability. Here’s the prompt I used:
Apply Roboto for all the text. Use a medium weight for the body and bold for headings. Maintain a 16px body text size and 24px for headings.
Next, I wanted to minimize the white space in my application because it made the design look very empty. This was the prompt that I found effective:
Minimize the whitespace in my web application to make it look less empty. However, maintain around 20px padding between sections and 10px for elements.
Lastly, I wanted to add night mode that reverses my application’s color palette when needed. Here’s the prompt:
Add a night mode for my application. Include a toggle to switch between the modes at the top right corner of the main dashboard.
Step 6: Adding a login and registration page
A login or registration page allows users to create an account to save their profiles, progress, goals, and preferences. It is important to give them a more personalized experience.
A login or sign-up page can take different shapes depending on the developer’s needs, and I wanted mine to have the following elements:
- Credentials fields – fields where users enter their username, email address, and username to access or create an account.
- Login or sign-up option – a button that switches the user to the account login or creation page.
- Error message – an error pop-up that appears when the inputted data is invalid.
- Forgot password link – a feature that lets users reset their forgotten account password.
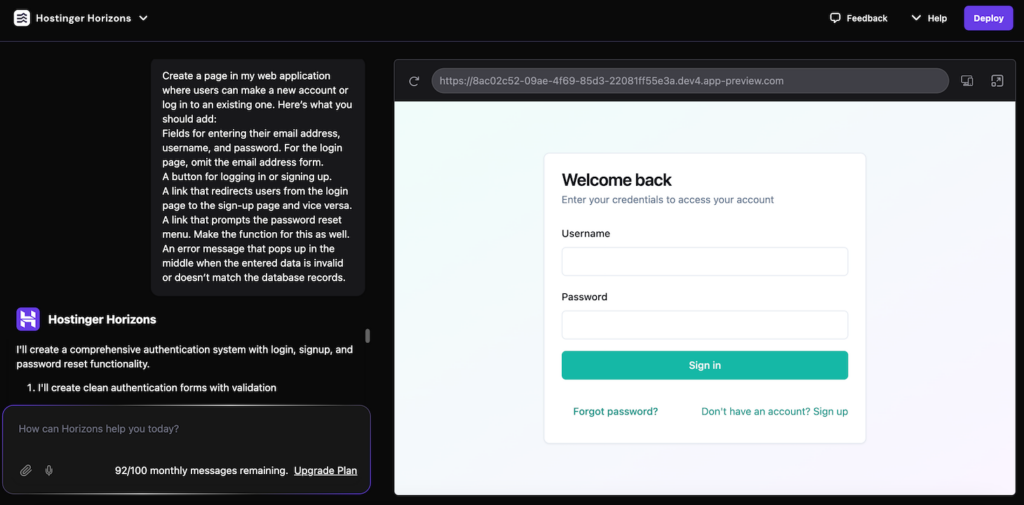
Based on these requirements, I created my login/sign-up page using the following prompt:
Create a page in my web application where users can make a new account or log in to an existing one. Here’s what you should add:

- Fields for entering their email address, username, and password. For the login page, omit the email address form.

- A button for logging in or signing up.

- A link that redirects users from the login page to the sign-up page and vice versa.

- A link that prompts the password reset menu. Make the function for this as well.

- An error message that pops up in the middle when the entered data is invalid or doesn’t match the database records.
At this point, I had a login/sign-up page that looked like this:
While this registration or login page looked fine, it was not yet functional because I hadn’t connected a database to store the entered data.
Step 7: Connecting a database
Now that my application already had all the features and the design, I moved on to the back end to enable data storage and processing.
To configure my application’s back-end, I used a database service from Supabase. You, of course, can use any other platform you want.
I started by registering for a Supabase account using my email address. Then, I created a new organization and selected the free plan. In my experience, this plan was sufficient for testing and personal use.
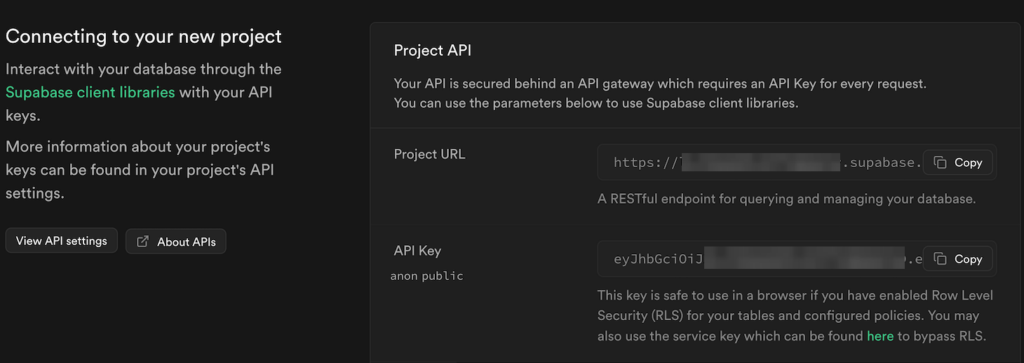
Next, I set up a new project by entering its name, database password, and region. Once finished, I was redirected to the Supabase project page.
From the Project API section, I copied the Project URL and API Key. I used these credentials to connect the database to my application.
Next, I headed back to the Hostinger Horizons dashboard and connected the database with this prompt:
Connect my Supabase database with my application using the following credentials:

- Project URL: your-project-url

- API Key: your-api-key

This database will store the user credentials and data, including their progress, preferences, and habits.

Make the necessary database tables and connect them with the corresponding fields in my application.

Make sure each field only accepts valid data. For example, the email form should only receive an email address.
In my case, Hostinger Horizons outputted an SQL command to create the necessary tables. I returned to the Supabase dashboard and selected SQL Editor from the sidebar.
Next, I pasted the SQL command into the designated field and hit Run to execute it. I headed back to Hostinger Horizons and told the AI that I had run the command using this prompt:
I ran the SQL command you provided. Validate all the tables and forms to make sure my database works properly.
Deploying and testing my habit-tracking web app
Now that my application was finished, the last step was to deploy it online. Before doing so, however, I wanted to test it to ensure that all functions worked as expected.
I simply interacted with my application from Hostinger Horizon’s preview menu on the right pane. When covering these steps, I recommend you create a checklist to keep track of what functions you have tested.
If you encounter any error or issue, simply ask Hostinger Horizons to fix it for you. For example, I noticed that the Log out button was missing during testing, so I entered the following prompt:
Add a logout button on the top right of the main dashboard next to the dark mode toggle. Make it so when a user clicks it, they will get redirected to the login page.
During my testing, I also checked how my application looked and functioned on a mobile phone by toggling the viewport on Hostinger Horizon’s preview menu.
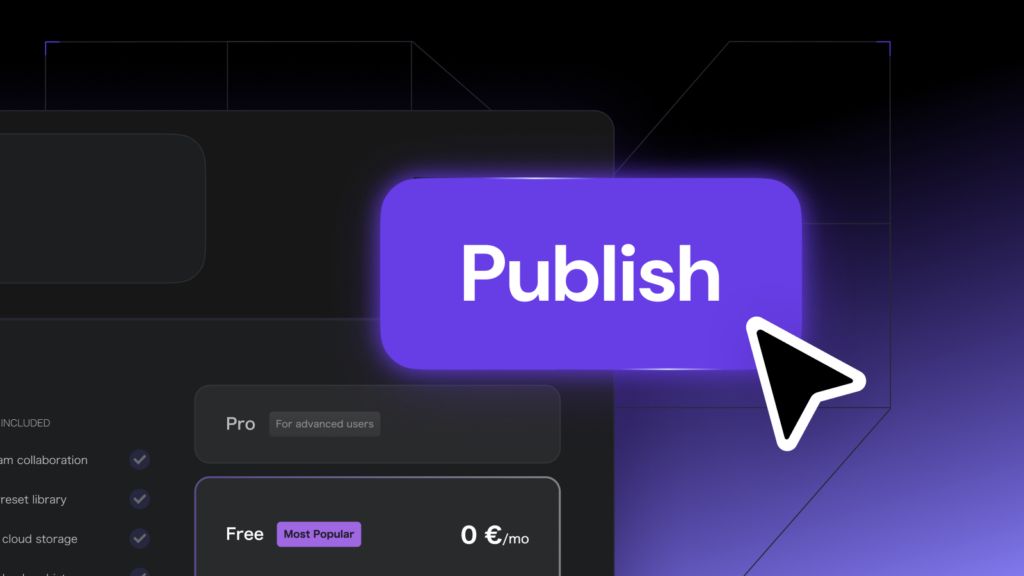
After ensuring my application worked and looked as expected, I clicked the Deploy button to publish my project. Since Hostinger Horizons includes a Business web hosting plan, I didn’t need to set one up manually.

By default, Hostinger Horizons attaches a temporary domain name to the application for testing purposes. I wanted to replace it with my own domain name.
I clicked the Get Domain button on the deployment confirmation window, entered my desired domain name, and hit Next.

After finishing the registration and payment process, my domain name was already connected to Hostinger Horizons. And that was it! My application was now online.
What’s next?
Now that I have shown you how I created my habit tracking app, it’s your turn to develop your own using Hostinger Horizons!
You can always experiment with the prompts and add your own twist to the application. You can use a different design, add extra functionalities and do things completely differently. For example, you can add reminders, rewards, milestones, and social-sharing features to encourage people to use your application more often. Sky is the limit when it comes to what you can do with this tool.

Ariffud is a Technical Content Writer with an educational background in Informatics. He has extensive expertise in Linux and VPS, authoring over 200 articles on server management and web development. Follow him on LinkedIn.