How to run DeepSeek on a Hostinger VPS using n8n

DeepSeek is an AI chatbot model released in January 2025 by a Chinese company of the same name. It quickly gained traction for its ability to answer questions, solve problems, and write computer programs. Performing on par with leading chatbots like OpenAI’s ChatGPT and Google’s Gemini, DeepSeek stands out by using fewer resources than its competitors.
Meanwhile, n8n is an open-source automation platform with a visual interface that lets you connect various services without writing a single line of code. By integrating DeepSeek with n8n, you can automate complex tasks, create smarter systems, connect DeepSeek with different applications, and incorporate the chatbot into your existing workflows.
This article will guide you through setting up DeepSeek with n8n on a Hostinger Linux virtual private server (VPS). By the end, you can leverage DeepSeek’s capabilities and n8n’s automation features to build AI-based systems that handle complex tasks efficiently.
Prerequisites
Before running DeepSeek with n8n, prepare two things: a VPS plan to install n8n and a DeepSeek account with at least a $2 balance top-up to obtain an API key.
While many VPS providers are available, Hostinger’s n8n VPS service offers clear advantages. We provide pre-built templates for various operating systems, control panels, and applications, including n8n. With just a few clicks, you can set up n8n, eliminating the need for manual installation and reducing the risk of errors.
Hostinger also offers multiple VPS plans with up to 8 vCPU cores, 32 GB of RAM, and 400 GB of NVMe storage to meet different performance requirements. For integrating DeepSeek with n8n, we recommend the KVM 8 plan at RM89.99/month, which provides optimized performance for both platforms.
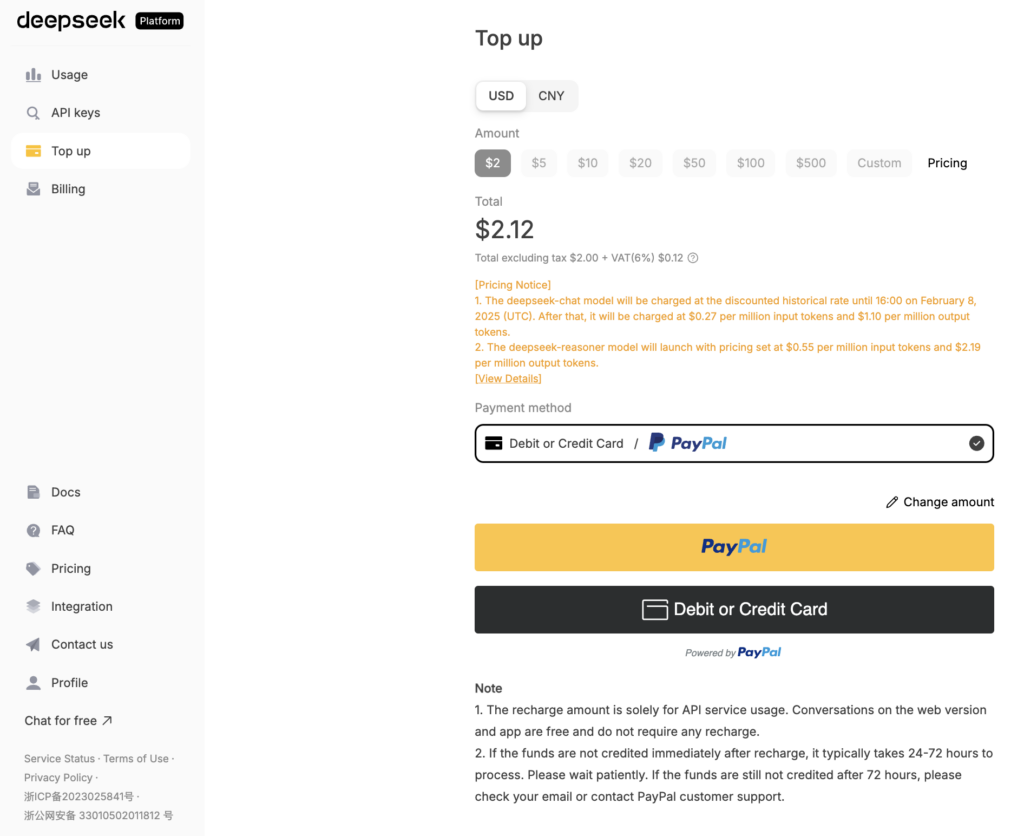
Besides purchasing a VPS, sign up for a DeepSeek account. After creating one, open the dashboard and top up with at least $2 to activate the API. While generating an API key is free, you must add balance to enable its functionality. Below are the token pricing details:
| Model | Input tokens | Output tokens |
| deepseek-chat (V3) | $0.014 | $0.28 |
| deepseek-reasoner (V1) | $0.14 | $2.19 |
To top up your balance, go to the Top up menu in the dashboard’s left sidebar, choose the amount you want to add, and complete the purchase.
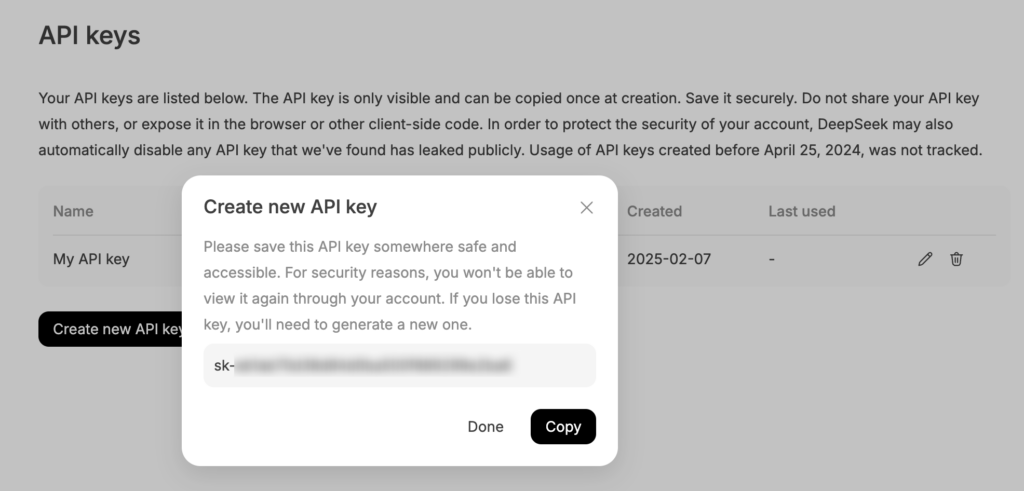
Once you’ve topped up, you can start using the API. Go to API keys → Create new API key, enter a name, and click Create API key. Your API key will be generated shortly. Copy and store it securely, as it will only be shown once.

Setting up DeepSeek using Hostinger’s n8n VPS template
After purchasing a VPS plan and obtaining your API key from DeepSeek, follow these steps to install n8n and set up DeepSeek within it on Hostinger.
Suggested reading
If you want to interact with DeepSeek in a traditional chat format, you can install it as an Ollama model. Follow our guide to learn how to run DeepSeek with Ollama on your server.
1. Install n8n using Hostinger’s one-click template
To install n8n on your VPS plan from Hostinger, follow the on-screen instructions to choose your server location, set a root password, and select the n8n template from the available options.
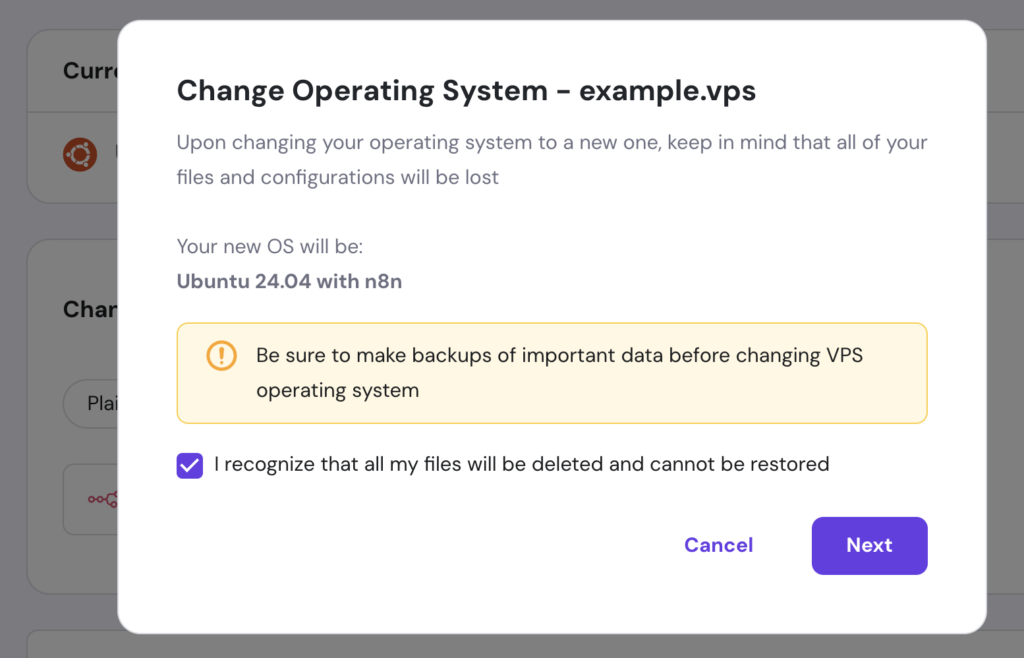
If you installed a different OS or application during setup, you can easily switch to n8n through hPanel by following these steps:
- Go to VPS → Manage.
- In the left sidebar, select OS & Panel → Operating System.
- Scroll down to the Change OS section and type n8n in the search field.
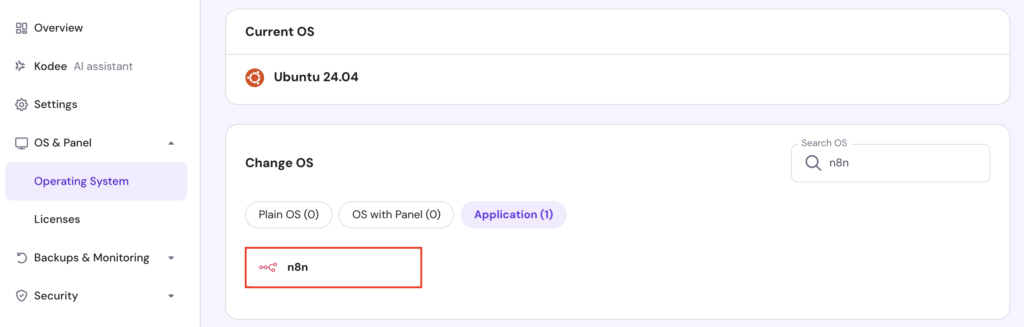
- Select the n8n template and hit Change OS.
- Tick the checkbox to acknowledge that changing the OS will erase all data, then enter a new password for your VPS.
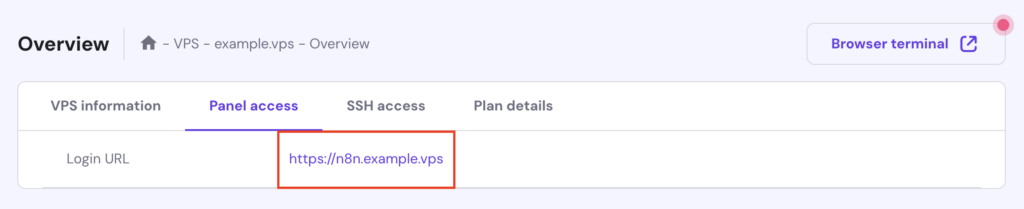
Wait for the installation process to complete. This should take about 10 to 15 minutes.
Once finished, go to Overview → Panel access to find the n8n login URL.
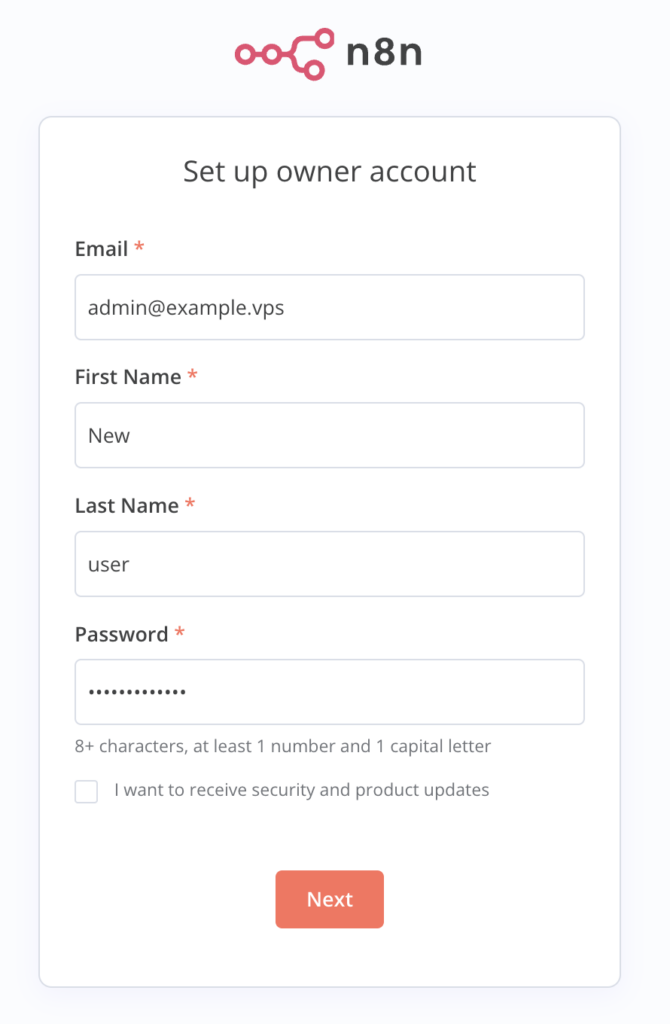
During your first visit, you’ll be prompted to create a new n8n account. Follow the instructions and securely store your login details, as you’ll need them each time you access the dashboard.
2. Install the n8n-nodes-deepseek node
After setting up n8n on your VPS, install the DeepSeek community node to integrate the chatbot into your workflows. Here’s how:
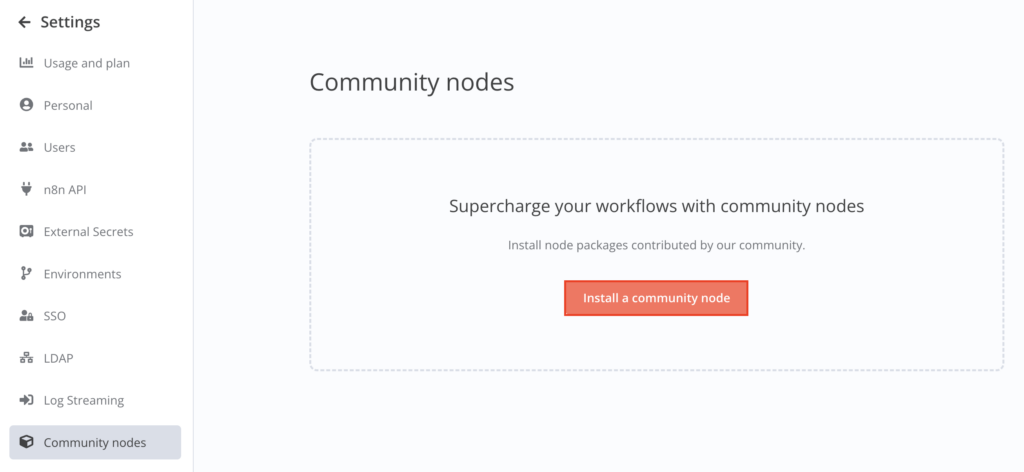
- On the n8n dashboard, click the three horizontal dots icon in the bottom-left corner and select Settings.
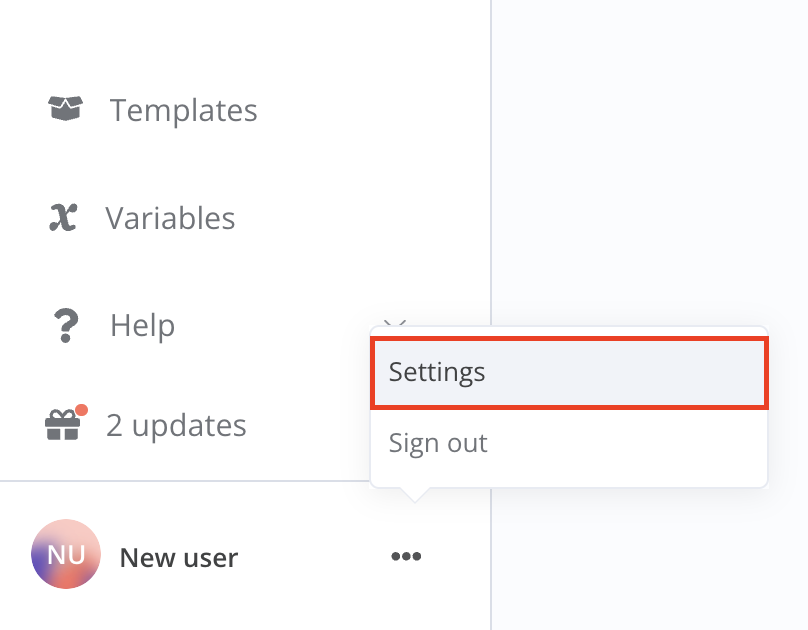
- Go to Community nodes → Install a community node.
- In the npm Package Name field, type n8n-nodes-deepseek. Tick the acknowledgment box, then hit Install.
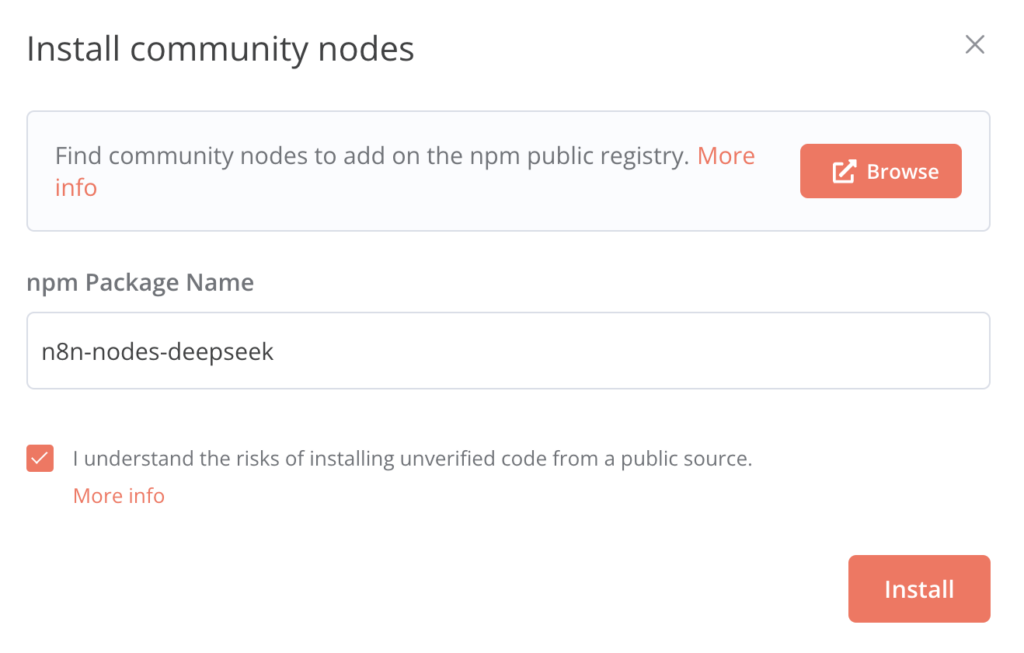
Wait a few seconds for the installation to complete. If successful, you’ll see n8n-nodes-deepseek listed under installed nodes.
3. Create a new workflow for DeepSeek
Now, create a simple workflow for DeepSeek with these steps:
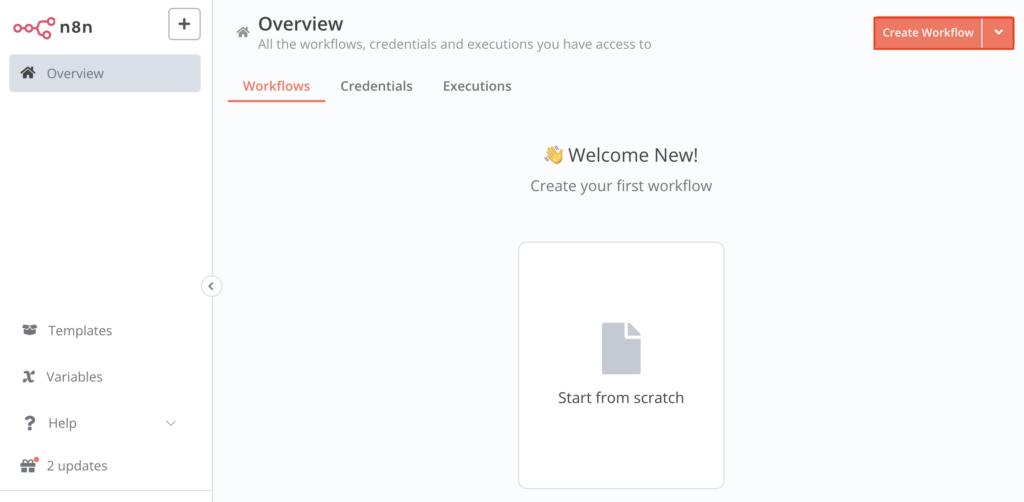
- Return to the Overview page on your n8n dashboard. Select the Workflows tab and hit Create Workflow in the top-right corner.
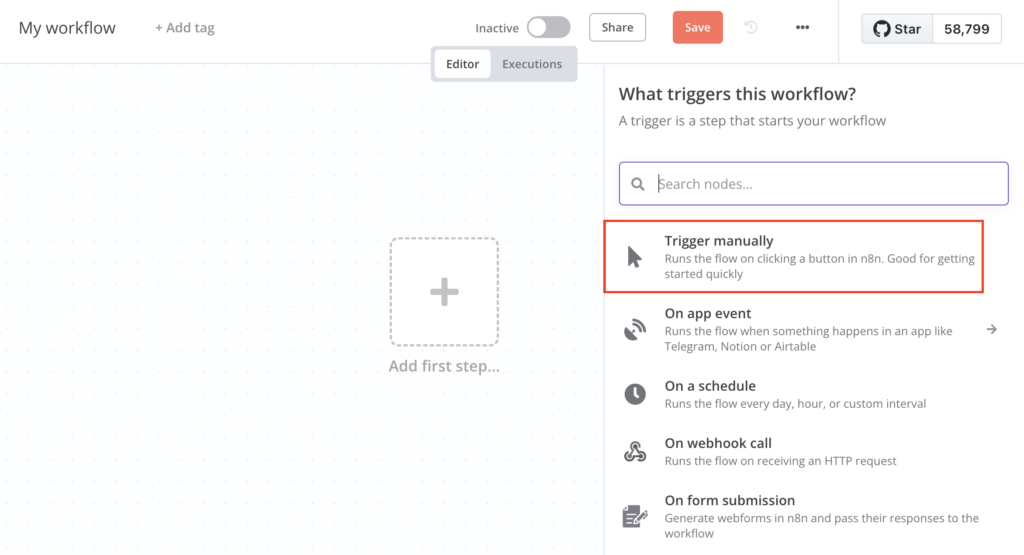
- Click Add first step…, then select Trigger manually from the available trigger options to start the flow.
- Hit the + button in the top-right corner and type DeepSeek in the search box.
- Select the node with the cube icon, which indicates the DeepSeek community node you installed earlier.
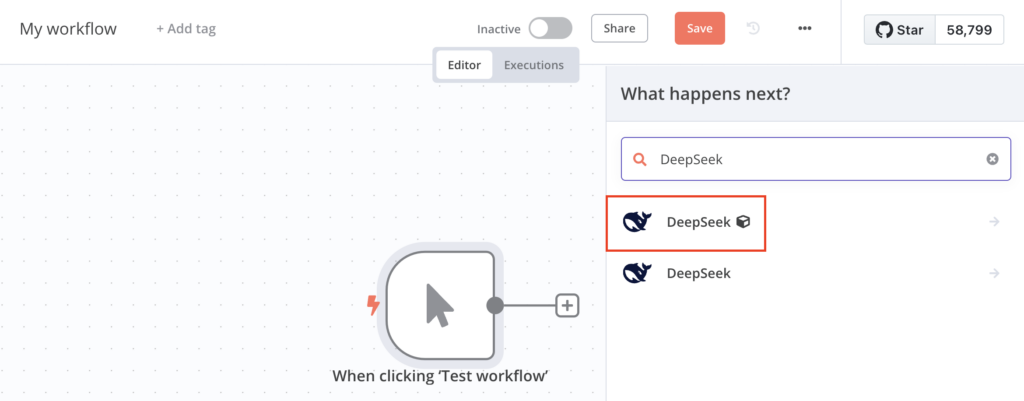
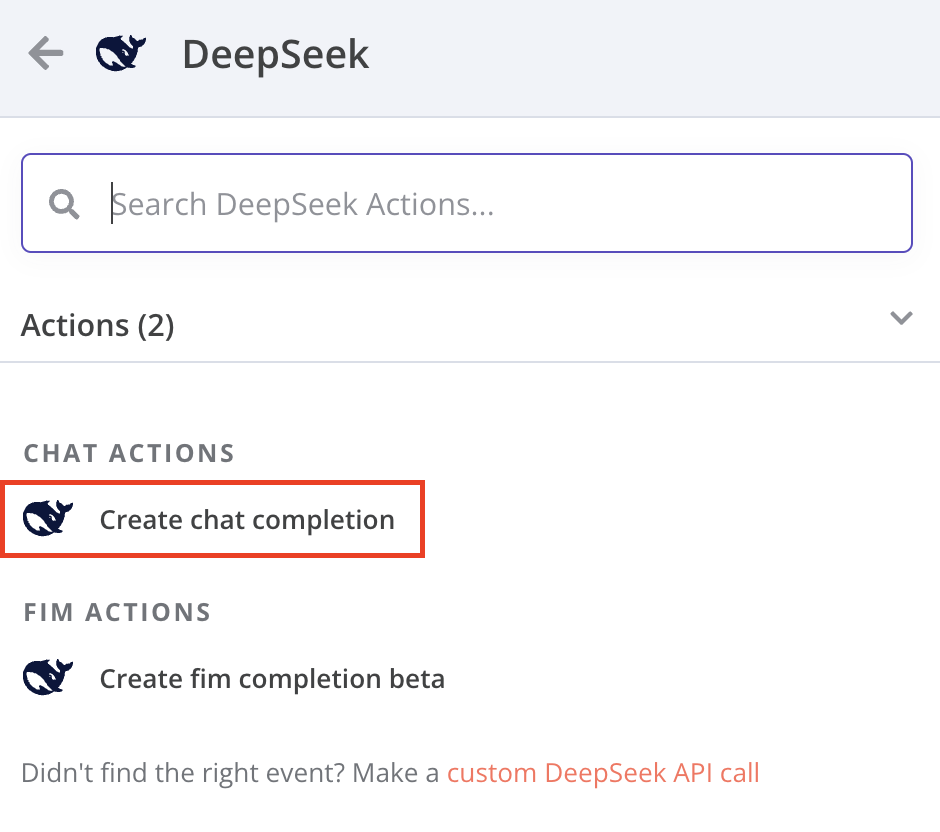
- Choose Create chat completion, which will open a new configuration dialog.
4. Set up DeepSeek credentials
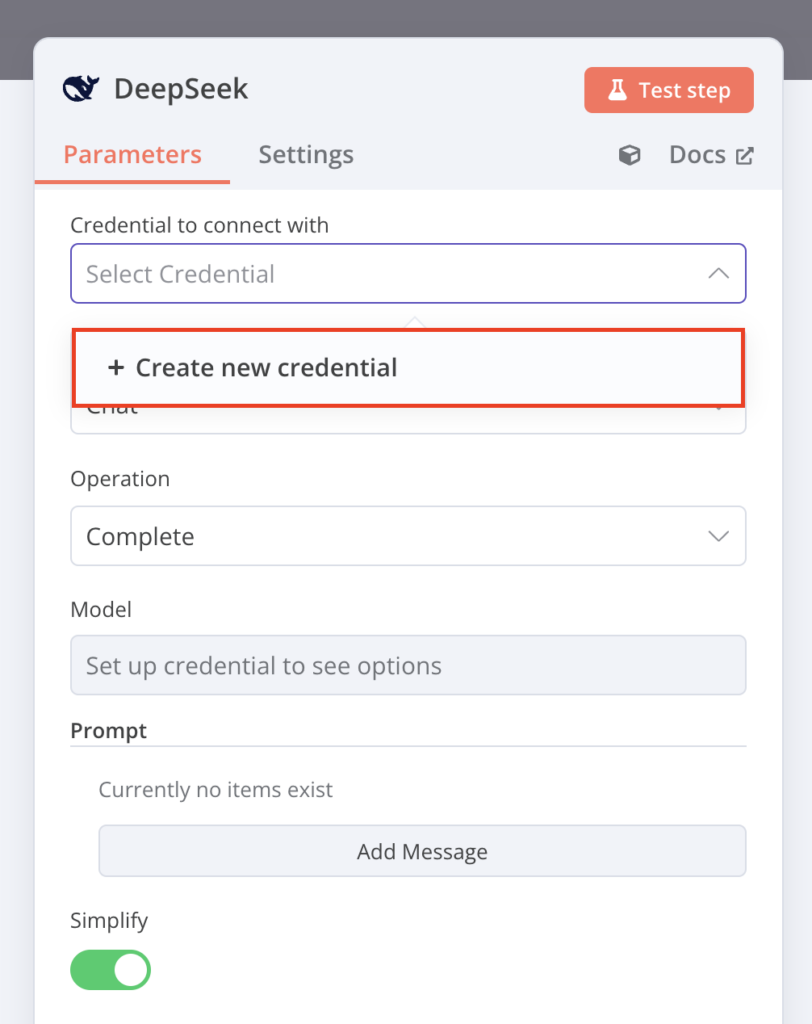
The configuration dialog lets you set up API credentials, select your preferred model, and customize other settings. Follow these steps to add the API key you got from DeepSeek:
- In the Credentials to connect with field, click the arrow icon to open the drop-down menu and select Create a new credential.
- Paste your API key into the dedicated field and hit Save.
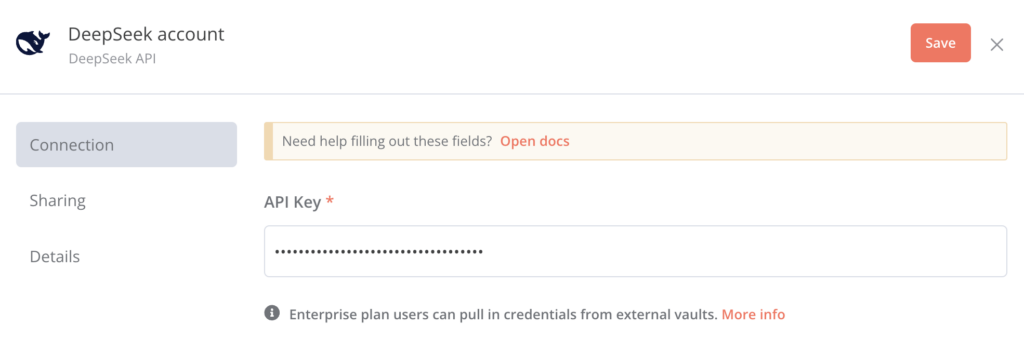
- Click X to return to the configuration dialog. The Credentials to connect with field should now display a DeepSeek account value.
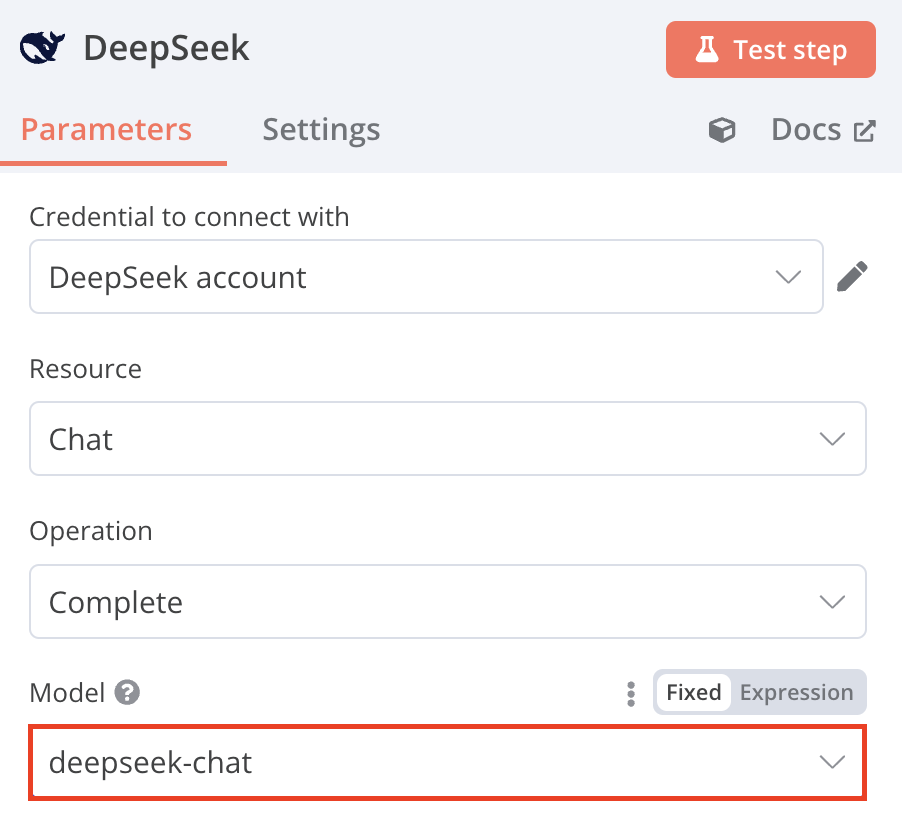
5. Configure the desired model
Still within the configuration dialog, select the model you want to use for the workflow and customize its behavior. Here are the instructions:
- Choose your desired DeepSeek model, whether deepseek-chat or deepseek-reasoner in the Model field.
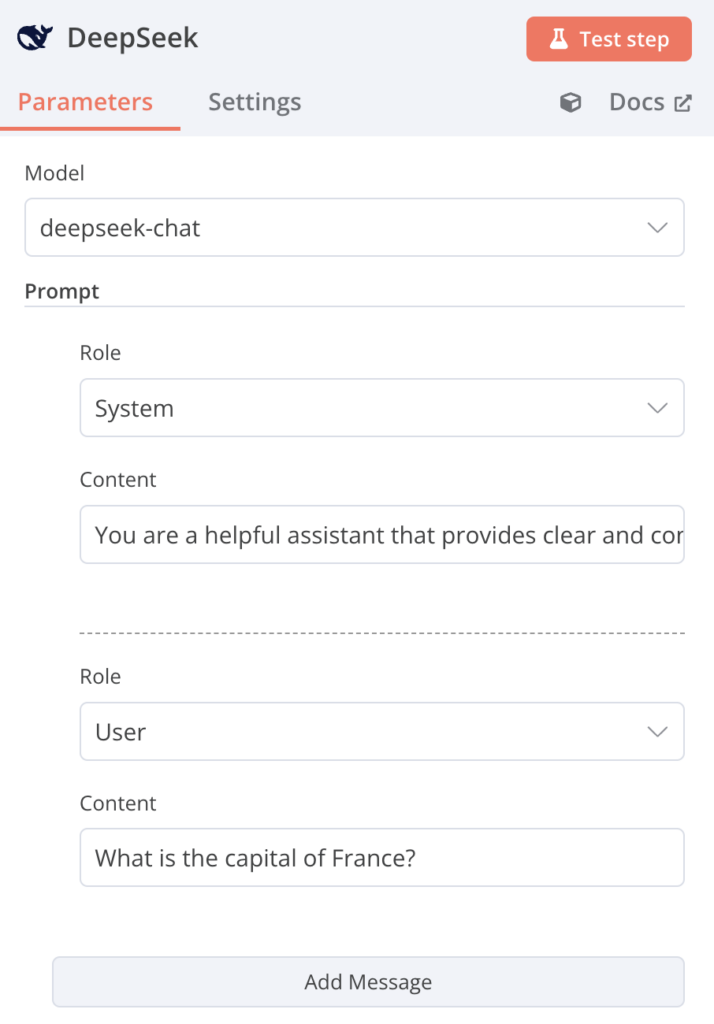
- Click Add Message and select the role you want. In this tutorial, we’ll choose System.
- Add context in the Content field. For the System role, define instructions to guide the model’s behavior. For example, “You are a helpful assistant that provides clear and concise answers.”
- Repeat the process for other roles. For the User role, enter the user’s input or question. You can type something like, “What is the capital of France?”
Tips for choosing the right model
deepseek-chat (V3) provides quick responses, making it ideal for tasks requiring real-time interactions, like live chat. Meanwhile, deepseek-reasoner (V1) offers more detailed output but takes longer to process. This makes it suitable for in-depth analysis tasks, such as problem-solving.
6. Test the integration
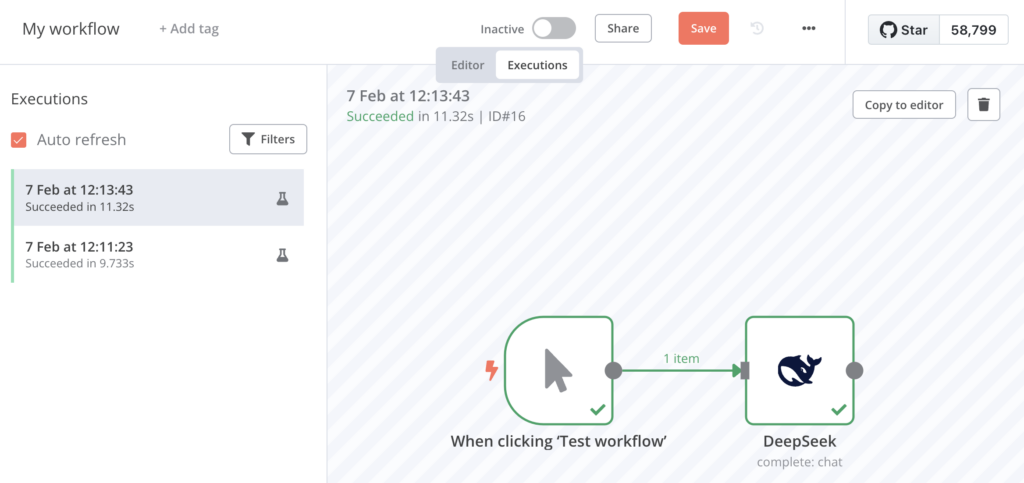
Once you finish configuring the DeepSeek node, test the workflow and verify the AI’s response by following these steps:
- Hit Test step and wait a few seconds for DeepSeek to process your input.
- If successful, the result will appear in the OUTPUT pane on the right side of your screen.

- Modify previous messages for different roles to experiment and test various responses.
- Once satisfied, click Back to Canvas to return to the workflow editor.
- Save your workflow by clicking the Save button.

- Alternatively, add another node to build a more complex workflow. If you do, test the entire workflow by clicking Test Workflow and viewing the result in the Executions tab.
7. Create another workflow for different automation
Now that you’ve successfully set up your first DeepSeek workflow, you can create a new workflow for a different automation. To do this, follow the same steps as before: go to Overview → Workflows → Create Workflow.
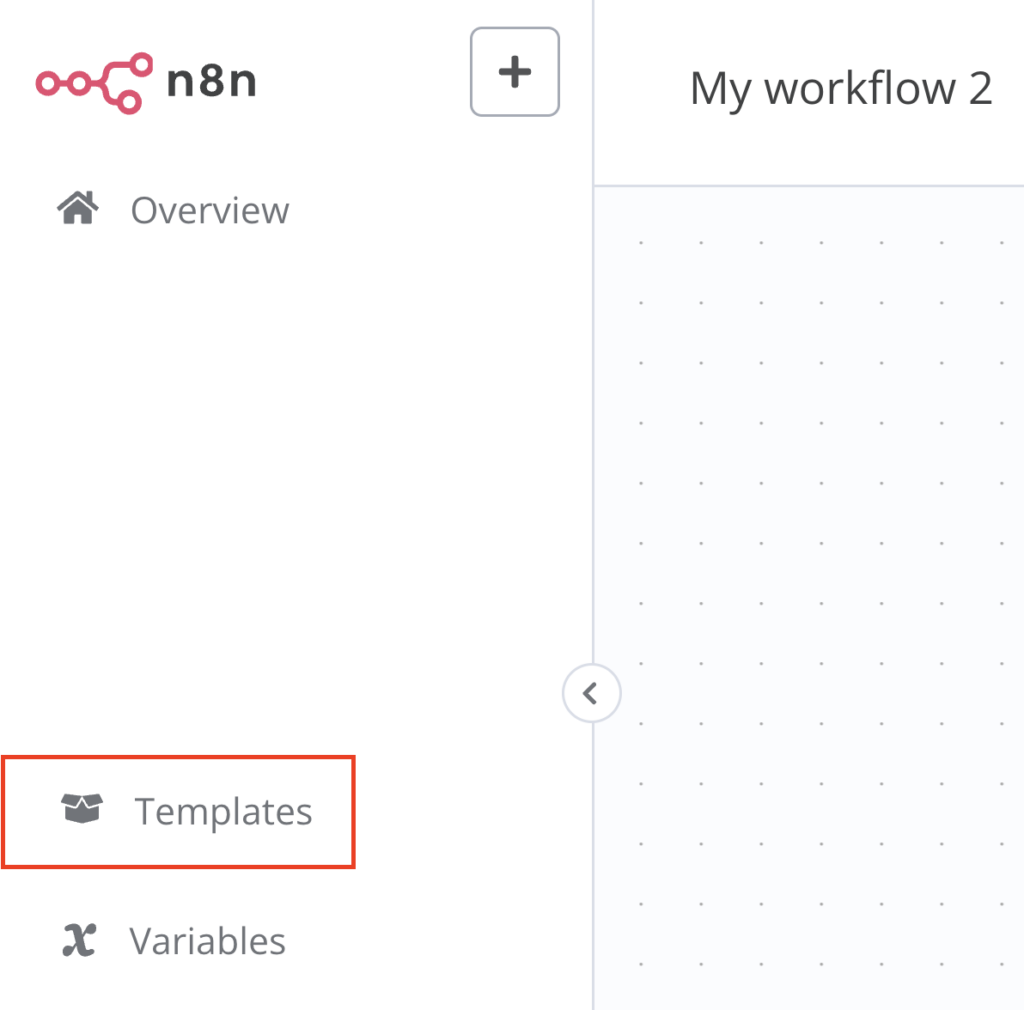
You can build the workflow manually, as shown in this tutorial, or use community templates from the n8n template library. If you choose the latter, here are the instructions:
- In the workflow editor’s left sidebar, select the Templates menu.
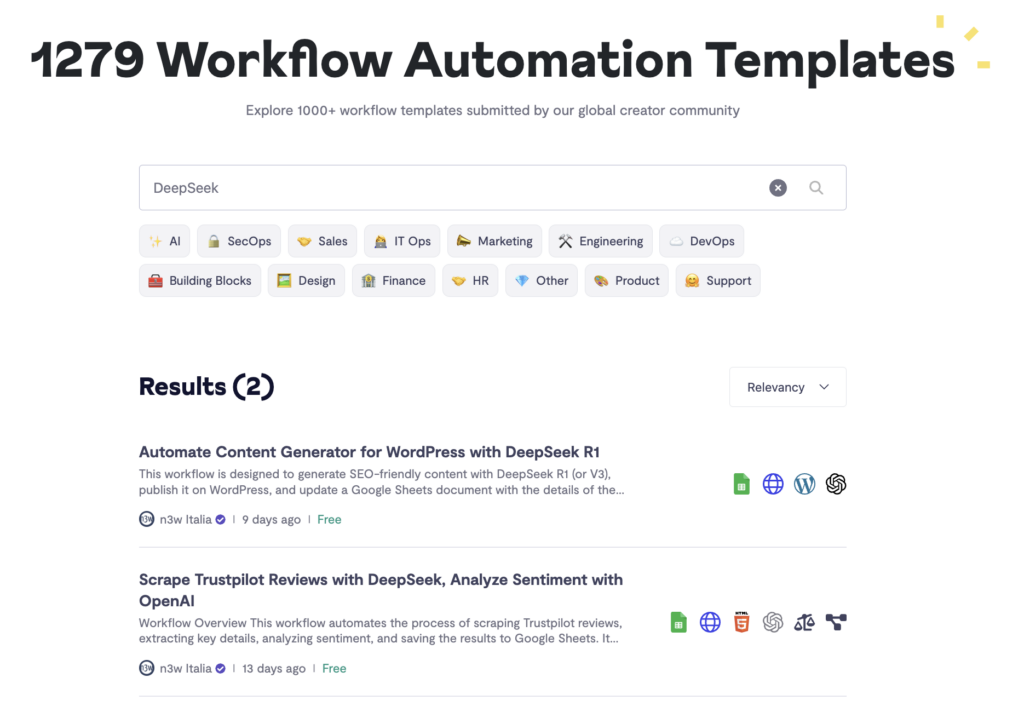
- Search for DeepSeek to find relevant automation templates.
- Click a template, then select Use workflow.

- Follow the instructions to modify the nodes and parameters or add additional APIs from different services, as each template may require specific adjustments to fit your use case.
Please note that although you can use the same DeepSeek API key for multiple workflows, we strongly recommend generating a new API key for each one. This improves security by isolating workflows, so if one key is compromised due to an API leak, it won’t affect your other workflows.
Integrating DeepSeek with your app
After creating your DeepSeek workflow in n8n, connect it to your app using a Webhook node for real-time requests or a scheduled trigger. Make n8n accessible via the live webhook URL or a custom domain. Then, integrate it by sending API requests or linking it to third-party tools like Zapier.
Conclusion
Running DeepSeek with n8n lets you build AI-driven workflows, automate processes, and integrate the chatbot into existing systems. In this tutorial, we covered how to set up DeepSeek on a Hostinger VPS:
- Get a VPS plan and DeepSeek API key.
- Install n8n on your server.
- Access the n8n dashboard and install the DeepSeek node.
- Create a new workflow and configure its structure.
- Set up API credentials in the configuration dialog.
- Select a DeepSeek model and customize its behavior.
- Test the integration and refine your workflow as needed.
Now that your setup is complete, experiment with different workflows, explore n8n’s community templates, and optimize DeepSeek’s responses to fit your needs. With the right automation, you can enhance system functionality using AI-powered solutions.
How to run DeepSeek with n8n FAQ
What is n8n?
n8n is an open-source automation tool that connects apps and services to create workflows. It features a graphical interface, so you can build complex automations and integrate them into your existing systems without coding.
Do I need to know coding to use n8n with DeepSeek?
No, n8n doesn’t require coding. Its visual interface lets you create workflows by dragging and dropping nodes. You can integrate DeepSeek, set up automation, and customize workflows without writing a single line of code, making it ideal for both beginners and advanced users.
How do I get an API key for DeepSeek?
To get a DeepSeek API key, sign up on the DeepSeek platform and log in to your dashboard. Navigate to the API keys menu and create a new key. Please note that you need to add a minimum balance of $2 to activate the API and use it in your workflow.

Ariffud is a Technical Content Writer with an educational background in Informatics. He has extensive expertise in Linux and VPS, authoring over 200 articles on server management and web development. Follow him on LinkedIn.